はじめに
Welcome, you will learn that replacing or installing a new processor/s is by far the more difficult procedure to complete. Once complete you will have a faster computer and a stronger understanding of your Mac Pro.
必要な工具と部品
-
-
Shut down the computer.
-
Wait 5 to 10 minutes to allow the computer’s internal components to cool.
-
Unplug all external cables from the computer except the power cord.
-
Touch the metal PCI access covers on the back of the computer to discharge any static electricity from your body.
-
Unplug the power cord.
-
Put on an ESD wrist strap.
-
-
-
Type: Serial Attached SCSI (SAS) or Serial ATA (SATA) 3 Gb/s
-
Width: 3.9 inches (102 mm)
-
Depth: 5.7 inches (147 mm)
-
Height: 1.0 inch
-
-
-
This procedure explains how to remove a standard card and a card that includes a booster cable. Before you can remove either type of card, however, you must first loosen the two captive screws that secure the PCI bracket to the enclosure and remove the bracket.
-
-
-
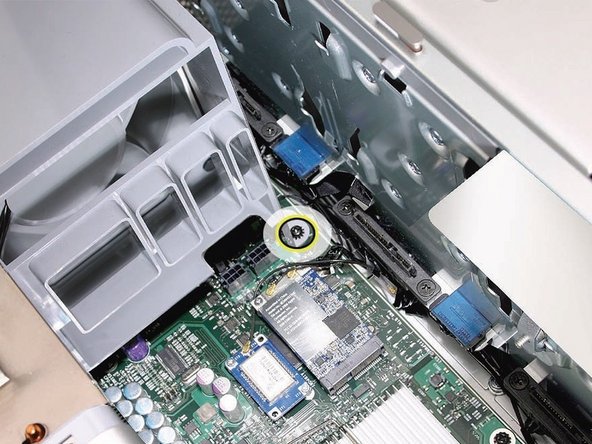
Disconnect the booster cable(s) from the logic board.
-
Release the small locking clip at the front of the card’s logic board connector by pushing the clip up toward the media shelf.
-
Holding the card by the top corners, gently pull up the card and remove it from its expansion slot.
-
-
Estoy buscando el cable de alimentación de la tarjeta gráfica, pero no lo consigo alguna idea de dónde lo podría conseguir?
-
-
Place the fingers of one hand under the lip of the heatsink cover nearest the logic board. Lift the lip slightly toward the media shelf to release the tabs and magnets under the top face of the cover.
-
With your fingers still under the cover’s bottom lip, lift the cover straight up to release the remaining tabs and magnets under the front face of the cover
-
Remove the cover from the enclosure.
You don’t need to place the fingers under the lip of the heat sink cover nearest to the logic board. It is much easier to use a pry tool and slide it through from front to the back. It will release the tabs very easily.
%#*@ this was a horrible guide until I read your comment. The model I’m pulling apart has no magnets holding it together
please, look this : http://pila.fr/wordpress/?p=1052 ;-)
This section of the guide does not apply to the 2006 A1186 (EMC 2113) MacPro 1,1. In this model (that I'm trying to disassemble in front of me, now), the heat sink cover is partly under the RAM cage, so it cannot come out before the RAM cage. The linked guide above seems to reference this fact.
Is there a way to submit an alternative version of this section for the models in question?
-
-
-
Using a long-handled, magnetized #1 Phillips screwdriver, remove the screw at the top rear of the front fan assembly that mounts the assembly to the logic board.
-
-
-
Remove the second Phillips screw at the bottom front of the assembly.
My MacPro1,1 doesn't have a philips screw in Step 14 .
Neither does my 3,1, nor does the Apple Service Source manual for the 3,1
Graham Lee - 返信
-
-
-
-
Place one hand on each end of the fan, lift straight up, and remove the fan from the enclosure.
You may end up with a model that needs significantly more force to remove. Took over 3 hours for me to wiggle it out.
I just carelessly smashed it with a hammer :)
-
-
-
800 MHz, DDR2, FB-DIMMS
-
72-bit wide, 240-pin modules
-
36 memory ICs maximum per DIMM
-
Error-correcting code (ECC)
-
-
-
Disconnect the rear fan cable from the logic board.
-
-
-
Using a long-handled, magnetized #1 Phillips screwdriver, loosen the four captive screws that mount the memory cage to the logic board.
-
Rotate the computer so that it is standing vertically. Using a magnetized short-handled or right-angled jeweler’s #1 Phillips screwdriver, carefully remove the two short screws that mount the memory cage to the bottom panel of the enclosure.
-
-
-
Using your forefinger, reach below the fan and release the latch nearest the logic board.
-
-
-
Using a flat-blade screwdriver, release the two latches nearest the front of the computer.
-
-
-
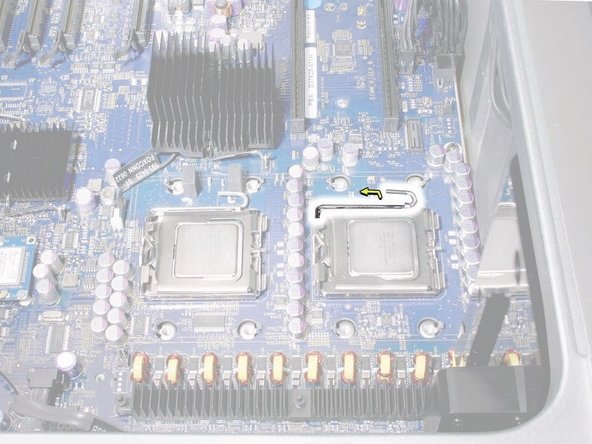
Using a long-handled, magnetized 3 mm flathead hex screwdriver, loosen the four captive mounting screws for the upper processor heatsink in the order indicated below.
-
Lift the heatsink straight up and out of the enclosure.
-
-
-
Using a long-handled, magnetized 3 mm flathead hex screwdriver, loosen the four captive mounting screws for the lower processor heatsink in the order indicated below.
-
Carefully tilt the heatsink so that it clears the bottom lip of the enclosure and then lift the heatsink out of the computer.
-
-
-
Preparing an EXISTING Heatsink for Re-installation. If you have a new heatsink, follow the NEW Heatsink procedure.
-
Using the alcohol pad included with the logic board or processor replacement part, clean off any used thermal grease from the processor and the bottom of the heatsink.
-
Using the thermal grease included with the logic board or processor replacement part, apply one dot of fresh grease to the raised square area on the bottom of the heatsink.
-
Spread the grease evenly across the square to a thickness of approximately 1 mm.
-
-
-
Preparing a New Heatsink for Re-installation. If you have a existing heatsink, follow the EXISTING Heatsink procedure.
-
Apply the top gasket included in the parts box to the top of the heatsink.
-
If you are replacing the lower processor heatsink with a new heatsink, install the bumper included in the parts box on the side of the heatsink.
-
-
-
Use the following guidelines when handling the processor heatsink and/or processor:
-
Wear disposable nitrile or latex gloves
-
Avoid touching the silver-colored coating on the underside of the heatsink and the top of the processor.
-
Always make a visual inspection of new or existing heatsinks and processors before installing them in the computer.
-
When removing or replacing the heatsink and/or processor, do not allow the heatsink to be separated from the processor for more than 30 minutes. The special coating on the heatsink and processor degrades with exposure to air; more than 30 minutes exposure could result in damage to the computer and a repeat, multi-part repair.
My heat sinks are absolutely stuck on my Mac Pro 2,1 - It seems to me that there is another screw or clip holding them in place but i'm pretty sure that it's just the thermal paste acting like an epoxy - its essentially glued on top of the processor. Thermal Material Remover carefully released down into the thermal paste area in between the sink and processor is a possibility but risky.
Any ideas on how to get it unstuck?
-


To reassemble your device, follow these instructions in reverse order.
To reassemble your device, follow these instructions in reverse order.
61 の人々がこのガイドを完成させました。

8 件のコメント
Hi there! Can you recommend which processor best fit with my machine: QUAD CORE XEON 3.0 (intel) 2.1 (mid 2008) with LION (10.7.6). I wish to run El Captain (10.11) or Sierra (10.12)..
Hey, buddy, how you doing?
Has a problem with your Mac Pro 2008
After the device is turned on for a few seconds, it is stopped
Please, what's the problem?
Hi!
I just bought a 2008 3,1 MacPro with 1cpu and I was wondering if it is possible that I can add a 2nd cpu… Do I have to order another Heatsink or anything else?
You will need a matching processor, a heat sink, (be careful to get the muliti copper pipes for a 3,1, not eh 1,1 or 2,1 although the older ones will work, it wont be matching), and some thermal paste.
If you are getting the 3.2 2 processor upgrade, then you will need 2 new 3.2 specific heat sinks. See the guide above for those.
Also you will need a long 3mm hex head screw driver. The Ifixit drivers barley worked.
Hi, I hope you are well. I have a problem with my Mac-pro early 2008. It has been running sweet for aons. I have had to do bits of maintenance frame time to time. When I power up the Mac, get a high pitched squealing noise like when you let out the air of a balloon to make it squeal. The my Mac won’t always boot. Occasionally it will re-boot intermittently once the squealing has stopped. I replaced my old hard drives with new ones about two years ago. Can you shed any light on my problem? Kind regards, Reuben
It sounds like your power supply is having problem.
try an SMC reset (if you dont know what that is then google will help you)
Updated to reflect same procedure for all models in range
DavidM - 返信