メインコンテンツにスキップ

Replacing the Reservoir Membrane of a Sterwins Booster Pump (900W, 19L, 3800L/h)

必要な工具と部品

  1. Replacing the Reservoir Membrane of a Sterwins Booster Pump (900W,  19L, 3800L/h), Tools Needed: 手順 1、 3の画像 1 Replacing the Reservoir Membrane of a Sterwins Booster Pump (900W,  19L, 3800L/h), Tools Needed: 手順 1、 3の画像 2 Replacing the Reservoir Membrane of a Sterwins Booster Pump (900W,  19L, 3800L/h), Tools Needed: 手順 1、 3の画像 3
    • Before fiddling with the booster pump, verify that it is not plugged in.

    • Tools Needed:

    • Flathead screwdriver

    • Flat wrench (size 14mm and 12mm)

    • L-shaped socket wrench (size 14mm)

    • Flat wrench (size 28mm) or an adjustable wrench

  2. Replacing the Reservoir Membrane of a Sterwins Booster Pump (900W,  19L, 3800L/h), Depressurize the reservoir: 手順 2、 3の画像 1 Replacing the Reservoir Membrane of a Sterwins Booster Pump (900W,  19L, 3800L/h), Depressurize the reservoir: 手順 2、 3の画像 2 Replacing the Reservoir Membrane of a Sterwins Booster Pump (900W,  19L, 3800L/h), Depressurize the reservoir: 手順 2、 3の画像 3
    • Unscrew the cap covering the valve that regulates the internal pressure of the reservoir.

    • Using the screwdriver, push on the valve core to depressurize the reservoir.

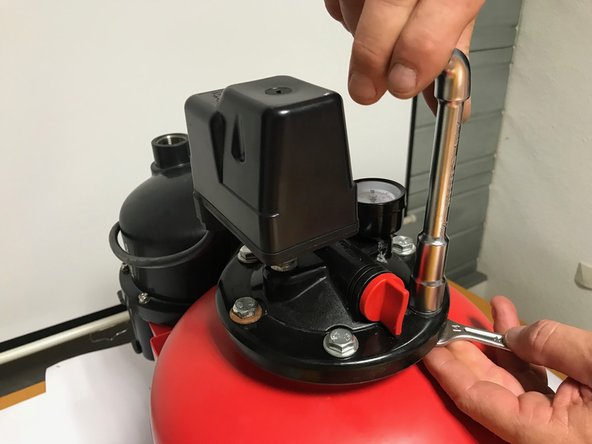
  3. Replacing the Reservoir Membrane of a Sterwins Booster Pump (900W,  19L, 3800L/h), Unscrew the seal plate: 手順 3、 3の画像 1 Replacing the Reservoir Membrane of a Sterwins Booster Pump (900W,  19L, 3800L/h), Unscrew the seal plate: 手順 3、 3の画像 2 Replacing the Reservoir Membrane of a Sterwins Booster Pump (900W,  19L, 3800L/h), Unscrew the seal plate: 手順 3、 3の画像 3
    • Using a flat wrench (size 14mm) and a socket wrench (size 14mm), unscrew the 6 bolts holding the seal plate in place.

  4. Replacing the Reservoir Membrane of a Sterwins Booster Pump (900W,  19L, 3800L/h), Remove the seal plate: 手順 4、 2の画像 1 Replacing the Reservoir Membrane of a Sterwins Booster Pump (900W,  19L, 3800L/h), Remove the seal plate: 手順 4、 2の画像 2
    • Unscrew the connection between the head of the pump and the tank with a flat wrench (size 28mm or adjustable)

  5. Replacing the Reservoir Membrane of a Sterwins Booster Pump (900W,  19L, 3800L/h), Remove the reservoir: 手順 5、 3の画像 1 Replacing the Reservoir Membrane of a Sterwins Booster Pump (900W,  19L, 3800L/h), Remove the reservoir: 手順 5、 3の画像 2 Replacing the Reservoir Membrane of a Sterwins Booster Pump (900W,  19L, 3800L/h), Remove the reservoir: 手順 5、 3の画像 3
    • Unscrew the valve nut with a flat wrench (size 12mm).

    • Position the tank upright at 90° to remove the reservoir.

  6. Replacing the Reservoir Membrane of a Sterwins Booster Pump (900W,  19L, 3800L/h), Replace the reservoir: 手順 6、 3の画像 1 Replacing the Reservoir Membrane of a Sterwins Booster Pump (900W,  19L, 3800L/h), Replace the reservoir: 手順 6、 3の画像 2 Replacing the Reservoir Membrane of a Sterwins Booster Pump (900W,  19L, 3800L/h), Replace the reservoir: 手順 6、 3の画像 3
    • Put the valve back into the fastening tab of the reservoir.

    • Locate the valve's original spot in the bottom of the tank.

    • Insert the reservoir into the tank.

  7. Replacing the Reservoir Membrane of a Sterwins Booster Pump (900W,  19L, 3800L/h), Set the reservoir in place: 手順 7、 3の画像 1 Replacing the Reservoir Membrane of a Sterwins Booster Pump (900W,  19L, 3800L/h), Set the reservoir in place: 手順 7、 3の画像 2 Replacing the Reservoir Membrane of a Sterwins Booster Pump (900W,  19L, 3800L/h), Set the reservoir in place: 手順 7、 3の画像 3
    • With your hands, put the valve back in its spot inside the tank.

    • With a flat wrench (size 12mm), put the nut holding the valve back in place.

    • Position the lip of the reservoir on the outside rim of the tank.

  8. Replacing the Reservoir Membrane of a Sterwins Booster Pump (900W,  19L, 3800L/h), Put the seal plate back on: 手順 8、 3の画像 1 Replacing the Reservoir Membrane of a Sterwins Booster Pump (900W,  19L, 3800L/h), Put the seal plate back on: 手順 8、 3の画像 2 Replacing the Reservoir Membrane of a Sterwins Booster Pump (900W,  19L, 3800L/h), Put the seal plate back on: 手順 8、 3の画像 3
    • Reposition the seal plate on the tank.

    • Screw the 6 bolts back into place with a flat wrench (size 14mm) and a socket wrench (size 14mm).

    • Screw the nut between the head of the pump and the tank back into place, with a flat wrench (size 28 mm or adjustable).

    • Repressurize the tank to 1.8 bar max

ゴール

2 の人々がこのガイドを完成させました。

以下の翻訳者の皆さんにお礼を申し上げます:

fr en

100%

これらの翻訳者の方々は世界を修理する私たちのサポートをしてくれています。 あなたも貢献してみませんか?
翻訳を始める ›

作成者

1人の作成者と共同作成されました。

iRobot

メンバー登録日: 09/24/09

1 ポイント

636のガイドは作成済み

2 件のコメント

Thank you so much for your tutorial. I am a window cleaner and it is a essential for me. After my pump broke last week I was planning on buying a new one but now its fixed because of you.

Neil Glass - 返信

Where can I buy the membrane?

Periklis Tsogkas - 返信

コメントを追加

統計データ:

過去 24時間: 1

過去 7 日: 31

過去 30 日: 108

今までの合計 5,707