メインコンテンツにスキップ

Replacement of the motherboard on a Dell XPS 12 9Q23

必要な工具と部品

  1. Replacement of the motherboard on a Dell XPS 12 9Q23, Battery: 手順 1、 1の画像 1
    • Pop the center cover open on the bottom cover.

    • Remove the center screw with a #00 Phillips screwdriver.

    • Use a T5 Torx screwdriver for the remaining screws around the edge of the bottom cover.

  2. Replacement of the motherboard on a Dell XPS 12 9Q23: 手順 2、 1の画像 1
    • Carefully remove back panel after all screws have been removed.

  3. Replacement of the motherboard on a Dell XPS 12 9Q23: 手順 3、 1の画像 1
    • After the back panel has been removed, disconnect the battery to prevent electrical shock

  4. Replacement of the motherboard on a Dell XPS 12 9Q23: 手順 4、 1の画像 1
    • Use a Phillips #00 screwdriver to remove the 8 screws that secure the battery.

  5. Replacement of the motherboard on a Dell XPS 12 9Q23, Remove the battery: 手順 5、 1の画像 1
    • Once all the screws have been removed the battery is now safe to extract

  6. Replacement of the motherboard on a Dell XPS 12 9Q23, Cooling Fan: 手順 6、 1の画像 1
    • Caution: Ensure your laptop has been powered down.

    • Close the laptop, flip the laptop over, and pop off the back small panel with a flathead screwdriver. The panel will be hanging by the hinges once open.

  7. Replacement of the motherboard on a Dell XPS 12 9Q23: 手順 7、 1の画像 1
    • Use a T5 Torx screwdriver to remove the screws along the edge of the bottom cover.

    • Use a magnetic board if possible to keep track of screws.

    • Open the center cover and use a Phillips #00 screwdriver to remove single screw.

  8. Replacement of the motherboard on a Dell XPS 12 9Q23: 手順 8、 1の画像 1
    • Carefully remove the back cover.

  9. Replacement of the motherboard on a Dell XPS 12 9Q23: 手順 9、 1の画像 1
    この手順で使用する道具:
    Anti-Static Wrist Strap
    $7.95
    購入する
    • Caution: Be mindful of static electric charge across the battery port. Usage of an antistatic strap is recommended but not required.

    • Disconnect the battery to prevent electrical shock.

    • If battery replacement is desired then the battery may be removed at this point via removal of the battery's perimeter screws.

  10. Replacement of the motherboard on a Dell XPS 12 9Q23: 手順 10、 1の画像 1
    • Disconnect yellow-colored ribbon cable from its port which sits at the bottom left of the fan housing.

  11. Replacement of the motherboard on a Dell XPS 12 9Q23: 手順 11、 1の画像 1
    • Dislodge the CMOS battery.

    • Unplug CMOS cable.

    • This step is not completely necessary, it allows extra room to maneuver the fan in and out during replacement.

  12. Replacement of the motherboard on a Dell XPS 12 9Q23: 手順 12、 1の画像 1
    • Use a Phillips #00 screwdriver to loosen the screws that secure the heat sink's heat spreader.

    • Screws cannot be fully removed from heatsink.

  13. Replacement of the motherboard on a Dell XPS 12 9Q23: 手順 13、 1の画像 1
    • Grip the heat sink from the sides and carefully lift it up to remove it.

    • Heatsink is a device used for absorbing heat and necessary to remove to reach the fan.

    • At this time there will be a whitish powder between the heatsink and the CPU. This powder below the heat spreader is degraded thermal paste. DO NOT wipe away this powder unless the thermal paste will be replaced upon reassembly.

  14. Replacement of the motherboard on a Dell XPS 12 9Q23: 手順 14、 1の画像 1
    • Use a Phillips screwdriver to remove the two cooling fan screws.

  15. Replacement of the motherboard on a Dell XPS 12 9Q23: 手順 15、 1の画像 1
    • Unplug the fan cable.

  16. Replacement of the motherboard on a Dell XPS 12 9Q23: 手順 16、 1の画像 1
    • The cooling fan can now be removed and a new one can be installed.

  17. Replacement of the motherboard on a Dell XPS 12 9Q23, Remove the WiFi card: 手順 17、 3の画像 1 Replacement of the motherboard on a Dell XPS 12 9Q23, Remove the WiFi card: 手順 17、 3の画像 2 Replacement of the motherboard on a Dell XPS 12 9Q23, Remove the WiFi card: 手順 17、 3の画像 3
    • We removed the battery to avoid electric shocks.

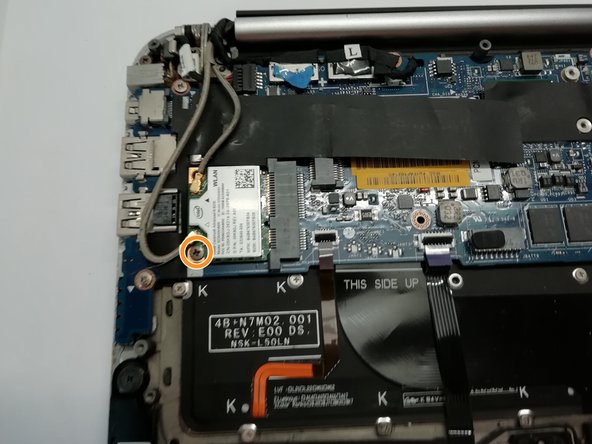
    • Disconnect the two wires from the WiFi card. You can do this with a pair of pliers or your fingernail.

    • Remove the screw with a #00 Phillips screwdriver.

    • Now remove your WiFi card to replace it.

  18. Replacement of the motherboard on a Dell XPS 12 9Q23, Adhesive tape: 手順 18、 1の画像 1
    • We removed the battery to avoid electric shocks.

    • Remove the adhesive tape.

  19. Replacement of the motherboard on a Dell XPS 12 9Q23, Remove the hard disk drive: 手順 19、 2の画像 1 Replacement of the motherboard on a Dell XPS 12 9Q23, Remove the hard disk drive: 手順 19、 2の画像 2
    • Remove the screw with a #00 Phillips screwdriver.

    • Remove the hard disk from its location.

  20. Replacement of the motherboard on a Dell XPS 12 9Q23, Remove the operating button: 手順 20、 2の画像 1 Replacement of the motherboard on a Dell XPS 12 9Q23, Remove the operating button: 手順 20、 2の画像 2
    • We removed the battery to avoid electric shocks. The hard disk, WiFi card and fan have also been removed.

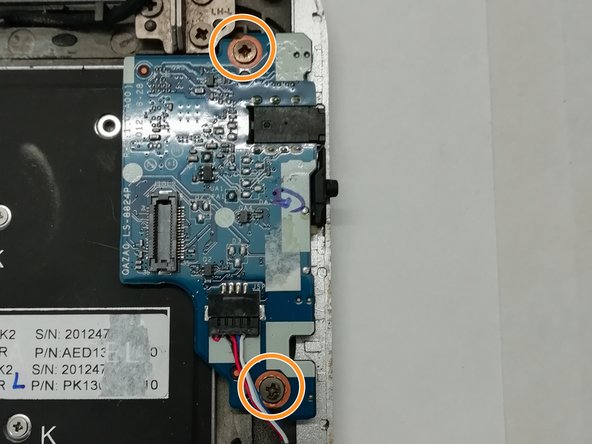
    • Remove the connector with a pair of pliers or your fingernail.

    • Remove the screws with a #00 Phillips screwdriver.

    • Remove the card afterwards.

  21. Replacement of the motherboard on a Dell XPS 12 9Q23, Remove the motherboard: 手順 21、 3の画像 1 Replacement of the motherboard on a Dell XPS 12 9Q23, Remove the motherboard: 手順 21、 3の画像 2 Replacement of the motherboard on a Dell XPS 12 9Q23, Remove the motherboard: 手順 21、 3の画像 3
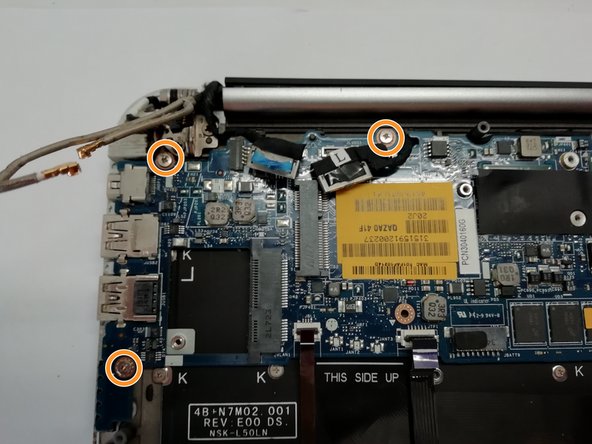
    • Disconnect the various connections from the motherboard.

    • Remove the screws with a #00 Phillips screwdriver.

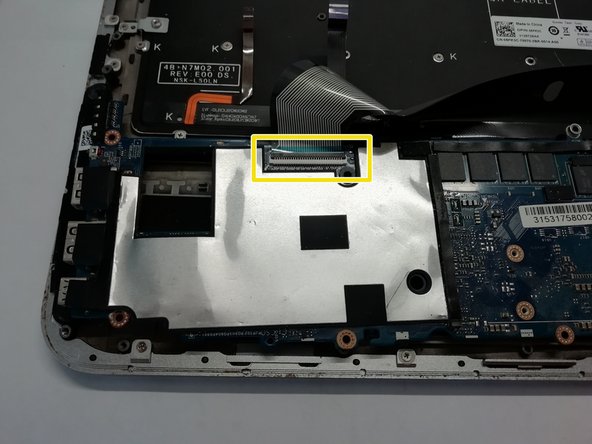
    • Carefully turn the motherboard over to disconnect the tablecloth from the keyboard.

    • You can now replace the motherboard.

終わりに

To reassemble your device, follow the instructions in reverse order.

ある他の人がこのガイドを完成しました。

以下の翻訳者の皆さんにお礼を申し上げます:

fr en

100%

Schwarzerさんは世界中で修理する私たちを助けてくれています! あなたも貢献してみませんか?
翻訳を始める ›

作成者

1人の作成者と共同作成されました。

Schwarzer

メンバー登録日: 08/07/19

4,844 ポイント

13のガイドは作成済み

チーム

i.Fixit FR Team i.Fixit FR Team人のメンバー

Community

3 メンバー

40のガイドは作成済み

0 件のコメント

コメントを追加

統計データ:

過去 24時間: 0

過去 7 日: 0

過去 30 日: 4

今までの合計 946