はじめに
You must disconnect or replace the screen of your Dell XPS 13 9380, this guide is then made for you!
必要な工具と部品
-
-
Use a Torx T5 driver to unscrew the eight screws securing the back panel.
-
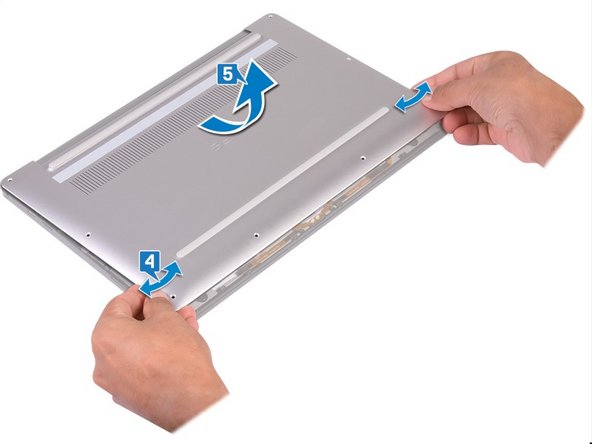
Use a spudger to pry up and loosen the back panel.
-
Lift the back panel up slightly from the non-hinged edge.
-
Pull the back panel away from the hinged edge, wiggling it back and forth to loosen the clips.
-
When the back panel clips are free, remove the back panel.
-
-
-
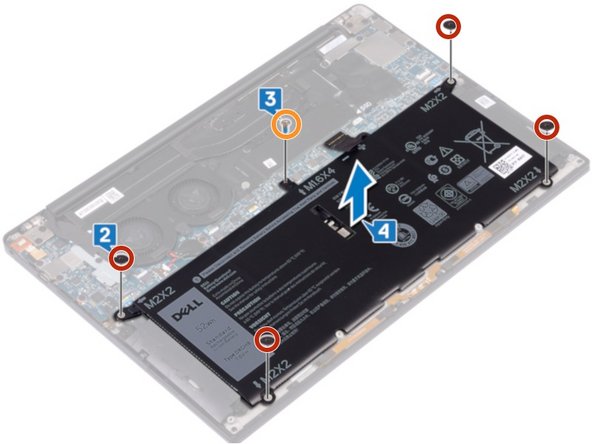
Disconnect the cable from the battery by pulling the connector towards the battery.
-
Remove the four screws (M2 x 2) securing the battery.
-
Remove the screw (M1.6 x 4) securing the battery.
-
Remove the battery from its recess.
-
-
-
-
1- Remove the screw (M1.6 x 3) that attaches the WiFi card and cable holder from the webcam to the motherboard. 2- Remove the WiFi card and cable holder.
-
3- Disconnect and lift the webcam cable from the motherboard, removing the adhesive tape that attaches the webcam cable to the fans.
-
4- Remove the two screws (M1.6 x 2.5) that attach the display cable holder to the motherboard. 5- Then remove everything.
-
6- Disconnect the screen connection from the motherboard.
-
-
-
7- Disconnect the antenna cables from the motherboard.
-
8- Remove the four screws (M2.5 x 4) that fix the hinges of the screen.
-
9- Place the back of the computer screen on a clean and level surface, then open the computer at a 90-degree angle.
-
10- Gently slide and lift the screen off the rest of the computer.
-
To reassemble your device, follow the instructions in reverse order.
To reassemble your device, follow the instructions in reverse order.
2 の人々がこのガイドを完成させました。
以下の翻訳者の皆さんにお礼を申し上げます:
100%
Schwarzerさんは世界中で修理する私たちを助けてくれています! あなたも貢献してみませんか?
翻訳を始める ›


