メインコンテンツにスキップ

このバージョンは誤った内容を含んでいる可能性があります。最新の承認済みスナップショットに切り替えてください。

必要な工具と部品

  1. この手順は未翻訳です。 翻訳を手伝う。

    : 手順 1、 2の画像 1 : 手順 1、 2の画像 2
    • You will need to be near a power source for this guide.

    • With the back of the DVD player facing you, remove the three 1 cm black screws on the right, left, and top sides using a Phillips #1 screwdriver.

  2. この手順は未翻訳です。 翻訳を手伝う。

    : 手順 2、 2の画像 1 : 手順 2、 2の画像 2
    • Pull the top cover towards you until you can lift it up and off.

  3. この手順は未翻訳です。 翻訳を手伝う。

    : 手順 3、 2の画像 1 : 手順 3、 2の画像 2
    • With the front of the DVD player facing you, turn the power on and eject the disc tray.

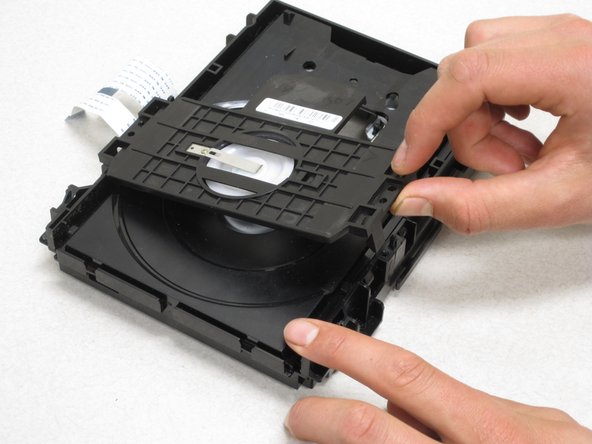
    • Press down on the disc tray with your thumbs while also pressing up with your pointer finger on the left and right edges of the silver cover. The cover should easily pop up and off the disc tray.

    • Be careful not to crack or bend the disc tray by pulling too hard.

  4. この手順は未翻訳です。 翻訳を手伝う。

    : 手順 4、 3の画像 1 : 手順 4、 3の画像 2 : 手順 4、 3の画像 3
    • To remove the front panel, lift up the clips on the bottom, left and right sides of the DVD player.

    • Be sure to have all clips lifted up at the same time otherwise it will be difficult to get the panel off.

    • If you are having trouble removing the panel, try wedging an object underneath the two clips on the bottom to keep them from falling back into place.

  5. この手順は未翻訳です。 翻訳を手伝う。

    : 手順 5、 1の画像 1
    • Gently remove the front panel by pulling it forward.

  6. この手順は未翻訳です。 翻訳を手伝う。

    : 手順 6、 1の画像 1
    • Press the eject button again to make the disc tray slide back into place.

    • Turn off the DVD player and unplug it from the wall before proceeding to further steps.

  7. この手順は未翻訳です。 翻訳を手伝う。

    : 手順 7、 2の画像 1 : 手順 7、 2の画像 2
    • Remove the two white ribbon cables that connect the motherboard and the disc tray by pulling on the ribbon cable where it attaches to the circuit board.

  8. この手順は未翻訳です。 翻訳を手伝う。

    : 手順 8、 3の画像 1 : 手順 8、 3の画像 2 : 手順 8、 3の画像 3
    • Remove the three 0.6 cm gold screws holding the disc tray to the bottom casing with a Philips #1 screwdriver.

    • Lift the disc tray out.

  9. この手順は未翻訳です。 翻訳を手伝う。

    : 手順 9、 3の画像 1 : 手順 9、 3の画像 2 : 手順 9、 3の画像 3
    • Remove the top cover of the disc tray by gently prying the clips off with a flathead screwdriver.

    • You will want to release one side before moving on to the other side, but do not lift the cover off until both sides are released.

  10. この手順は未翻訳です。 翻訳を手伝う。

    : 手順 10、 3の画像 1 : 手順 10、 3の画像 2 : 手順 10、 3の画像 3
    • Very gently wipe the laser down with lens cleaner.

    • Be very careful that no excess cleaner drips down into the disc drive.

    • Use extreme caution when wiping the laser to avoid damaging it. If too much force is used, it will break or be pushed off-center and will not read the disc properly.

ゴール

作成者

3人の作成者と共同で作成されました。

Alexander Roberts

メンバー登録日: 01/04/11

101 ポイント

1ガイドが承認済み

チーム

Cal Poly, Team 14-7, Forte Winter 2011 Cal Poly, Team 14-7, Forte Winter 2011人のメンバー

CPSU-FORTE-W11S14G7

5 メンバー

7のガイドは作成済み

2 件のコメント

This was a terrific explanation. Our DVD player suddenly began acting up - wouldn't read DVD, wouldn't eject DVD, etc. I used these steps shown above to open up the DVD player and discovered daughter had put two DVDs in at the same time. I was able to remove the 'extra' DVD ha ha and now it works great. Thanks so much for your work to put up this overview on how to open up the case.

Dave F in Missouri - 返信

My laser is no good. I took it out but can't seem to find a replacement. I searched it online, but no luck. Any idea how to find a new one? I heard that a new one costs as much as just getting a new DVD player.

Ltl Paa - 返信

コメントを追加

統計データ:

過去 24時間: 0

過去 7 日: 1

過去 30 日: 14

今までの合計 2,292