メインコンテンツにスキップ

Repairing HTC Droid Incredible Back Panel

アーカイブされたガイド
このガイドは将来的な使用のためにのみ保存されてます。ご自身の修理作業には更新バージョンをご利用ください。

必要な工具と部品

  1. Repairing HTC Droid Incredible Back Panel, Battery: 手順 1、 3の画像 1 Repairing HTC Droid Incredible Back Panel, Battery: 手順 1、 3の画像 2 Repairing HTC Droid Incredible Back Panel, Battery: 手順 1、 3の画像 3
    • Pry off back plastic, starting at the gap provided at the bottom of the phone. A spudger can be used to make this easier.

  2. Repairing HTC Droid Incredible Back Panel: 手順 2、 2の画像 1 Repairing HTC Droid Incredible Back Panel: 手順 2、 2の画像 2
    • Remove battery, prying from the provided gap at the upper-right corner of the battery

  3. Repairing HTC Droid Incredible Back Panel, Back Panel: 手順 3、 2の画像 1 Repairing HTC Droid Incredible Back Panel, Back Panel: 手順 3、 2の画像 2
    • Depress MicroSD to eject it from the side of the case.

  4. Repairing HTC Droid Incredible Back Panel: 手順 4、 3の画像 1 Repairing HTC Droid Incredible Back Panel: 手順 4、 3の画像 2 Repairing HTC Droid Incredible Back Panel: 手順 4、 3の画像 3
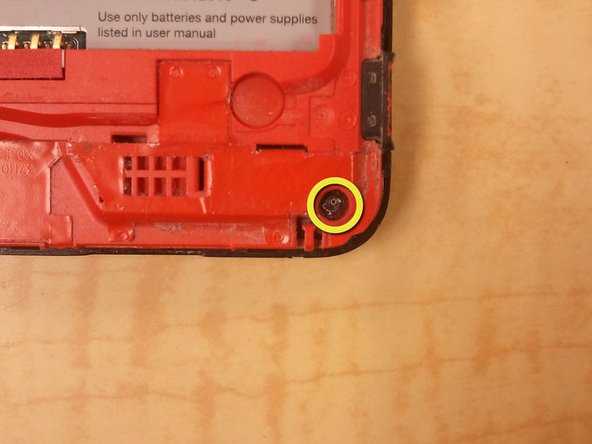
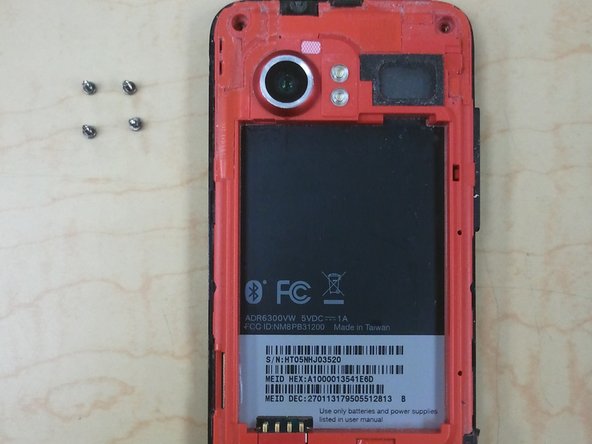
    • Remove 4 corner screws, you may have to remove a "VOID" sticker from one of the screw heads.

  5. Repairing HTC Droid Incredible Back Panel: 手順 5、 3の画像 1 Repairing HTC Droid Incredible Back Panel: 手順 5、 3の画像 2 Repairing HTC Droid Incredible Back Panel: 手順 5、 3の画像 3
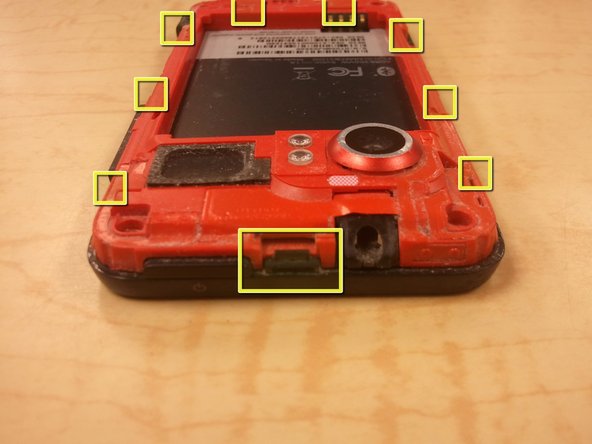
    • Using a spudger, unclip the nine clips holding the back panel to the front panel, highlighted in included pictures.

    • Start at the top, and work clockwise, being careful not to break the clips.

    • There are, 1, 3, 2, and 3 clips on each side, respectively.

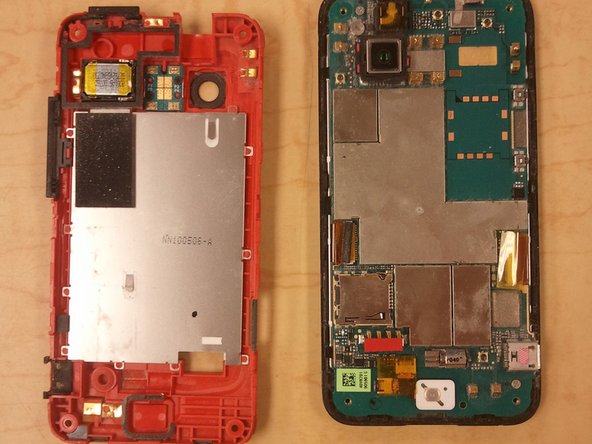
    • After the clips are disengaged, there are no cables holding the back panel in place.

終わりに

To reassemble your device, follow these instructions in reverse order.

5 の人々がこのガイドを完成させました。

作成者

1人の作成者と共同作成されました。

Mobile Rapid Response Unit

メンバー登録日: 05/07/12

1,941 ポイント

6のガイドは作成済み

0 件のコメント

コメントを追加

統計データ:

過去 24時間: 0

過去 7 日: 0

過去 30 日: 1

今までの合計 1,092