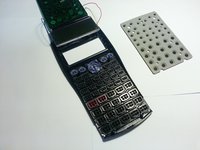
メインコンテンツにスキップ

Repairing Buttons on Casio fx-300ES Calculator

必要な工具と部品

  1. Repairing Buttons on Casio fx-300ES Calculator, Repairing Buttons on Casio fx-300ES Calculator: 手順 1、 2の画像 1 Repairing Buttons on Casio fx-300ES Calculator, Repairing Buttons on Casio fx-300ES Calculator: 手順 1、 2の画像 2
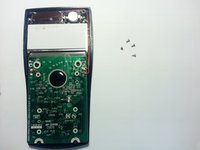
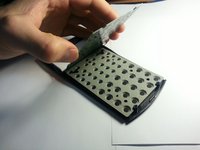
    • Remove the six 5 mm screws on the back of the calculator.

  2. Repairing Buttons on Casio fx-300ES Calculator: 手順 2、 2の画像 1 Repairing Buttons on Casio fx-300ES Calculator: 手順 2、 2の画像 2
    • Carefully remove the back plate to reveal the circuit board and the battery.

  3. Repairing Buttons on Casio fx-300ES Calculator: 手順 3、 3の画像 1 Repairing Buttons on Casio fx-300ES Calculator: 手順 3、 3の画像 2 Repairing Buttons on Casio fx-300ES Calculator: 手順 3、 3の画像 3
    • Remove the four 4 mm screws from the circuit board.

  4. Repairing Buttons on Casio fx-300ES Calculator: 手順 4、 1の画像 1
    • Be aware of the placement of the blue, black, red, and yellow wires because they will fall out when the next step is taken.

  5. Repairing Buttons on Casio fx-300ES Calculator: 手順 5、 3の画像 1 Repairing Buttons on Casio fx-300ES Calculator: 手順 5、 3の画像 2 Repairing Buttons on Casio fx-300ES Calculator: 手順 5、 3の画像 3
    • Carefully lift the circuit board while leaving the grey rubber piece face down.

    • Simply flip the circuit board and the screen over but do not remove them fully.

    • Make sure the calculator is face down.

    • Buttons are loose do not flip calculator over.

  6. Repairing Buttons on Casio fx-300ES Calculator: 手順 6、 3の画像 1 Repairing Buttons on Casio fx-300ES Calculator: 手順 6、 3の画像 2 Repairing Buttons on Casio fx-300ES Calculator: 手順 6、 3の画像 3
    • Now lift the grey rubber piece off to reveal the individual buttons.

    • Buttons are loose make sure they do not come off with the rubber piece.

  7. Repairing Buttons on Casio fx-300ES Calculator: 手順 7、 3の画像 1 Repairing Buttons on Casio fx-300ES Calculator: 手順 7、 3の画像 2 Repairing Buttons on Casio fx-300ES Calculator: 手順 7、 3の画像 3
    • To remove the buttons you can use your screwdriver and lightly flip them out of their individual spaces.

    • You can now access all the buttons and make any alterations needed.

  8. Repairing Buttons on Casio fx-300ES Calculator: 手順 8、 1の画像 1
    • Refer to this picture if any buttons get misplaced or fall out.

終わりに

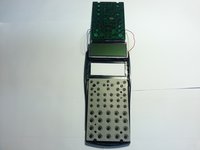
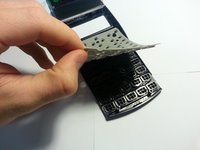
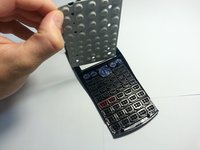
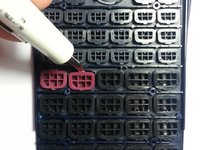
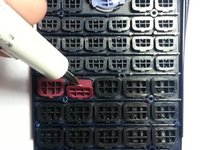
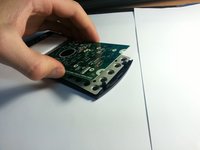
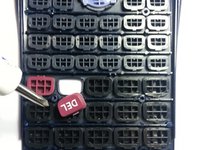
To reassemble your device, follow these instructions in reverse order.

4 の人々がこのガイドを完成させました。

作成者

4人の作成者と共同で作成されました。

Daniel Riedeman

メンバー登録日: 04/09/15

219 ポイント

1ガイドが承認済み

チーム

Cal Poly, Team 28-2, Green Spring 2015 Cal Poly, Team 28-2, Green Spring 2015人のメンバー

CPSU-GREEN-S15S28G2

4 メンバー

2のガイドは作成済み

4 件のコメント

Great photos make sure to replace the stock photos with those you take. Maybe retake photos with white background.

Kathryn Webb - 返信

my answer key button not working. when i press button it shows the X10 so what can i do plzz give tips for repairing

ayush shukla - 返信

Halp my board is stuck to the front plate sith super glue from previous owner.

[deleted] - 返信

I repaired my Casio fx-300w, a similar calculator with similar buttons. My mother, who gave it to me, spilled coffee once when using it in her office. I got rid of the sticky coffee gunk formed nearly 12 years ago.

Matthew Yang - 返信

コメントを追加

統計データ:

過去 24時間: 3

過去 7 日: 22

過去 30 日: 94

今までの合計 24,845