このバージョンは誤った内容を含んでいる可能性があります。最新の承認済みスナップショットに切り替えてください。
必要な工具と部品
-
-
この手順は未翻訳です。 翻訳を手伝う。
-
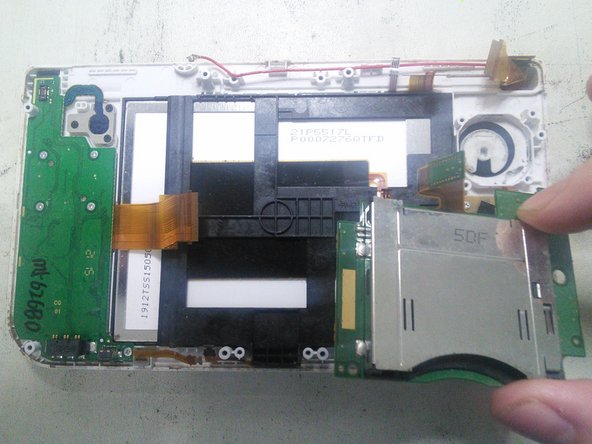
Glissez un outil plat entre le support noir du LCD/Tactile et le boitier de la console puis soulevez-le doucement. Glissez ensuite un médiator en dessous pour le maintenir.
-
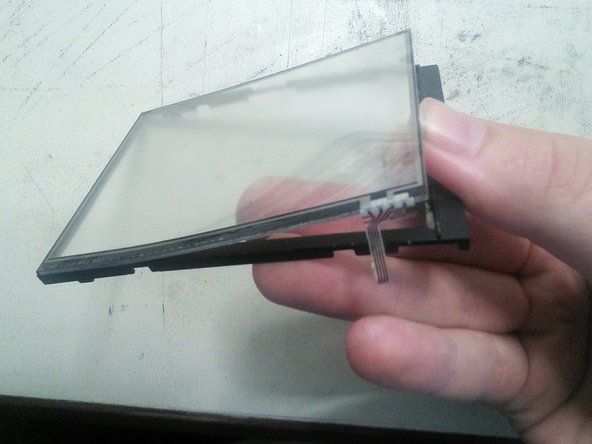
Ensuite, vous pouvez soit soulever l'ensemble en le poussant par dessous, soit continuer à faire le tour pour déclipser l'ensemble et l'extraire.
-


16 の人々がこのガイドを完成させました。

チーム

12 件のコメント
I followed this guide to the letter last night on my hyrule gold new 3ds XL (from hence forth I will refer to this unit as my “old n3dsXL”) before attempting the same repair on my new unit. It worked fine on my old n3dsXL. So I went ahead with doing the same repair on my new unit.
Well it went fine till I tried to turn it on. The blue light comes on then after a few seconds there’s a “pop” sound and the unit turns back off. Can anyone tell me what just happened here?
Also tried putting the original touch screen back in the new unit and it still does the same pop sound and shuts off
You might need to reseat the cables i had this issue on my old ds lite and my old n3ds all i had to do was that and it fixed it for me also if that doesn’t work get a cotton swab and dip it in rubbing alcohol and clean the end of the ribbon cables then re insert them.
Same thing happened to me my first time—brief blue light but would not power on. Tore it down and re-connected all the cables more carefully the second time. That fixed it.
BBW -
I just disassembled my new 3ds xl to clean my lower screen and touch sensor following this guide, it went smoothly but now everything works except the touch sensor, why??
I have done this successfully three times now—thank you for the excellent guide. Newcomers should know there is one ERROR and one OMISSION in the procedure. (1) ERROR - In Step 13, the topmost ZIF connector marked in red *does* have a clamp, unlike the other four. If you attempt to pull the connector loose without opening the clamp you will break it—see the frustrated comments to Step 13 for examples. (2) OMISSION - At Step 16, before removing the cartridge drive you must unplug the connector at the top of the component. This is shown as unplugged in the photo, but the step is missing from the written instructions. The clamp on this plug loosens on the *opposite* side from where the cable is inserted, unlike the other clamps in the guide.