メインコンテンツにスキップ

Redmi Note 4 Global Display Replacement

必要な工具と部品

  1. Redmi Note 4 Global Display Replacement, Display: 手順 1、 2の画像 1 Redmi Note 4 Global Display Replacement, Display: 手順 1、 2の画像 2
    • Use a pin to remove the SIM & SD card

  2. Redmi Note 4 Global Display Replacement: 手順 2、 3の画像 1 Redmi Note 4 Global Display Replacement: 手順 2、 3の画像 2 Redmi Note 4 Global Display Replacement: 手順 2、 3の画像 3
    • With the help of a silicone spatula or similar opening tool, press gently into the separation between housing and screen

    • Gently pry the frame away from the screen .

  3. Redmi Note 4 Global Display Replacement: 手順 3、 1の画像 1
    • Disconnect the rest of all the connectors. (Image shows fingerprint scanner connector already removed)

  4. Redmi Note 4 Global Display Replacement: 手順 4、 3の画像 1 Redmi Note 4 Global Display Replacement: 手順 4、 3の画像 2 Redmi Note 4 Global Display Replacement: 手順 4、 3の画像 3
    • First disconnect the connector for the fingerprint scanner

    • Then carefully pry the scanner (it is adhered to the board )

    • Preheating the scanner area with a hair dryer can help

  5. Redmi Note 4 Global Display Replacement: 手順 5、 1の画像 1
    • Remove all Phillips screws screws eg with a #00 Phillips driver

  6. Redmi Note 4 Global Display Replacement: 手順 6、 1の画像 1
    • Remove the rest of the screws

    • Gently pry off the plastic covers

  7. Redmi Note 4 Global Display Replacement: 手順 7、 2の画像 1 Redmi Note 4 Global Display Replacement: 手順 7、 2の画像 2
    • Remove the plastic cover from the top of the phone

    • Gentle prying may be help to loosen it.

    • Remove the screw hidden under the cover.

  8. Redmi Note 4 Global Display Replacement: 手順 8、 2の画像 1 Redmi Note 4 Global Display Replacement: 手順 8、 2の画像 2
    • Move the plastic tab to the side to remove the main board

  9. Redmi Note 4 Global Display Replacement: 手順 9、 2の画像 1 Redmi Note 4 Global Display Replacement: 手順 9、 2の画像 2
    • Disconnect the ribbon cable

    • Remove the screw.

    • Carefully remove the circuit board

  10. Redmi Note 4 Global Display Replacement: 手順 10、 2の画像 1 Redmi Note 4 Global Display Replacement: 手順 10、 2の画像 2
    • Gently separate the side button bar from the frame

  11. Redmi Note 4 Global Display Replacement: 手順 11、 2の画像 1 Redmi Note 4 Global Display Replacement: 手順 11、 2の画像 2
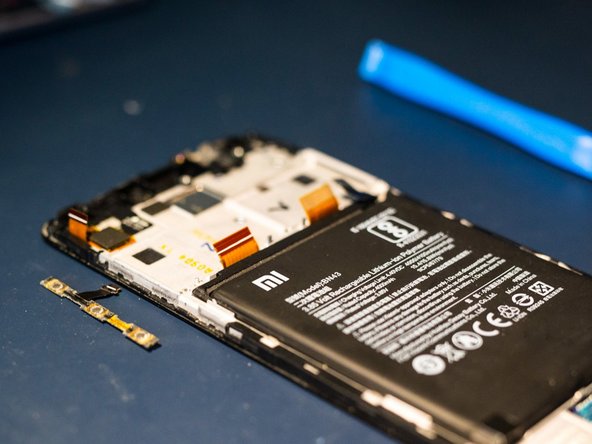
    • Remove the upper speaker

    • Caution: When removing the speaker, the two parts of the speaker can separate from each other. They are only held together by two very thin copper cables!

    • The best way to get to the bottom of the speaker and pry it out carefully is by using the direction of the red arrow.

  12. Redmi Note 4 Global Display Replacement: 手順 12、 2の画像 1 Redmi Note 4 Global Display Replacement: 手順 12、 2の画像 2
    • Peel off the two battery adhesive strips to remove the battery

    • Pull as flat as possible and rather slowly. Heating the display with a hair dryer makes the whole thing a little easier.

  13. Redmi Note 4 Global Display Replacement: 手順 13、 1の画像 1
    • Disconnect the ribbon cable for the charging board. Keep it safe for later reuse.

  14. Redmi Note 4 Global Display Replacement: 手順 14、 2の画像 1 Redmi Note 4 Global Display Replacement: 手順 14、 2の画像 2
    • Depending on the completeness of the replacement part, the LED lighting may also be removed

    • T o remove it, gently pry with some pointed tweezers or similar tool

  15. Redmi Note 4 Global Display Replacement, First Test: 手順 15、 2の画像 1 Redmi Note 4 Global Display Replacement, First Test: 手順 15、 2の画像 2
    • For testing purposes, the button bar, the screen and the battery can be connected.

    • Attention! When doing so, there is an increased risk of damaging the connections or the battery. Be very careful!

    • A long press on the bottom button should start the phone

  16. Redmi Note 4 Global Display Replacement: 手順 16、 1の画像 1
    • Insert the upper speaker and press it into the end position

  17. Redmi Note 4 Global Display Replacement: 手順 17、 1の画像 1
    • If previously removed, insert the LED bar (red circle)

    • Insert the charging board into proper position and tighten (blue circle)

  18. Redmi Note 4 Global Display Replacement: 手順 18、 1の画像 1
    • Remove the blue protective strip from the corresponding adhesive surface. Insert the ribbon cable into the power supply

    • Press the cable flat onto the adhesive area

    • Ensure everything is properly aligned

  19. Redmi Note 4 Global Display Replacement: 手順 19、 1の画像 1
    • Install the lower plastic cover and screw it in place

  20. Redmi Note 4 Global Display Replacement: 手順 20、 3の画像 1 Redmi Note 4 Global Display Replacement: 手順 20、 3の画像 2 Redmi Note 4 Global Display Replacement: 手順 20、 3の画像 3
    • Insert the motherboard

    • Use the metal pin and the plastic hook to check proper alignment.

  21. Redmi Note 4 Global Display Replacement: 手順 21、 1の画像 1
    • Reconnect all connectors

  22. Redmi Note 4 Global Display Replacement, Replacing the battery: 手順 22、 2の画像 1 Redmi Note 4 Global Display Replacement, Replacing the battery: 手順 22、 2の画像 2
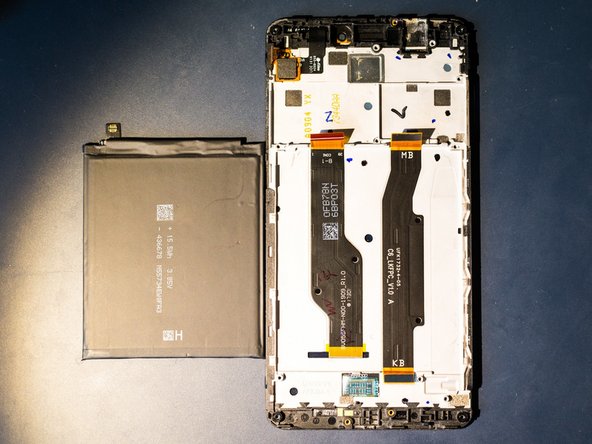
    • Remove the cover from the two adhesive strips for the battery

    • Insert the battery and reconnect it.

  23. Redmi Note 4 Global Display Replacement: 手順 23、 1の画像 1
    • Press the fingerprint scanner back into its position.

    • Press the display back into the housing. Done!

終わりに

Repeat the steps in reverse order to reassemble your device.

4 の人々がこのガイドを完成させました。

以下の翻訳者の皆さんにお礼を申し上げます:

de en

100%

これらの翻訳者の方々は世界を修理する私たちのサポートをしてくれています。 あなたも貢献してみませんか?
翻訳を始める ›

作成者

2人の作成者と共同で作成されました。

Frederic

メンバー登録日: 10/23/18

457 ポイント

1ガイドが承認済み

3 件のコメント

There are major steps missing between step 14 and step 15. This is not a complete guide on screen replacement.

Don - 返信

Hi Don, which steps are you missing between 14 and 15 ? Once all parts are removed from the old display one can try the test fit on the new display.

Frederic - 返信

Watch and pray ,global warming.

Jerry Scott - 返信

コメントを追加

統計データ:

過去 24時間: 3

過去 7 日: 30

過去 30 日: 149

今までの合計 5,990