メインコンテンツにスキップ

RCA Pro10 Edition Power/Volume Buttons Replacement

必要な工具と部品

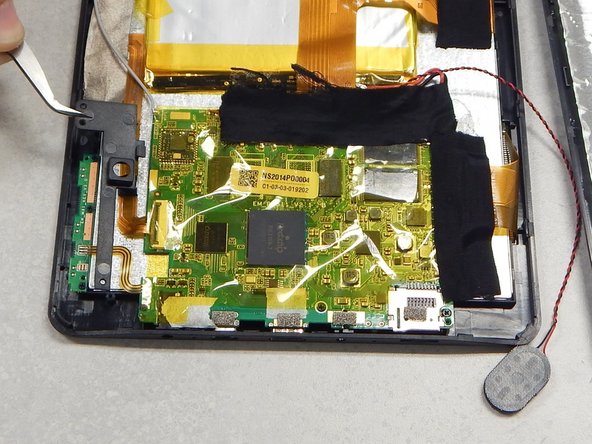
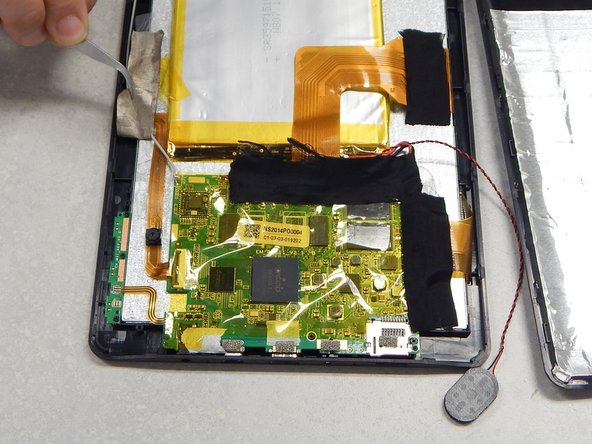
  1. RCA Pro10 Edition Power/Volume Buttons Replacement, Speaker: 手順 1、 2の画像 1 RCA Pro10 Edition Power/Volume Buttons Replacement, Speaker: 手順 1、 2の画像 2
    • Using a separating tool, look for a seam in the plastic casing that looks most accessible.

    • Use the prying tool to separate the front and back casing, working your way around the perimeter.

    • Utilize a card tool or a pick to assist in keeping the case separated.

    • To reassemble the device simply align the two casing halves and pinch to snap together or press down on the edges while the device in on a table.

  2. RCA Pro10 Edition Power/Volume Buttons Replacement: 手順 2、 1の画像 1
    • Flip over the back of the device while keeping it close to the front, the speaker is attached to it.

    • Remove the yellow tape securing the speaker to the back casing.

  3. RCA Pro10 Edition Power/Volume Buttons Replacement: 手順 3、 2の画像 1 RCA Pro10 Edition Power/Volume Buttons Replacement: 手順 3、 2の画像 2
    • Use the separating tool to pry the speaker from its surface.

    • Use caution when removing the speaker, you may damage the screen.

    • Cut or desolder the wires to replace or repair the speaker.

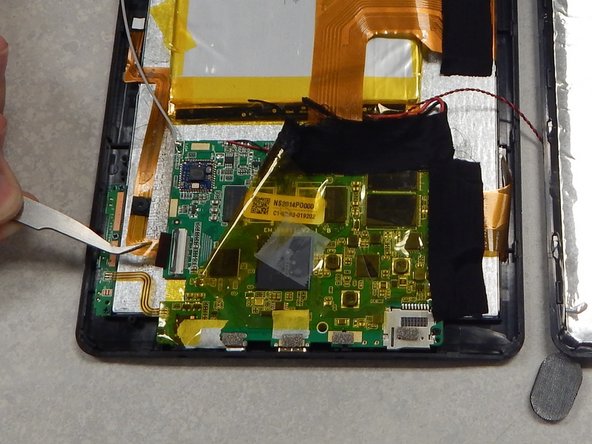
  4. RCA Pro10 Edition Power/Volume Buttons Replacement, Camera: 手順 4、 3の画像 1 RCA Pro10 Edition Power/Volume Buttons Replacement, Camera: 手順 4、 3の画像 2 RCA Pro10 Edition Power/Volume Buttons Replacement, Camera: 手順 4、 3の画像 3
    • Using a P00 Phillips screwdriver, remove the three screws securing the black plastic camera housing and remove it.

    • Peel back the beige tape while holding down the camera ribbon cable to prevent tears

  5. RCA Pro10 Edition Power/Volume Buttons Replacement: 手順 5、 2の画像 1 RCA Pro10 Edition Power/Volume Buttons Replacement: 手順 5、 2の画像 2
    • Lift the locking tab that is securing the camera ribbon cable.

    • Slide the ribbon cable out from the connector and remove from casing.

  6. RCA Pro10 Edition Power/Volume Buttons Replacement, Power/Volume Buttons: 手順 6、 1の画像 1
    • Use a P00 Phillips screwdriver to remove the three screws securing the button board.

    • Desolder the contacts on the button board to remove or replace it.

終わりに

To reassemble your device, follow these instructions in reverse order.

作成者

4人の作成者と共同で作成されました。

Dayne Russell

メンバー登録日: 01/27/15

401 ポイント

4のガイドは作成済み

チーム

Pasco Hernando, Team 1-1, Prince Winter 2015 Pasco Hernando, Team 1-1, Prince Winter 2015人のメンバー

PHSC-PRINCE-W15S1G1

6 メンバー

10のガイドは作成済み

コメント 1 件

What is the part number for the Power/Volume Buttons? Where can I purchase one?

EvanSnow - 返信

コメントを追加

統計データ:

過去 24時間: 0

過去 7 日: 1

過去 30 日: 6

今までの合計 985