メインコンテンツにスキップ

RCA 8 Apollo Volume Button Replacement

必要な工具と部品

  1. RCA 8 Apollo Volume Button Replacement, Back Panel: 手順 1、 1の画像 1
    • Before you begin, discharge your tablet battery below 25%. A charged lithium-ion battery can catch fire and/or explode if accidentally punctured.

    • Power off your tablet before beginning to disassemble.

  2. RCA 8 Apollo Volume Button Replacement: 手順 2、 2の画像 1 RCA 8 Apollo Volume Button Replacement: 手順 2、 2の画像 2
    • Insert an iFixit opening tool into the gap between the tablet and back panel.

    • Using a combination of iFixit opening tools and iFixit opening picks, pry the tablet upward around its perimeter to release it from the plastic rear case.

    • If inserted too far, an opening pick can damage your device. It is helpful to mark the edge with an opening pick, or opening tool at a depth that will not damage the inner contents of the tablet.

  3. RCA 8 Apollo Volume Button Replacement: 手順 3、 2の画像 1 RCA 8 Apollo Volume Button Replacement: 手順 3、 2の画像 2
    • Disconnect the red and black speaker wires from the tablet.

    • The front and back of the tablet will be disconnected.

  4. RCA 8 Apollo Volume Button Replacement, Volume Button: 手順 4、 1の画像 1
    • The volume button control pad is located in the back panel, on the right side of the tablet.

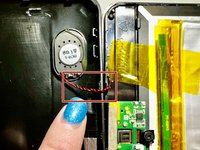
    • Push on the outside of the volume button control pad and it will simply loosen and detach.

終わりに

To reassemble your device, follow these instructions in reverse order.

作成者

1人の作成者と共同作成されました。

Brooke Still

メンバー登録日: 04/12/24

123 ポイント

1ガイドが承認済み

チーム

Casper College, Team 1-1, Lareau Spring 2024 Casper College, Team 1-1, Lareau Spring 2024人のメンバー

CASC-LAREAU-S24S1G1

3 メンバー

4のガイドは作成済み

0件のガイドコメント

コメントを追加

統計データ:

過去 24時間: 1

過去 7 日: 2

過去 30 日: 5

今までの合計 78