メインコンテンツにスキップ

Puritan Bennett 840 Expiratory Filter Replacement

医療機器
この修理ガイドは医療機器メーカーからの是認を得ておらず、iFixitと医療機器メーカーは提携していません。

必要な工具と部品

  1. Puritan Bennett 840 Expiratory Filter Replacement, Expiratory Filter: 手順 1、 1の画像 1
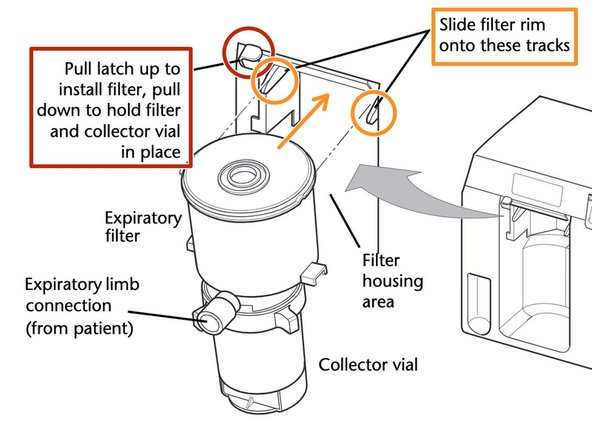
    • Locate the expiratory filter system inside the patient circuit. It is a cylindrical object that sits inside the housing as shown.

    • The expiratory filter itself is the larger cylinder that sits on top of the collector vial, but both are removed from the patient circuit as one entity.

  2. Puritan Bennett 840 Expiratory Filter Replacement: 手順 2、 1の画像 1
    • Once the expiratory filter has been located, find the latch that sits on the outside edge of the housing area (see picture).

    • Gently push this latch upward, and slide the filter out of the housing.

    • The image shows a process for installation–in the same way, the latch can be raised to remove the filter for replacement.

  3. Puritan Bennett 840 Expiratory Filter Replacement: 手順 3、 1の画像 1
    • Once the expiratory filter has been removed from the housing, detach the expiratory filter system from the patient circuit expiratory limb tubing.

  4. Puritan Bennett 840 Expiratory Filter Replacement: 手順 4、 1の画像 1
    • Obtain a new expiratory filter intended for the replacement.

    • This can either be a new single-use expiratory filter, or a reusable filter that has been sterilized using an autoclave.

    • The model shown is the Re/X800 model for the Puritan Bennett 840; the link to purchase them is provided in the details section of the tutorial.

  5. Puritan Bennett 840 Expiratory Filter Replacement: 手順 5、 1の画像 1
    • Locate the same latch used in Step 1, and lift it up gently.

    • Slide the new expiratory filter system into the housing so that the rims rest on the ridges inside the housing.

    • Ensure that the fitting for the expiratory limb tubing is facing your direction before sliding it in.

  6. Puritan Bennett 840 Expiratory Filter Replacement: 手順 6、 1の画像 1
    • Once the expiratory filter system is inside the housing, push the latch down gently and ensure that the filter stays in place.

    • Locate the expiratory limb tubing in the patient circuit, and attach it to the fitting on the outside of the expiratory filter.

  7. Puritan Bennett 840 Expiratory Filter Replacement: 手順 7、 1の画像 1
    • Check to see if your ventilator uses a dran bag.

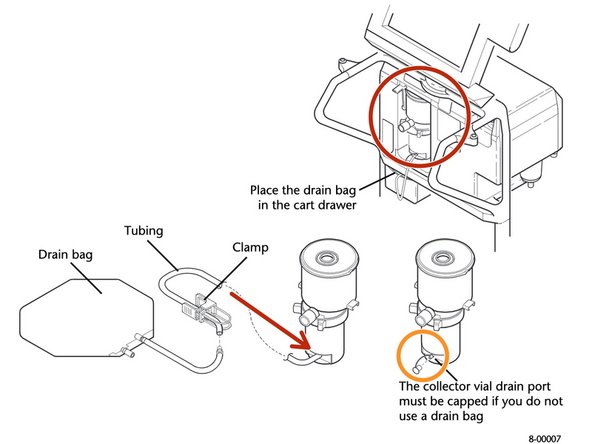
    • If your ventilator uses a drain bag, attach the drain bag to the collector vial as shown, which is placed underneath the expiratory filter system.

    • If a drain bag is not used, make sure to cap the bottom outlet of the collector vial.

    • This step is crucial as it allows the user to proceed with an expiratory filter test described in the conclusion. Ensure that the drain bag, if applicable, is attached fully.

終わりに

Once all steps are completed and the filter has been replaced, run an SST circuit leak test to ensure that the expiratory limb tubing, drain bag tubing, or any other components are sealed tightly. A circuit leak test should be conducted each time the filter is replaced.

ある他の人がこのガイドを完成しました。

作成者

1人の作成者と共同作成されました。

Julia Rios

メンバー登録日: 04/07/20

196 ポイント

1ガイドが承認済み

チーム

Cal Poly, Team S7-G4, Paton Spring 2020 Cal Poly, Team S7-G4, Paton Spring 2020人のメンバー

CPSU-PATON-S20S7G4

3 メンバー

3のガイドは作成済み

0 件のコメント

コメントを追加

統計データ:

過去 24時間: 0

過去 7 日: 9

過去 30 日: 36

今までの合計 1,434