メインコンテンツにスキップ

Porter-Cable 382 Dust Seal | Dust Break Replacement

必要な工具と部品

  1. Porter-Cable 382 Dust Seal | Dust Break Replacement, Sander Pad: 手順 1、 1の画像 1
    • When changing the sander pad, be sure to rotate the sander upside down so the pad and three highlighted screws are facing upward toward you.

    • Once the sander is upside down begin by removing your old sandpaper.

    • Once the sandpaper is removed locate the three screws on your sander pad.

  2. Porter-Cable 382 Dust Seal | Dust Break Replacement: 手順 2、 1の画像 1
    • Remove the three, (star bolt) screws with the iFixit screw driver with a "T20" head. Be sure to hold the pad of the sander as it will rotate as you try to loosen the screws.

    • Once the screws are removed pull upward toward you and the sander pad will come apart from the device.

  3. Porter-Cable 382 Dust Seal | Dust Break Replacement, Dust Seal/ Break: 手順 3、 1の画像 1
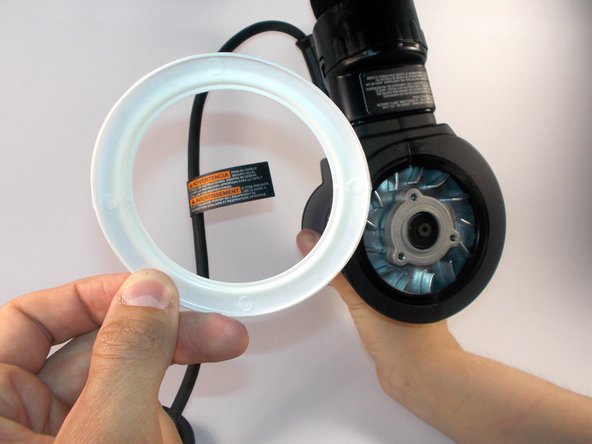
    • Once the sander pad is removed and the sander is exposed locate the white plastic like circular piece surrounding the outside of the sander.

  4. Porter-Cable 382 Dust Seal | Dust Break Replacement: 手順 4、 2の画像 1 Porter-Cable 382 Dust Seal | Dust Break Replacement: 手順 4、 2の画像 2
    • Once you have located the plastic white ring pull up its outer edge as shown. The lip on the inside will bend and be freed from its secured placement.

    • To reassemble, you will have to line up the protruding square with the key slot as shown otherwise your dust seal/ brake will not go back in.

終わりに

To reassemble your device, follow these instructions in reverse order.

作成者

2人の作成者と共同で作成されました。

jpfoxracing9

メンバー登録日: 03/11/16

189 ポイント

1ガイドが承認済み

チーム

UMass Dartmouth, Team 8-7, Botvin Spring 2016 UMass Dartmouth, Team 8-7, Botvin Spring 2016人のメンバー

UMASSD-BOTVIN-S16S8G7

3 メンバー

4のガイドは作成済み

0 件のコメント

コメントを追加

統計データ:

過去 24時間: 0

過去 7 日: 3

過去 30 日: 10

今までの合計 546