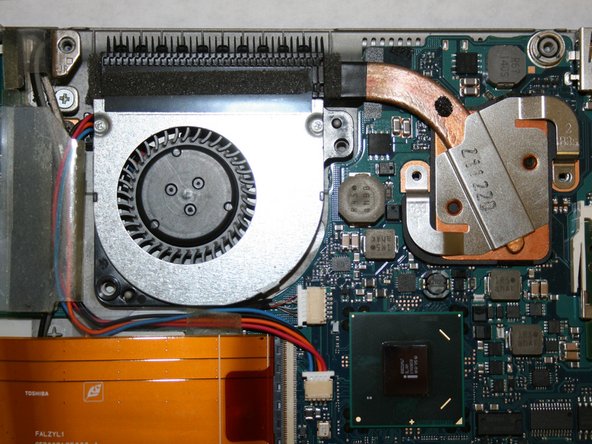
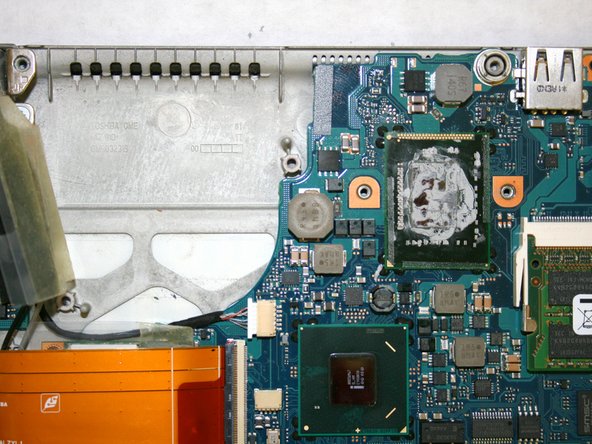
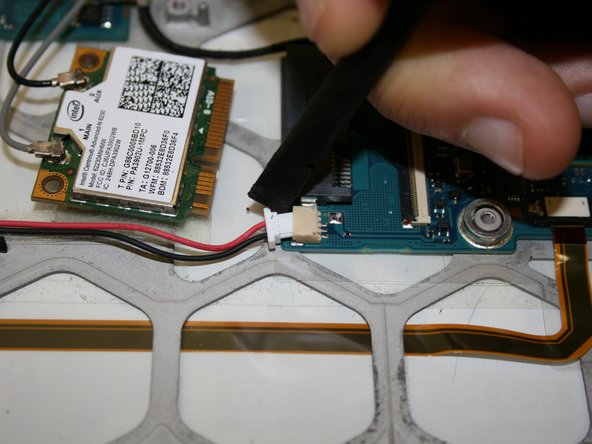
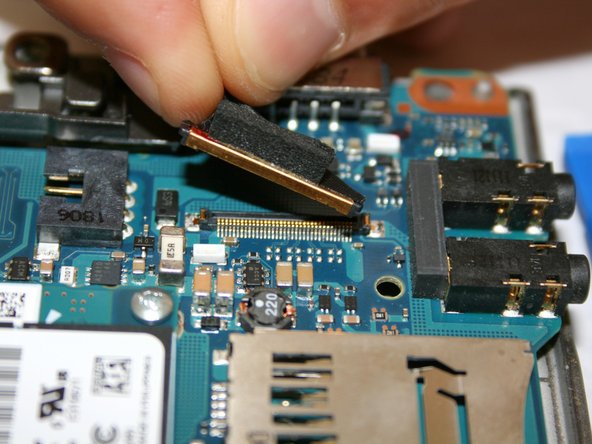
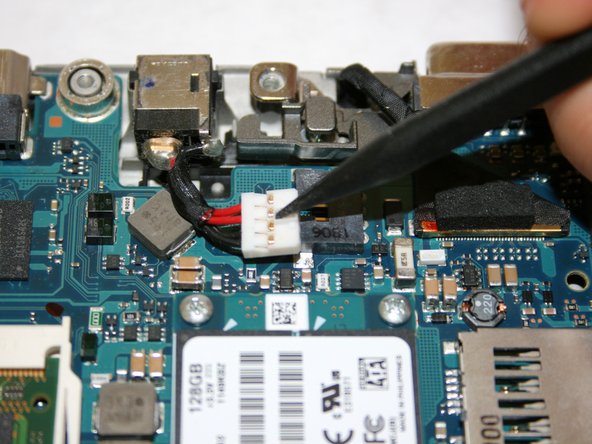
メインコンテンツにスキップ

Portege Z830-S8302 Motherboard Replacement

必要な工具と部品

  1. Portege Z830-S8302 Motherboard Replacement, Battery: 手順 1、 3の画像 1 Portege Z830-S8302 Motherboard Replacement, Battery: 手順 1、 3の画像 2 Portege Z830-S8302 Motherboard Replacement, Battery: 手順 1、 3の画像 3
    • Flip the laptop over with the screen facing down to reveal the bottom panel.

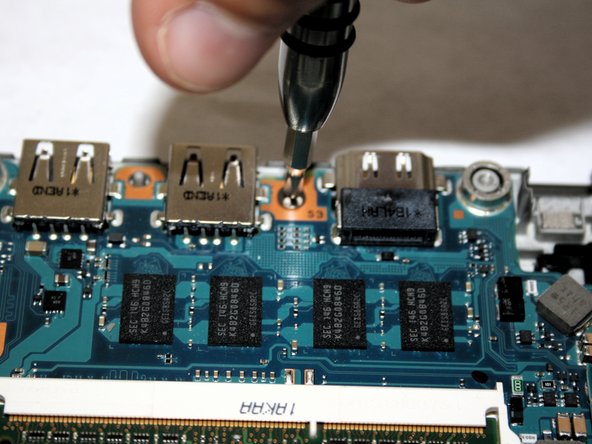
    • Unscrew each of the highlighted screws with a Phillips #0 screwdriver.

  2. Portege Z830-S8302 Motherboard Replacement: 手順 2、 3の画像 1 Portege Z830-S8302 Motherboard Replacement: 手順 2、 3の画像 2 Portege Z830-S8302 Motherboard Replacement: 手順 2、 3の画像 3
    • Use a metal spudger to remove fitting and reveal the screw.

    • Use a screwdriver with a Torx T7 bit to remove the screw.

  3. Portege Z830-S8302 Motherboard Replacement: 手順 3、 3の画像 1 Portege Z830-S8302 Motherboard Replacement: 手順 3、 3の画像 2 Portege Z830-S8302 Motherboard Replacement: 手順 3、 3の画像 3
    • The SD Card slot is on the top right corner of the device near the headphone jacks.

    • Depress the fake SD Card and release.

    • Pull the fake SD Card out and remove it completely from the slot, as this will help in the removal of the backplate.

  4. Portege Z830-S8302 Motherboard Replacement: 手順 4、 2の画像 1 Portege Z830-S8302 Motherboard Replacement: 手順 4、 2の画像 2
    • Lift the back plate starting at the opposing edge to the SD card. Lift from left to right and continue lifting this plate at this angle until it's free from the laptop.

    • Once the backplate is completely off, this will reveal the inside components of the device.

    • Upon reassembly of the back cover, make sure to line up the two headphone jacks on the upper right corner with the holes in the back cover or else it will not seat fully.

  5. Portege Z830-S8302 Motherboard Replacement: 手順 5、 3の画像 1 Portege Z830-S8302 Motherboard Replacement: 手順 5、 3の画像 2 Portege Z830-S8302 Motherboard Replacement: 手順 5、 3の画像 3
    • The battery is the black rectangular piece in the bottom half of the device.

    • Remove six 5mm screws holding down the battery using a Phillips PH0 screwdriver.

    • Lift the battery and separate from its place holder.

    • Do not fully remove the battery as it is still connected by the connector in the top right corner.

  6. Portege Z830-S8302 Motherboard Replacement: 手順 6、 3の画像 1 Portege Z830-S8302 Motherboard Replacement: 手順 6、 3の画像 2 Portege Z830-S8302 Motherboard Replacement: 手順 6、 3の画像 3
    • Using the nylon spudger, disconnect the white plugin.

    • Once the wire has been disconnected you may remove the battery.

  7. Portege Z830-S8302 Motherboard Replacement, Motherboard: 手順 7、 2の画像 1 Portege Z830-S8302 Motherboard Replacement, Motherboard: 手順 7、 2の画像 2
    • Use a Phillips #0 screwdriver to remove the two 5 mm screws securing the fan.

  8. Portege Z830-S8302 Motherboard Replacement: 手順 8、 2の画像 1 Portege Z830-S8302 Motherboard Replacement: 手順 8、 2の画像 2
    • Use a nylon spudger to push the wire (red/blue) plug out of its motherboard port.

    • Be gentle and avoid applying extensive pressure when removing this plug, as the motherboard is fragile.

  9. Portege Z830-S8302 Motherboard Replacement: 手順 9、 2の画像 1 Portege Z830-S8302 Motherboard Replacement: 手順 9、 2の画像 2
    • Lift up the wire and peel back the clear protective tape.

    • Split the black protective foam inside the tape in half to uncover the wires.

    • This step should free the wires free from their connections.

  10. Portege Z830-S8302 Motherboard Replacement: 手順 10、 2の画像 1 Portege Z830-S8302 Motherboard Replacement: 手順 10、 2の画像 2
    • Remove the fan from the motherboard.

  11. Portege Z830-S8302 Motherboard Replacement: 手順 11、 3の画像 1 Portege Z830-S8302 Motherboard Replacement: 手順 11、 3の画像 2 Portege Z830-S8302 Motherboard Replacement: 手順 11、 3の画像 3
    • Remove the two 4 mm screws from the heat sink with a Phillips #0 screwdriver.

    • Lift and remove the heat sink from the CPU.

    • Reapply thermal paste to the heat sink upon reassembly.

  12. Portege Z830-S8302 Motherboard Replacement: 手順 12、 3の画像 1 Portege Z830-S8302 Motherboard Replacement: 手順 12、 3の画像 2 Portege Z830-S8302 Motherboard Replacement: 手順 12、 3の画像 3
    • Use a plastic opening tool to flip up the black lock-bar on the ZIF connector, then disconnect the large orange ribbon cable.

  13. Portege Z830-S8302 Motherboard Replacement: 手順 13、 2の画像 1 Portege Z830-S8302 Motherboard Replacement: 手順 13、 2の画像 2
    • Remove the clear tape covering the Wi-Fi card.

  14. Portege Z830-S8302 Motherboard Replacement: 手順 14、 3の画像 1 Portege Z830-S8302 Motherboard Replacement: 手順 14、 3の画像 2 Portege Z830-S8302 Motherboard Replacement: 手順 14、 3の画像 3
    • Remove the single 3 mm screw from the Wi-Fi card with a Phillips #0 screwdriver.

    • Disconnect the Wi-Fi module from the motherboard by gently pulling the card out of its port.

  15. Portege Z830-S8302 Motherboard Replacement: 手順 15、 3の画像 1 Portege Z830-S8302 Motherboard Replacement: 手順 15、 3の画像 2 Portege Z830-S8302 Motherboard Replacement: 手順 15、 3の画像 3
    • Disconnect the plug from the motherboard using a Plastic Opening Tool.

  16. Portege Z830-S8302 Motherboard Replacement: 手順 16、 3の画像 1 Portege Z830-S8302 Motherboard Replacement: 手順 16、 3の画像 2 Portege Z830-S8302 Motherboard Replacement: 手順 16、 3の画像 3
    • Remove the CMOS battery connector cable (red/black) from its port using a Nylon Spudger Tool.

  17. Portege Z830-S8302 Motherboard Replacement: 手順 17、 3の画像 1 Portege Z830-S8302 Motherboard Replacement: 手順 17、 3の画像 2 Portege Z830-S8302 Motherboard Replacement: 手順 17、 3の画像 3
    • Disconnect the cable from the motherboard using a Nylon Spudger.

  18. Portege Z830-S8302 Motherboard Replacement: 手順 18、 3の画像 1 Portege Z830-S8302 Motherboard Replacement: 手順 18、 3の画像 2 Portege Z830-S8302 Motherboard Replacement: 手順 18、 3の画像 3
    • Use a Plastic Opening Tool to disconnect the black ribbon from the motherboard.

  19. Portege Z830-S8302 Motherboard Replacement: 手順 19、 3の画像 1 Portege Z830-S8302 Motherboard Replacement: 手順 19、 3の画像 2 Portege Z830-S8302 Motherboard Replacement: 手順 19、 3の画像 3
    • Disconnect the white cable from the port by using a Plastic Opening Tool.

  20. Portege Z830-S8302 Motherboard Replacement: 手順 20、 3の画像 1 Portege Z830-S8302 Motherboard Replacement: 手順 20、 3の画像 2 Portege Z830-S8302 Motherboard Replacement: 手順 20、 3の画像 3
    • Remove the screen data cable from its connector.

  21. Portege Z830-S8302 Motherboard Replacement: 手順 21、 3の画像 1 Portege Z830-S8302 Motherboard Replacement: 手順 21、 3の画像 2 Portege Z830-S8302 Motherboard Replacement: 手順 21、 3の画像 3
    • Disconnect the DC power plug connector located at the top of the motherboard using a nylon spudger.

    • Gently remove the whole piece from its holder and place it aside.

  22. Portege Z830-S8302 Motherboard Replacement: 手順 22、 3の画像 1 Portege Z830-S8302 Motherboard Replacement: 手順 22、 3の画像 2 Portege Z830-S8302 Motherboard Replacement: 手順 22、 3の画像 3
    • Remove one Phillips #0 3 mm screw from the top of the motherboard.

    • Gently lift the motherboard out of its casing to fully remove it from the device.

終わりに

To reassemble your device, follow these instructions in reverse order.

ある他の人がこのガイドを完成しました。

作成者

8人の作成者と共同で作成されました。

Tanner Krygier

メンバー登録日: 09/17/18

913 ポイント

5のガイドは作成済み

チーム

Washington State, Team S2-G7, Hope Fall 2018 Washington State, Team S2-G7, Hope Fall 2018人のメンバー

WSU-HOPE-F18S2G7

3 メンバー

15のガイドは作成済み

コメント 1 件

Seems to work with Z930 and Z935 as well. Nice guide!

RobloxRed - 返信

コメントを追加

統計データ:

過去 24時間: 0

過去 7 日: 1

過去 30 日: 16

今までの合計 1,121