メインコンテンツにスキップ

Polaroid Cube Video Quality Switch Replacement

必要な工具と部品

  1. Polaroid Cube Video Quality Switch Replacement, Battery: 手順 1、 1の画像 1
    • Remove the SD card cover by twisting it using a Plastic Opening Tool

  2. Polaroid Cube Video Quality Switch Replacement: 手順 2、 1の画像 1
    • Use the Plastic Opening tool to pry off and remove the front cover.

  3. Polaroid Cube Video Quality Switch Replacement: 手順 3、 1の画像 1
    • Using a J00 head screwdriver, remove the four 3.27mm screws from the front of the camera near the lens.

  4. Polaroid Cube Video Quality Switch Replacement: 手順 4、 2の画像 1 Polaroid Cube Video Quality Switch Replacement: 手順 4、 2の画像 2
    • Use the Plastic Opening Tool to pry open the shell of the camera.

    • There are four latches, one at each corner, that you will need to detach.

  5. Polaroid Cube Video Quality Switch Replacement: 手順 5、 1の画像 1
    • Remove shell from top and bottom of camera.

  6. Polaroid Cube Video Quality Switch Replacement: 手順 6、 1の画像 1
    • Remove the rubber seal wrapped around the camera.

  7. Polaroid Cube Video Quality Switch Replacement: 手順 7、 2の画像 1 Polaroid Cube Video Quality Switch Replacement: 手順 7、 2の画像 2
    • Remove the tape wrapped around the battery.

  8. Polaroid Cube Video Quality Switch Replacement: 手順 8、 3の画像 1 Polaroid Cube Video Quality Switch Replacement: 手順 8、 3の画像 2 Polaroid Cube Video Quality Switch Replacement: 手順 8、 3の画像 3
    • Using a J00 head screwdriver, unscrew the four 3.46mm screws from the top and bottom circuit board.

  9. Polaroid Cube Video Quality Switch Replacement: 手順 9、 2の画像 1 Polaroid Cube Video Quality Switch Replacement: 手順 9、 2の画像 2
    • Use the plastic opening tool to remove the circuit board that the battery is connected to.

  10. Polaroid Cube Video Quality Switch Replacement: 手順 10、 1の画像 1
    • Gently remove the battery pin connector from the circuit board.

  11. Polaroid Cube Video Quality Switch Replacement, Video Quality Switch: 手順 11、 2の画像 1 Polaroid Cube Video Quality Switch Replacement, Video Quality Switch: 手順 11、 2の画像 2
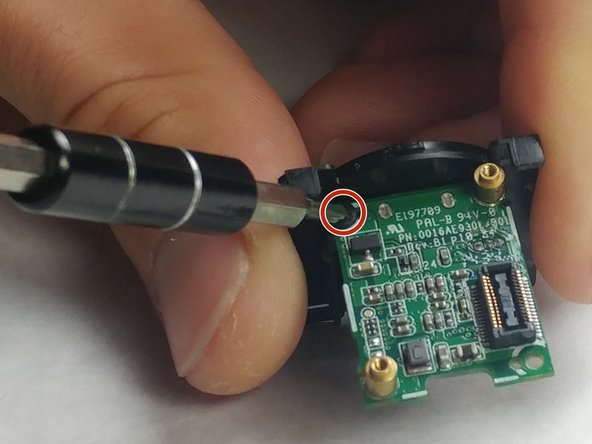
    • Using a J00 head screwdriver, unscrew the 3.46mm screw that connects the top circuit board to the video quality switch board.

  12. Polaroid Cube Video Quality Switch Replacement: 手順 12、 1の画像 1
    • Remove the circuit board.

  13. Polaroid Cube Video Quality Switch Replacement: 手順 13、 2の画像 1 Polaroid Cube Video Quality Switch Replacement: 手順 13、 2の画像 2
    • Using a J00 head screwdriver, unscrew the two 3.46mm screws connecting the video quality switch to the case.

    • Remove and replace the broken video quality switch.

終わりに

To reassemble your device, follow these instructions in reverse order.

4 の人々がこのガイドを完成させました。

作成者

3人の作成者と共同で作成されました。

Grant Baldwin

メンバー登録日: 09/29/16

685 ポイント

2のガイドは作成済み

チーム

IUPUI, Team 3-2, Harley Fall 2016 IUPUI, Team 3-2, Harley Fall 2016人のメンバー

IUPUI-HARLEY-F16S3G2

4 メンバー

3のガイドは作成済み

0 件のコメント

コメントを追加

統計データ:

過去 24時間: 0

過去 7 日: 0

過去 30 日: 6

今までの合計 857