メインコンテンツにスキップ

Plum Optimax 10 Speaker Replacement

必要な工具と部品

  1. Plum Optimax 10 Speaker Replacement, Back Cover: 手順 1、 2の画像 1 Plum Optimax 10 Speaker Replacement, Back Cover: 手順 1、 2の画像 2
    • Use a metal spudger to remove the small panels to the immediate left and right side of the camera.

  2. Plum Optimax 10 Speaker Replacement: 手順 2、 2の画像 1 Plum Optimax 10 Speaker Replacement: 手順 2、 2の画像 2
    • Use a metal spudger to begin lifting the back cover.

    • Then, create leverage and gently remove the entire cover.

  3. Plum Optimax 10 Speaker Replacement, Motherboard: 手順 3、 2の画像 1 Plum Optimax 10 Speaker Replacement, Motherboard: 手順 3、 2の画像 2
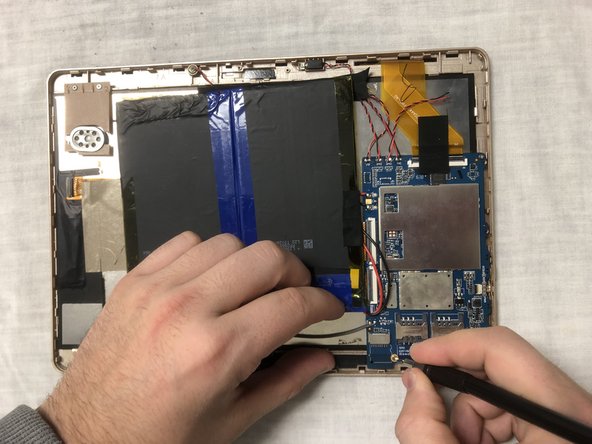
    • Use flathead screwdriver tool to remove the three 2.5 mm screws shown in the photo. Two screws are located at the base of the motherboard and there is one screw located at the top.

  4. Plum Optimax 10 Speaker Replacement: 手順 4、 1の画像 1
    • Once screws are removed, carefully remove the motherboard out of encasing.

  5. Plum Optimax 10 Speaker Replacement, Battery: 手順 5、 2の画像 1 Plum Optimax 10 Speaker Replacement, Battery: 手順 5、 2の画像 2
    • Remove electrical tape placed around the battery to keep it in place.

  6. Plum Optimax 10 Speaker Replacement: 手順 6、 2の画像 1 Plum Optimax 10 Speaker Replacement: 手順 6、 2の画像 2
    • Use the spudger as a wedge underneath the battery to assist in removal.

    • Once loosened with the spudger, the battery is now removed from the device.

    • Always use a plastic opening tool or nylon spudger to remove batteries. Metal tools can puncture a battery and potentially catch on fire.

  7. Plum Optimax 10 Speaker Replacement, Speaker: 手順 7、 1の画像 1
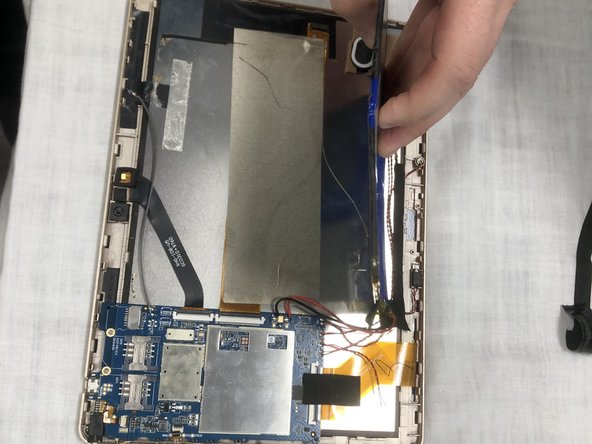
    • On the top side of the motherboard (where the black and red wires are), locate and look closely for the "SPK1" lead.

    • Use a pair of wire cutters to clip the wires from the "SPK1" lead.

    • The speaker will pop out of its place and use the wire cutters to remove the wires connected from "SPK1" from the speaker.

  8. Plum Optimax 10 Speaker Replacement: 手順 8、 1の画像 1
    • Once the wires are located, strip 2mm of the rubbing casing around the top of the wire for the black and red wires. You need to see the aluminum inside.

    • You only need enough aluminum exposed so that you can solder the wires to its respective contact plate.

  9. Plum Optimax 10 Speaker Replacement: 手順 9、 1の画像 1
    • Using a soldering iron, gently make a connection with solder to the red wire while also making contact to the right contact plate of the speaker.

    • Repeat for black wire for contact plate on speaker.

  10. Plum Optimax 10 Speaker Replacement: 手順 10、 1の画像 1
    • Strip the bottom of the black and red wire by the motherboard.

    • Make a connection with the solder to the board where the black wire is on the negative contact.

    • Connect the red wire to the positive contact on the motherboard and solder.

    • Be careful not to hold the solder iron on the board for an extended period of time. The board could be burned and permanently damaged.

終わりに

To reassemble your device, follow these instructions in reverse order.

作成者

3人の作成者と共同で作成されました。

Michael Glennon Graupner

メンバー登録日: 10/03/19

289 ポイント

3のガイドは作成済み

0 件のコメント

コメントを追加

統計データ:

過去 24時間: 0

過去 7 日: 0

過去 30 日: 0

今までの合計 77