メインコンテンツにスキップ

PlayStation Vita Right Button Board Replacement

必要な工具と部品

  1. PlayStation Vita Right Button Board Replacement, Case Separation: 手順 1、 2の画像 1 PlayStation Vita Right Button Board Replacement, Case Separation: 手順 1、 2の画像 2
    • Power off and remove the memory card.

    • Using a Phillips #00 screwdriver, remove the four 6.4mm screws on the back casing.

  2. PlayStation Vita Right Button Board Replacement: 手順 2、 3の画像 1 PlayStation Vita Right Button Board Replacement: 手順 2、 3の画像 2 PlayStation Vita Right Button Board Replacement: 手順 2、 3の画像 3
    • Using your fingernail or a spudger, pry open the accessory port cover on the top of the device.

    • Using a Phillips #00 screwdriver, remove the two 5.4mm screws hidden beneath the accessory port cover.

  3. PlayStation Vita Right Button Board Replacement: 手順 3、 2の画像 1 PlayStation Vita Right Button Board Replacement: 手順 3、 2の画像 2
    • Remove the two 5.4mm Phillips #00 screws on the bottom of the device near the charging port.

  4. PlayStation Vita Right Button Board Replacement: 手順 4、 3の画像 1 PlayStation Vita Right Button Board Replacement: 手順 4、 3の画像 2 PlayStation Vita Right Button Board Replacement: 手順 4、 3の画像 3
    • Beginning at the sides of the device, use a plastic opening tool to separate the front and rear cases.

    • Continue working your way around the device gently prying it open.

    • There are still wires holding the front and rear cases together. You may damage the connections if you yank the cases completely apart.

  5. PlayStation Vita Right Button Board Replacement: 手順 5、 2の画像 1 PlayStation Vita Right Button Board Replacement: 手順 5、 2の画像 2
    • Gently separate the two cases, minding the battery and the touch screen controller connectors holding the two cases together.

  6. PlayStation Vita Right Button Board Replacement: 手順 6、 1の画像 1
    • Using a spudger, free the touch screen controller flex cable by gently prying up the connection.

  7. PlayStation Vita Right Button Board Replacement: 手順 7、 1の画像 1
    • Free the battery cable by gently prying up on the connection with a spudger.

  8. PlayStation Vita Right Button Board Replacement: 手順 8、 1の画像 1
    • Separate the front and rear cases.

  9. PlayStation Vita Right Button Board Replacement, Wireless Card: 手順 9、 3の画像 1 PlayStation Vita Right Button Board Replacement, Wireless Card: 手順 9、 3の画像 2 PlayStation Vita Right Button Board Replacement, Wireless Card: 手順 9、 3の画像 3
    • Using the pointy end of the spudger, disconnect the three antenna cable connectors on top of the wireless card.

    • Deroute the antenna cables so that they are out of the wireless card casing. Rest the wires out of the way.

  10. PlayStation Vita Right Button Board Replacement: 手順 10、 2の画像 1 PlayStation Vita Right Button Board Replacement: 手順 10、 2の画像 2
    • Hook the spudger beneath the tab on the wireless card casing and release the tab.

    • Peel up and remove the wireless card casing.

  11. PlayStation Vita Right Button Board Replacement: 手順 11、 2の画像 1 PlayStation Vita Right Button Board Replacement: 手順 11、 2の画像 2
    • Remove the two 4.4mm Phillips #00 screws on the wireless card.

    • The wireless card will naturally pop out at an angle.

    • Pull out the wireless card.

  12. PlayStation Vita Right Button Board Replacement, Right Shoulder Button: 手順 12、 3の画像 1 PlayStation Vita Right Button Board Replacement, Right Shoulder Button: 手順 12、 3の画像 2 PlayStation Vita Right Button Board Replacement, Right Shoulder Button: 手順 12、 3の画像 3
    • Pry up the right shoulder button casing with a spudger and set it aside.

  13. PlayStation Vita Right Button Board Replacement: 手順 13、 1の画像 1
    • Remove the translucent, plastic right shoulder button cover.

  14. PlayStation Vita Right Button Board Replacement: 手順 14、 3の画像 1 PlayStation Vita Right Button Board Replacement: 手順 14、 3の画像 2 PlayStation Vita Right Button Board Replacement: 手順 14、 3の画像 3
    • Release the right shoulder button flex cable socket by using a spudger to gently pry open the tab.

    • Using tweezers, slide the flex cable out of the socket.

  15. PlayStation Vita Right Button Board Replacement: 手順 15、 2の画像 1 PlayStation Vita Right Button Board Replacement: 手順 15、 2の画像 2
    • Using a spudger, gently peel up the right shoulder button from the light adhesive connecting it to casing.

  16. PlayStation Vita Right Button Board Replacement, Right Button Board: 手順 16、 2の画像 1 PlayStation Vita Right Button Board Replacement, Right Button Board: 手順 16、 2の画像 2
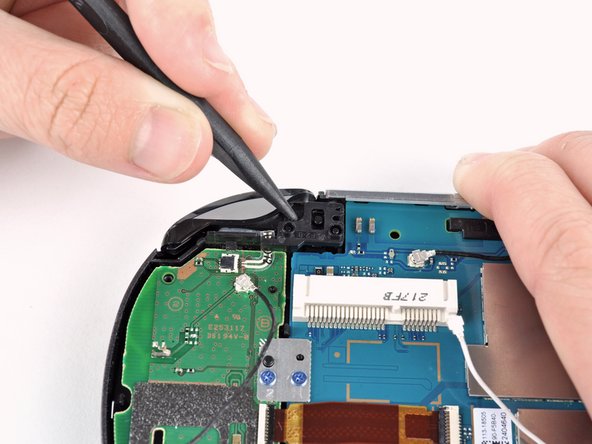
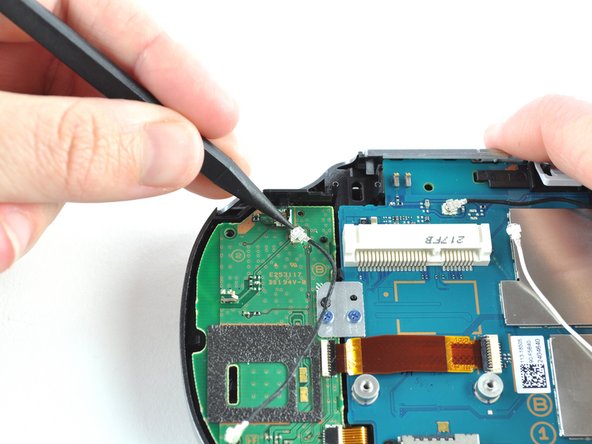
    • Using the pointy end of a spudger, detach the antenna cable on the right button board.

    • Remove the antenna cable.

  17. PlayStation Vita Right Button Board Replacement: 手順 17、 2の画像 1 PlayStation Vita Right Button Board Replacement: 手順 17、 2の画像 2
    • Using a spudger, pry up and release the ZIF socket on the right button board.

    • Gently pull the flex cable out of the socket. Rest the flex cable out of the way.

  18. PlayStation Vita Right Button Board Replacement: 手順 18、 3の画像 1 PlayStation Vita Right Button Board Replacement: 手順 18、 3の画像 2 PlayStation Vita Right Button Board Replacement: 手順 18、 3の画像 3
    • Release the tab on the small flex cable socket by prying up the tab with a spudger.

    • Using tweezers, gently pull the flex cable out of the socket. Rest the flex cable out of the way.

  19. PlayStation Vita Right Button Board Replacement: 手順 19、 3の画像 1 PlayStation Vita Right Button Board Replacement: 手順 19、 3の画像 2 PlayStation Vita Right Button Board Replacement: 手順 19、 3の画像 3
    • Remove the two 5.0mm Phillips #00 screws from the metal bracket securing the right button board to the motherboard.

    • Remove the metal bracket, using a spudger as necessary to lift it out.

  20. PlayStation Vita Right Button Board Replacement: 手順 20、 3の画像 1 PlayStation Vita Right Button Board Replacement: 手順 20、 3の画像 2 PlayStation Vita Right Button Board Replacement: 手順 20、 3の画像 3
    • Use a spudger to free the right button board by prying up from the bottom right corner of board.

    • Gently lift the right button board out.

終わりに

To reassemble your device, follow these instructions in reverse order.

ある他の人がこのガイドを完成しました。

作成者

3人の作成者と共同で作成されました。

Brittany McCrigler

メンバー登録日: 03/05/12

89,011 ポイント

131のガイドは作成済み

チーム

iFixit iFixit人のメンバー

Staff

135 メンバー

16,732のガイドは作成済み

0 件のコメント

コメントを追加

統計データ:

過去 24時間: 2

過去 7 日: 13

過去 30 日: 64

今までの合計 7,791