メインコンテンツにスキップ

PlayStation Vitaの右ショルダーボタンの交換

必要な工具と部品

  1. PlayStation Vitaの右ショルダーボタンの交換, ケースの分解: 手順 1、 2の画像 1 PlayStation Vitaの右ショルダーボタンの交換, ケースの分解: 手順 1、 2の画像 2
    • Vitaの電源を切り、メモリーカードを取り出します。

    • #00プラスドライバーを使って、背面ケースに留めてある6.4mmネジを4本外します。

  2. PlayStation Vitaの右ショルダーボタンの交換: 手順 2、 3の画像 1 PlayStation Vitaの右ショルダーボタンの交換: 手順 2、 3の画像 2 PlayStation Vitaの右ショルダーボタンの交換: 手順 2、 3の画像 3
    • 指の爪やスパッジャーを使って、デバイス上部のアクセサリポートカバーをこじ開けます。

    • #00プラスドライバーを使って、アクセサリポートカバーの下に隠れていた5.4mmネジを2本外します。

  3. PlayStation Vitaの右ショルダーボタンの交換: 手順 3、 2の画像 1 PlayStation Vitaの右ショルダーボタンの交換: 手順 3、 2の画像 2
    • デバイス底面の充電ポートのそばに留めてある5.4mm#00プラスネジを2本外します。

  4. PlayStation Vitaの右ショルダーボタンの交換: 手順 4、 3の画像 1 PlayStation Vitaの右ショルダーボタンの交換: 手順 4、 3の画像 2 PlayStation Vitaの右ショルダーボタンの交換: 手順 4、 3の画像 3
    • フロントケースとリアケースに分離するため、プラスチック製開口ツールをデバイスの側面から差し込みます。

    • 続いてデバイスの周囲で開口ツールを動かし、慎重にデバイスを開口します。

    • フロントケースとリアケースの両方に接続しているワイヤーがまだあります。ケースを強く引っ張って完全に離すと接続部にダメージを与える恐れがありますのでご注意ください。

  5. PlayStation Vitaの右ショルダーボタンの交換: 手順 5、 2の画像 1 PlayStation Vitaの右ショルダーボタンの交換: 手順 5、 2の画像 2
    • バッテリーと、2つのケースを同時に固定しているタッチスクリーンコントロールコネクタに注意しながら、2つのケースを慎重に取り外します。

    One of the shoulder buttons fell out when I was doing this step, along with the piece holding it in place. They go back in just fine when reassembling but make sure that they are oriented properly, of course.

    klung - 返信

  6. PlayStation Vitaの右ショルダーボタンの交換: 手順 6、 1の画像 1
    • スパッジャーを使って、接続部を慎重に持ち上げてタッチスクリーンコントローラのフレックスケーブルの接続を外します。

  7. PlayStation Vitaの右ショルダーボタンの交換: 手順 7、 1の画像 1
    • スパッジャーで接続部分を慎重に持ち上げて、バッテリーケーブルを外します。

    Any idea what type of pcb header is on the board for the battery? I have a motherboard with a broken header but I cant source a replacement

    Jimbo Jones - 返信

    This is where I screwed up so I recommend extra caution for other newbies. Only the black part is supposed to come off. Don't be an idiot like me and pry off too much...

    ylimakiminna - 返信

    Yea I messed up there too. Is there a way to fix it?

    Alethia Henry - 返信

    This component was far more stubborn than the screen connector when it came to removal. I opted for a smaller tool than the spudger (small flat-head) and managed to disconnect it after determining the best bit size for the job. Screwdriver is metal, obviously, so being gentle helps to avoid damaging anything.

    klung - 返信

    broke the white part

    Benaya Miller - 返信

  8. PlayStation Vitaの右ショルダーボタンの交換: 手順 8、 1の画像 1
    • フロントケースとリアケースを取り外します。

  9. PlayStation Vitaの右ショルダーボタンの交換, ワイヤレスカード: 手順 9、 3の画像 1 PlayStation Vitaの右ショルダーボタンの交換, ワイヤレスカード: 手順 9、 3の画像 2 PlayStation Vitaの右ショルダーボタンの交換, ワイヤレスカード: 手順 9、 3の画像 3
    • スパッジャーの先端を使って、ワイヤレスカード上部に付いている3つのアンテナケーブルコネクタの接続を外します。

    • アンテナケーブルを巻き戻します。するとワイヤレスカードケースから取り出せます。一旦、ワイヤを脇に置いてください。

    Step 9-11 only apply to the 3G version of the PS Vita.

    logicj83 - 返信

    Hello, I have the PCH-2001 model of the PS vita and the right analog stick went out. I ordered a replacement and the stick is slightly larger than the original. The original has a black rectangle on the back, the new version has the star version, which is what you have on this website as the replacement part. Any help here would be much appreciated. Thanks.

    Ben Ragains - 返信

    Can I install a WiFi motherboard on a 3g ps vita model 1100?

    fmind11 - 返信

  10. PlayStation Vitaの右ショルダーボタンの交換: 手順 10、 2の画像 1 PlayStation Vitaの右ショルダーボタンの交換: 手順 10、 2の画像 2
    • ワイヤレスカードケース上のタブの下からスパッジャーを引っ掛けて、タブをリリースします。

    • ワイヤレスカードケースをめくり上げて外します。

  11. PlayStation Vitaの右ショルダーボタンの交換: 手順 11、 2の画像 1 PlayStation Vitaの右ショルダーボタンの交換: 手順 11、 2の画像 2
    • ワイヤレスカード上に留められた4.4mm#00プラスネジを2本外します。

    • ワイヤレスカードは、斜めに自然に飛び出すはずです。

    • ワイヤレスカードを引き抜きます。

    My screwdriver does not want to unscrew those. They won’t turn at all.

    Rei - 返信

    My screwdriver does not want to unscrew those. They won’t turn at all.

    Got the same, used PH #0 and grabbed wireless card casing with fingers from the top to release pressure on screen and avoid (possibly) breaking it.

    Yuriy Zhyromskiy - 返信

    Some PS vita models seem to use a T2 screw instead of a PH#00. I’ve encountered this twice now.

    kaosjr kaosjr - 返信

    I replaced de wifi card but is still difficult to connect to wifi. Could it be the wifi antenna? which cable model is it?

    Fernando Diaz - 返信

    3G Vita 1000.

    I found that the PH00 head wouldn't actually fit in to the screw correctly. A PH000 fit but was still requiring a bit more force than seemed necessary. Also the card did not pop up when the screws were released and that's because Sony used a tacky pad under the card so needed a bit of prying up to get the angle.

    Paul Pimm - 返信

  12. PlayStation Vitaの右ショルダーボタンの交換, 右ショルダーボタン: 手順 12、 3の画像 1 PlayStation Vitaの右ショルダーボタンの交換, 右ショルダーボタン: 手順 12、 3の画像 2 PlayStation Vitaの右ショルダーボタンの交換, 右ショルダーボタン: 手順 12、 3の画像 3
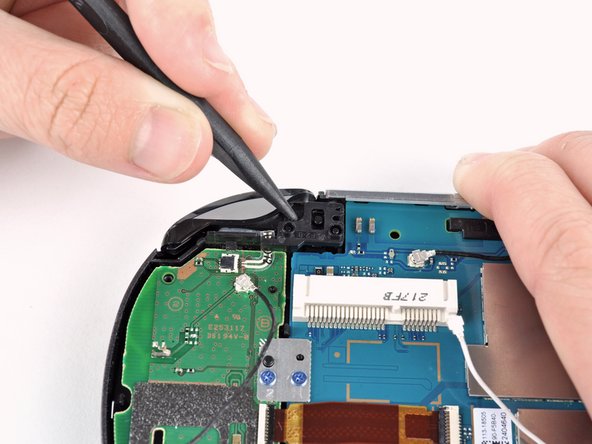
    • スパッジャーで右側ショルダーボタンのケースを持ち上げて、脇に置きます。

    Is this really necessary?

    fmind11 - 返信

  13. PlayStation Vitaの右ショルダーボタンの交換: 手順 13、 1の画像 1
    • 半透明のプラスチック製の右側ショルダーボタンカバーを取り外します。

  14. PlayStation Vitaの右ショルダーボタンの交換: 手順 14、 3の画像 1 PlayStation Vitaの右ショルダーボタンの交換: 手順 14、 3の画像 2 PlayStation Vitaの右ショルダーボタンの交換: 手順 14、 3の画像 3
    • 右側ショルダーボタンのフレックスケーブルのソケットを、スパッジャーを使って、タブから慎重に持ち上げて、外してください。

    • ピンセットを使って、フレックスケーブルをソケットからスライドして外します。

  15. PlayStation Vitaの右ショルダーボタンの交換: 手順 15、 2の画像 1 PlayStation Vitaの右ショルダーボタンの交換: 手順 15、 2の画像 2
    • スパッジャーを使って、ケースに軽く接着剤で固定されている右側ショルダーのボタンを丁寧に剥がして取り出します。

終わりに

デバイスを再度組み立てるには、この説明書の逆の順番で組み立ててください。

4 の人々がこのガイドを完成させました。

以下の翻訳者の皆さんにお礼を申し上げます:

en jp

100%

これらの翻訳者の方々は世界を修理する私たちのサポートをしてくれています。 あなたも貢献してみませんか?
翻訳を始める ›

作成者

3人の作成者と共同で作成されました。

Brittany McCrigler

メンバー登録日: 03/05/12

89,011 ポイント

131のガイドは作成済み

チーム

iFixit iFixit人のメンバー

Staff

135 メンバー

16,732のガイドは作成済み

5 件のコメント

Is anyone else experiencing the button getting stuck?

Fantasy Silicone Statuettes - 返信

Yes, mine is getting stuck, too. I am hoping a replacement will solve this problem.

aseelau -

Has anyone experienced or seen an issue where the trigger button acts with the same functionality as the home button. Every time I press the right trigger it exits to home or exits the game.....help please

Daniel - 返信

I followed this guide on my 3G vita in order to replace the right trigger cable. I found it wasn't necessary to remove the wireless card if anyone else finds that part tricky.

Caleb - 返信

i am replacing the whole front part of my vita do to screen cracked and wont turn on, when i put the button back on, how would i do so to make it stick back on? would i need to reglue it or will it stick back on by itself?

Saul Calderon - 返信

コメントを追加

統計データ:

過去 24時間: 5

過去 7 日: 21

過去 30 日: 116

今までの合計 14,414