メインコンテンツにスキップ

PlayStation 4 Slim Bottom Cover Replacement

必要な工具と部品

  1. PlayStation 4 Slim Bottom Cover Replacement, Bottom Cover: 手順 1、 3の画像 1 PlayStation 4 Slim Bottom Cover Replacement, Bottom Cover: 手順 1、 3の画像 2 PlayStation 4 Slim Bottom Cover Replacement, Bottom Cover: 手順 1、 3の画像 3
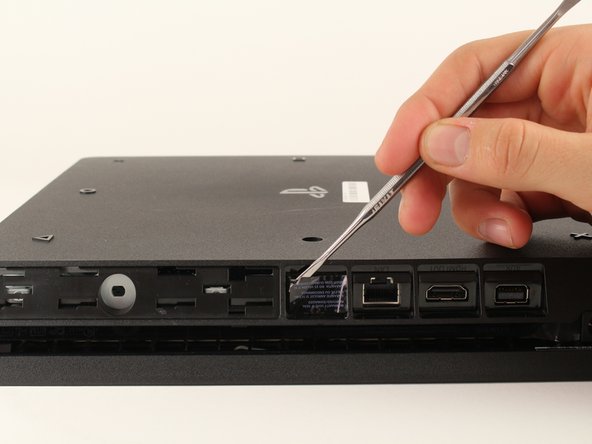
    • Locate the plastic warranty sticker next to the three ports on the side of the console.

    • Remove the warranty sticker by peeling it off with any kind of spudger.

    • Removing the warranty sticker will NOT cause your warranty to be null and void.

  2. PlayStation 4 Slim Bottom Cover Replacement: 手順 2、 2の画像 1 PlayStation 4 Slim Bottom Cover Replacement: 手順 2、 2の画像 2
    • Unscrew and remove the 5.0mm screw that was behind the sticker using a T8 security Torx screwdriver with a counter-clockwise motion.

  3. PlayStation 4 Slim Bottom Cover Replacement: 手順 3、 3の画像 1 PlayStation 4 Slim Bottom Cover Replacement: 手順 3、 3の画像 2 PlayStation 4 Slim Bottom Cover Replacement: 手順 3、 3の画像 3
    • Place the Playstation 4 Slim upside down with the side of the screw you just removed facing you.

    • Pry up on the two corners that are facing you with your fingers.

    • This may take a bit of force to open up and you will hear a fairly loud click when the bottom cover detaches.

    • Remove the bottom cover by sliding it towards the back corners and lifting up.

終わりに

To reassemble your device, follow these instructions in reverse order.

36 の人々がこのガイドを完成させました。

作成者

7人の作成者と共同で作成されました。

Hernan Rodriguez

メンバー登録日: 01/24/18

3,642 ポイント

3のガイドは作成済み

チーム

Cal Poly, Team S19-G4, Livingston Winter 2018 Cal Poly, Team S19-G4, Livingston Winter 2018人のメンバー

CPSU-LIVINGSTON-W18S19G4

4 メンバー

35のガイドは作成済み

2 件のコメント

Wo kann man die Bodenplatte kaufen?

Emre Kaman - 返信

コメントを追加

統計データ:

過去 24時間: 13

過去 7 日: 128

過去 30 日: 754

今までの合計 47,512