メインコンテンツにスキップ

PlayStation 4 Pro Power Supply Unit Replacement

必要な工具と部品

  1. PlayStation 4 Pro Power Supply Unit Replacement, Power Supply Unit: 手順 1、 3の画像 1 PlayStation 4 Pro Power Supply Unit Replacement, Power Supply Unit: 手順 1、 3の画像 2 PlayStation 4 Pro Power Supply Unit Replacement, Power Supply Unit: 手順 1、 3の画像 3
    • Begin by flipping the console upside down.

    • Use your finger to pull and snap off the plastic cover over the hard drive.

  2. PlayStation 4 Pro Power Supply Unit Replacement: 手順 2、 2の画像 1 PlayStation 4 Pro Power Supply Unit Replacement: 手順 2、 2の画像 2
    • Use a screwdriver to remove the single Phillips #0 screw securing the hard drive caddy.

    • Pull the hard drive caddy straight out.

  3. PlayStation 4 Pro Power Supply Unit Replacement: 手順 3、 3の画像 1 PlayStation 4 Pro Power Supply Unit Replacement: 手順 3、 3の画像 2 PlayStation 4 Pro Power Supply Unit Replacement: 手順 3、 3の画像 3
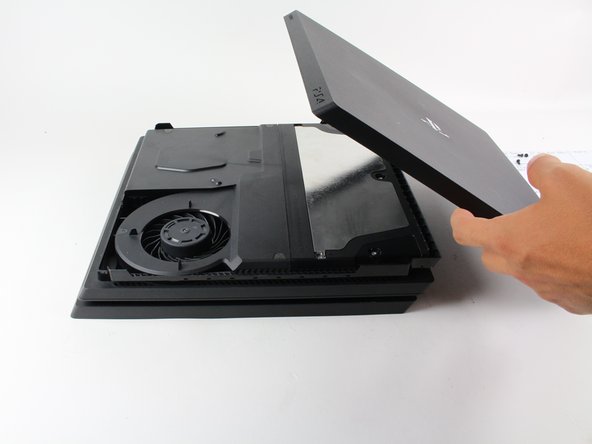
    • Flip the console right side up.

    • Grip the two corners located at the front of the device.

    • Pull upwards until a loud click is heard.

    • This may require a lot of force, so do not be afraid to get a little rough with your console.

    • After both corners detach, slide the cover backwards and lift off.

  4. PlayStation 4 Pro Power Supply Unit Replacement: 手順 4、 3の画像 1 PlayStation 4 Pro Power Supply Unit Replacement: 手順 4、 3の画像 2 PlayStation 4 Pro Power Supply Unit Replacement: 手順 4、 3の画像 3
    • Use a T8 Torx Security screwdriver to remove the five screws.

    • Two 31mm screws.

    • Three 10mm screws.

    • Remove the metal plate.

  5. PlayStation 4 Pro Power Supply Unit Replacement: 手順 5、 3の画像 1 PlayStation 4 Pro Power Supply Unit Replacement: 手順 5、 3の画像 2 PlayStation 4 Pro Power Supply Unit Replacement: 手順 5、 3の画像 3
    • Flip the console to its back once again.

    • Use a T8 Torx Security screwdriver to remove the three black 7mm screws in the back panel.

    • Remove the bottom cover in the same way as the top cover. Grip on both sides, pull up until a click is heard and slide off.

  6. PlayStation 4 Pro Power Supply Unit Replacement: 手順 6、 2の画像 1 PlayStation 4 Pro Power Supply Unit Replacement: 手順 6、 2の画像 2
    • Use a T8 Torx security screwdriver to remove the two 10mm silver screws from the metal plate.

  7. PlayStation 4 Pro Power Supply Unit Replacement: 手順 7、 3の画像 1 PlayStation 4 Pro Power Supply Unit Replacement: 手順 7、 3の画像 2 PlayStation 4 Pro Power Supply Unit Replacement: 手順 7、 3の画像 3
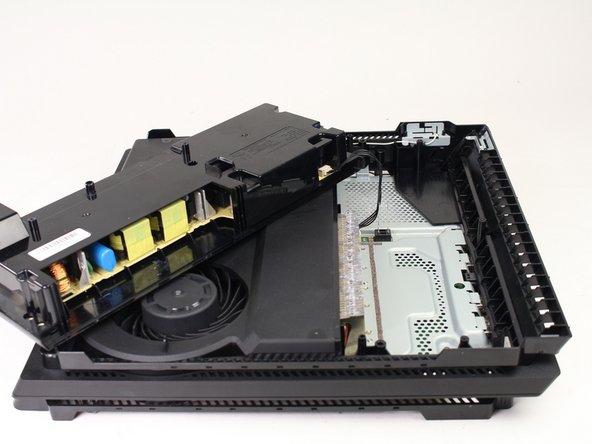
    • Flip the console over to continue working on the top side.

    • Place fingers underneath edge of power supply unit on both sides and pull straight up.

    • Be careful not to pull too far, the assembly is still connected at one point.

    • Grip the connector behind the power supply and pull straight out.

終わりに

To reassemble your device, follow these instructions in reverse order.

36 の人々がこのガイドを完成させました。

作成者

8人の作成者と共同で作成されました。

Ashlyn Chow

メンバー登録日: 04/25/17

3,345 ポイント

1ガイドが承認済み

チーム

Cal Poly, Team S21-G5, Livingston Spring 2017 Cal Poly, Team S21-G5, Livingston Spring 2017人のメンバー

CPSU-LIVINGSTON-S17S21G5

4 メンバー

49のガイドは作成済み

10 件のコメント

Thank you soooo much for helping me save my ps4 pro guys! At the moment I love you like no one before! ;D

Fayce D D - 返信

Can you go further in your tear-down and show us how to open up the power supply without breaking the PSU plastic case? Thanks. ^_^

Matt - 返信

I bought a PS4 power supply CR 300 and my PS4 has an FR 300 power supply will they interchange

joseph fish - 返信

My PlayStation Pro has a power supply FR 300 and the power supply I bought was a CR 300 power supply will they interchange

joseph fish - 返信

Hola como saber que tipo de fuente vida mi ps4 pro modelo 7215b

Tomás Javier - 返信

コメントを追加

統計データ:

過去 24時間: 13

過去 7 日: 149

過去 30 日: 731

今までの合計 91,185