メインコンテンツにスキップ

PlayStation 4 サーマルペーストの交換

必要な工具と部品

ビデオの概要

  1. PlayStation 4 サーマルペーストの交換, ハードドライブのカバーを外す: 手順 1、 3の画像 1 PlayStation 4 サーマルペーストの交換, ハードドライブのカバーを外す: 手順 1、 3の画像 2 PlayStation 4 サーマルペーストの交換, ハードドライブのカバーを外す: 手順 1、 3の画像 3
    • トップカバーの隙間に沿って両手でPS4を握ります。

    • トップカバーの光沢がある側を親指で外れるまでスライドさせます。

    • トップカバーの光沢のある側を持ち上げ、PS4から取り外します。

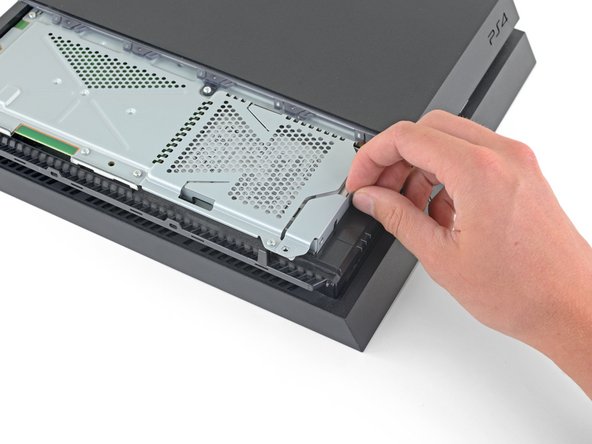
  2. PlayStation 4 サーマルペーストの交換, ハードドライブブラケットを外す: 手順 2、 2の画像 1 PlayStation 4 サーマルペーストの交換, ハードドライブブラケットを外す: 手順 2、 2の画像 2
    • プラスドライバーを使って、ハードドライブブラケットを本体に固定している長さ6.5mmのプラスねじを取り外します。

  3. PlayStation 4 サーマルペーストの交換, ハードドライブブラケットを外す: 手順 3、 3の画像 1 PlayStation 4 サーマルペーストの交換, ハードドライブブラケットを外す: 手順 3、 3の画像 2 PlayStation 4 サーマルペーストの交換, ハードドライブブラケットを外す: 手順 3、 3の画像 3
    • 本体からハードドライブブラケットを引き出します。

    • ハードドライブを落とさないように注意してください。内部の部品は壊れやすく、突然の衝撃で破損する可能性があります。

  4. PlayStation 4 サーマルペーストの交換, PS4を裏返します: 手順 4、 1の画像 1
    • PS4を裏返しにして、裏面を上に配置します。

  5. PlayStation 4 サーマルペーストの交換, 不正開封防止(ボイド)ステッカーを剥がします: 手順 5、 3の画像 1 PlayStation 4 サーマルペーストの交換, 不正開封防止(ボイド)ステッカーを剥がします: 手順 5、 3の画像 2 PlayStation 4 サーマルペーストの交換, 不正開封防止(ボイド)ステッカーを剥がします: 手順 5、 3の画像 3
    • ピンセットを使って、PS4裏側の中央に貼られた2箇所のステッカーを剥がして、その下に留められたネジを露出させます。

  6. PlayStation 4 サーマルペーストの交換, プラスチックのネジカバーを外します: 手順 6、 2の画像 1 PlayStation 4 サーマルペーストの交換, プラスチックのネジカバーを外します: 手順 6、 2の画像 2
    • ピンセットを使って、両側のコーナーにあるプラスチックのネジカバーを取り出して、さらに2本のケース用ネジを露出させます。

  7. PlayStation 4 サーマルペーストの交換, リアケースネジを外します: 手順 7、 2の画像 1 PlayStation 4 サーマルペーストの交換, リアケースネジを外します: 手順 7、 2の画像 2
    • PS4の背面に留められた、7.2mmトルクス安全ネジを4本外します。

  8. PlayStation 4 サーマルペーストの交換, 下部ケースを外します: 手順 8、 2の画像 1 PlayStation 4 サーマルペーストの交換, 下部ケースを外します: 手順 8、 2の画像 2
    • 親指を使って下部ケースを持ち上げて、PS4から外します。

    • 下部ケースはプラスチックケースで固定されています。下部ケースを外すには、相当な力が必要です。

  9. PlayStation 4 サーマルペーストの交換: 手順 9、 2の画像 1 PlayStation 4 サーマルペーストの交換: 手順 9、 2の画像 2
    • ピンセットを使って、電源ケーブルをまっすぐ抜いて、マザーボードから電源ユニットの接続を外します。 

    • コネクタが引っかかると感じたら、スパッジャーでコネクターを軽くこじ開けてください。

  10. PlayStation 4 サーマルペーストの交換, 電源ユニットを取り出します: 手順 10、 2の画像 1 PlayStation 4 サーマルペーストの交換, 電源ユニットを取り出します: 手順 10、 2の画像 2
    • 9.7mmトルクスセキュリティネジを外します。

    • 4.1mmとブラケットを外します。

  11. PlayStation 4 サーマルペーストの交換: 手順 11、 3の画像 1 PlayStation 4 サーマルペーストの交換: 手順 11、 3の画像 2 PlayStation 4 サーマルペーストの交換: 手順 11、 3の画像 3
    • PS4から電源ユニットをまっすぐ持ち上げます。

    • 電源ユニットは左側の突起内にしっかりと固定されています。取り外すには、何度も試行する必要があります。

    • 再組み立ての際には、左側の突起内に収まっていることを確認してから、電源を押し込んでください。

  12. PlayStation 4 サーマルペーストの交換, Wi-Fiアンテナを取り出します: 手順 12、 2の画像 1 PlayStation 4 サーマルペーストの交換, Wi-Fiアンテナを取り出します: 手順 12、 2の画像 2
    • スパッジャーの先端を使って、マザーボードからアンテナケーブルの接続を外します。

  13. PlayStation 4 サーマルペーストの交換: 手順 13、 3の画像 1 PlayStation 4 サーマルペーストの交換: 手順 13、 3の画像 2 PlayStation 4 サーマルペーストの交換: 手順 13、 3の画像 3
    • ピンセットもしくは指先でアンテナケーブルを摘み、ケーブル配線から取り出します。

  14. PlayStation 4 サーマルペーストの交換: 手順 14、 3の画像 1 PlayStation 4 サーマルペーストの交換: 手順 14、 3の画像 2 PlayStation 4 サーマルペーストの交換: 手順 14、 3の画像 3
    • ピンセットもしくは指先で、アンテナケーブルの配線を光学ドライブケーブルの下から外します。

  15. PlayStation 4 サーマルペーストの交換: 手順 15、 2の画像 1 PlayStation 4 サーマルペーストの交換: 手順 15、 2の画像 2
    • アンテナに留められた、9.7mmトルクスセキュリティネジを1本外します。

  16. PlayStation 4 サーマルペーストの交換: 手順 16、 2の画像 1 PlayStation 4 サーマルペーストの交換: 手順 16、 2の画像 2
    • Wi-Fiアンテナを取り出します。

  17. PlayStation 4 サーマルペーストの交換, 光学ドライブの接続を外します: 手順 17、 3の画像 1 PlayStation 4 サーマルペーストの交換, 光学ドライブの接続を外します: 手順 17、 3の画像 2 PlayStation 4 サーマルペーストの交換, 光学ドライブの接続を外します: 手順 17、 3の画像 3
    • 指先で光学ドライブ上部にある、リボンケーブルのメタルリリースレバーを押さえます。

    • 指先もしくはピンセットを使って、リボンケーブルに付いた黒いタブを引っ張って、ケーブルの接続を外します。

    • リボンケーブルを差し込んで、再装着する際は、メタルレバーを押す必要はありません。完全に装着した時、クリック音が聞こえます。

  18. PlayStation 4 サーマルペーストの交換: 手順 18、 3の画像 1 PlayStation 4 サーマルペーストの交換: 手順 18、 3の画像 2 PlayStation 4 サーマルペーストの交換: 手順 18、 3の画像 3
    • 指先を使って、マザーボードに接続されたリボンケーブル用のメタルリリースレバーを押さえます。

    • 指先もしくはピンセットで、黒いタブを引っ張ってリボンケーブルの接続を外します。

    • 再組み立てのために、リボンケーブルを置いておきます。

    • リボンケーブルを再装着する際に、メタルレバーを押さえる必要はありません。完全に装着したら、カチッと音がします。

  19. PlayStation 4 サーマルペーストの交換: 手順 19、 2の画像 1 PlayStation 4 サーマルペーストの交換: 手順 19、 2の画像 2
    • 指やピンセットを使って、マザーボードから光学ドライブのケーブルを外します。

  20. PlayStation 4 サーマルペーストの交換: 手順 20、 3の画像 1 PlayStation 4 サーマルペーストの交換: 手順 20、 3の画像 2 PlayStation 4 サーマルペーストの交換: 手順 20、 3の画像 3
    • 指やピンセットを使って、光学ドライブのケーブルを固定しているケーブルガイドから外します。

  21. PlayStation 4 サーマルペーストの交換, 光学ドライブを取り出します: 手順 21、 2の画像 1 PlayStation 4 サーマルペーストの交換, 光学ドライブを取り出します: 手順 21、 2の画像 2
    • 光学ドライブを固定している4本のネジを外します。

    • 9.7mmトルクスネジー3本

    • 6.2mmプラスネジー1本

  22. PlayStation 4 サーマルペーストの交換: 手順 22、 2の画像 1 PlayStation 4 サーマルペーストの交換: 手順 22、 2の画像 2
    • PS4本体から、光学ドライブをまっすぐ持ち上げて外します。

  23. PlayStation 4 サーマルペーストの交換, 上部ケースを取り出します: 手順 23、 2の画像 1 PlayStation 4 サーマルペーストの交換, 上部ケースを取り出します: 手順 23、 2の画像 2
    • 上部ケースを固定している、9.7mmトルクスネジを2本外します。

  24. PlayStation 4 サーマルペーストの交換: 手順 24、 3の画像 1 PlayStation 4 サーマルペーストの交換: 手順 24、 3の画像 2 PlayStation 4 サーマルペーストの交換: 手順 24、 3の画像 3
    • 上部ケースを持ち上げて、PS4から取り出します。

    • 上部ケースはフロント側のプラスチックタブで固定されています。これを外すには、かなりの力が必要です。

  25. PlayStation 4 サーマルペーストの交換, 上部EMIシールドを取り出します: 手順 25、 2の画像 1 PlayStation 4 サーマルペーストの交換, 上部EMIシールドを取り出します: 手順 25、 2の画像 2
    • 上部EMIシールドを固定している9.7mmトルクスネジを12本外します。

  26. PlayStation 4 サーマルペーストの交換: 手順 26、 3の画像 1 PlayStation 4 サーマルペーストの交換: 手順 26、 3の画像 2 PlayStation 4 サーマルペーストの交換: 手順 26、 3の画像 3
    • この手順は、プレッシャープレートの正しい外し方を説明します。

    • 15.6 mmプラスネジを2本外します。

    • プレッシャープレートのネジを半回転ずつ回して徐々に外していきます。

    • プレッシャープレートの圧力を均等にするために、2つのネジを交互に外していきます。

    • 片側のネジを一度に緩めた後に、もう片側のネジを緩めてしまうと、プロセッサーが破損する恐れがあります。

  27. PlayStation 4 サーマルペーストの交換: 手順 27、 1の画像 1
    • プレッシャープレッシャーを取り出します。

  28. PlayStation 4 サーマルペーストの交換: 手順 28、 2の画像 1 PlayStation 4 サーマルペーストの交換: 手順 28、 2の画像 2
    • EMIシールドを取り出します。

  29. PlayStation 4 サーマルペーストの交換, マザーボードを取り出します: 手順 29、 2の画像 1 PlayStation 4 サーマルペーストの交換, マザーボードを取り出します: 手順 29、 2の画像 2
    • ファンケーブルとマザーボードの間にスパッジャーの先端を差し込みます。

    • スパッジャーをひねりながらコネクタをまっすぐ持ち上げて、マザーボードから接続を外します。

  30. PlayStation 4 サーマルペーストの交換: 手順 30、 2の画像 1 PlayStation 4 サーマルペーストの交換: 手順 30、 2の画像 2
    • PS4のフロント側にあるマザーボードの端を摘みます。

    • USBポートがPS4ケースから外れるまで、マザーボードを持ち上げます。

  31. PlayStation 4 サーマルペーストの交換: 手順 31、 3の画像 1 PlayStation 4 サーマルペーストの交換: 手順 31、 3の画像 2 PlayStation 4 サーマルペーストの交換: 手順 31、 3の画像 3
    • PS4からマザーボードを持ち上げて取り出します。

    • このガイドを使って、マザーボードをインストールする前に、プロセッサに放熱グリスを塗布してください。

    • 新しい放熱グリスを装着し忘れたり、正しく塗布できない場合、PS4がオーバーヒートする可能性があります。ご注意ください。

    • マザーボードのI/O側を先に差し込み、その後反対側を入れます。

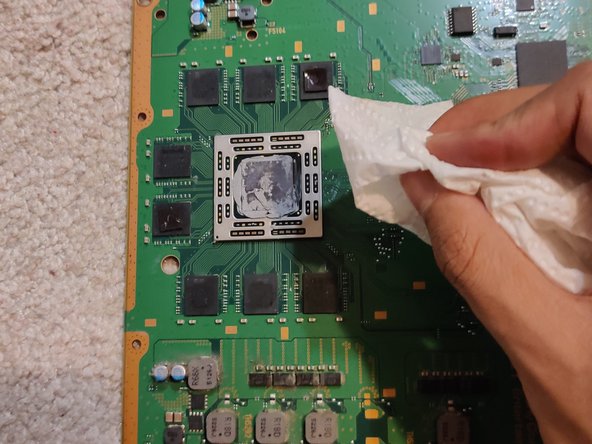
  32. PlayStation 4 サーマルペーストの交換, サーマルペースト: 手順 32、 3の画像 1 PlayStation 4 サーマルペーストの交換, サーマルペースト: 手順 32、 3の画像 2 PlayStation 4 サーマルペーストの交換, サーマルペースト: 手順 32、 3の画像 3
    • ティッシュペーパーを使って、既存のサーマルペーストを除去します。新しいグリスを手に取り、コンポーネントの中央部に少量を塗布します。

    • 両側のサーマルペーストを綺麗に除去しているか確認してください。

終わりに

このデバイスを再組み立てするには、インストラクションを逆の順番に従って作業を進めてください。

144 の人々がこのガイドを完成させました。

以下の翻訳者の皆さんにお礼を申し上げます:

en jp

100%

Midori Doiさんは世界中で修理する私たちを助けてくれています! あなたも貢献してみませんか?
翻訳を始める ›

作成者

7人の作成者と共同で作成されました。

Alyasin Hossain

メンバー登録日: 10/29/20

2,202 ポイント

1ガイドが承認済み

チーム

CSU Los Angeles, Team S12-G1, Harris Fall 2020 CSU Los Angeles, Team S12-G1, Harris Fall 2020人のメンバー

CSULA-HARRIS-F20S12G1

1 メンバー

9のガイドは作成済み

17 件のコメント

Se me hizo muy buena la guia, sobre todo para no cometer algun error al trabajar en la reparacion, mi PS4 dejo de zumbar el abanico con el cambio de pasta termica y una limpieza general de polvo y pelusa.

Luis Garcia - 返信

I followed this guide step by step, including reversing the order to reassemble my unit.

My PS4 is still loud but not as loud as before, so everything worked well. Thanks for the writeup!

Billy P - 返信

i might be a little late to reply, but i followed this guide aswell BUT after step 31 i took off the extra metal/aluminum plating and saw thats that where the bulk of the dust will be built up, this plate has the vents that go to the cooling fan on the opposite side of it after unscrewing. i bought an original ps4, it sounded like a jet engine taking off. The vents on my ps4 were just about covered in dust almost no airflow was able to get through, after taking the extra step and taking off the 1 extra panel (the one under the motherboard in step 31) and of course after replacing the thermal paste made my ps4 run and sound like new again,

Beau -

I cannot reply to Beau's comment.

I also went the extra step of taking that metal shroud that sits below the motherboard (step 31).

I completely recommend this step. It is then you can get access to the heat sink fins to remove dust. There are 3 screws that hold this metal shroud in place. Easy to get out.

Then you can also now remove the fan - 2 screws for this.

You can then clean out the accumulated dust from the fan and in the plastic shroud, that the fan sits in.

Holy cow, dust factory. :)

Cary B - 返信

Great guide! Just did it and now the console is dead silent during gameplay of super demanding games <3 I just went a step further after Step 31 and removed the plate there so that I could properly take care of the heat sink underneath that had lots of dust on it.

Sébastien Morin - 返信

コメントを追加

統計データ:

過去 24時間: 155

過去 7 日: 1,060

過去 30 日: 5,411

今までの合計 233,323