はじめに
前モデルの発売から7年後、ついにSony PlayStationのボックスに4というモデル番号が加えられました。iFixitと一緒にこのモデルを分解し、何か変わったのかーそしてこのモデルは待ちわびた甲斐があったのか確認しましょう。北米で発売された一番最初のPS4モデルを、私たちの素晴らしいパートナーであるChipworksと一緒にタッグを組んで分解しました。
最新の分解や修理に関する新情報をFacebookやInstagramやTwitter 、Twitter 日本語版 をフォローして見つけてください!
必要な工具と部品
ビデオの概要
-
-
これからPlayStation 4を分解します。これから見つけるパーツは次のものが含まれるでしょう。
-
8-core AMD “Jaguar” x86-64 CPU
-
1.84 TFLOPS, AMD Radeon Graphics Core Next Engine GPU
-
8 GB GDDR5 RAM
-
500 GBの取り外しが可能でアップグレード可能なハードドライブストレージ
-
802.11 b/g/n Wireless とBluetooth 2.1
-
USB 3.0 + Ethernet 10/100/1000
-
1.21 ギガワットフラックスキャパシタ (OK、これは期待できませんが、私たちが欲しいと願っているものです:映画”Back to the Future”より)
-
-
-
7年間もお腹の中で育んだハードウェアとはどれぐらい発達しているのでしょうか?早く中身を見たい衝動を抑えきれず、一瞬で箱を開きます。まず最初に出てくるものです。
-
箱の中に入ったまた別の箱、はい次へ。
-
PS4コンソール(もしPS4が入っていなかったらSony Computer Entertainmentに連絡しましょう)
-
DualShock 4コントローラー
-
電源ケーブル
-
HDMIケーブル
-
Micro-USBケーブル
-
マイク、スイッチ、シャツクリップ付きのMonoヘッドホンセット
"Jim Washburn was an ex college coach. He'll get on his motorcycle and drive from Coast to Coast; and if he sees anybody that looks like a big, explosive pass rusher, he'll pull over and work em out."
- The Coach (Jon Gruden)
-
-
-
この輝きを放つ新しいモノリスを箱から出しましょう。これを何かに接続したくなるはずです。背後に回ると、Sonyが付けたポートの数々が確認できます。
-
電源インレット
-
光デジタル音声出力
-
HDMI
-
イーサネット
-
外付けデバイスに接続するための独自の補助ポート:例えばPlayStation Cameraなど
-
-
-
嬉しいニュースです。SonyはPS4のハードドライブを通して、人々にパワーを与えてくれました。ハードドライブはユーザーが自分で交換できます。
-
iFixitでは、より大きな容量のディスクドライブや高速SSDを好む勇敢なゲーマー用に、交換ガイドを公開しています。あなたとハードドライブの間にあるのはプラスチックカバーと数本のネジだけです。
I don't have the part that you can open and there is no where else I could possibly open it
If it aint raining, boy, we aint training!
Am I right?
How bout it?
You ever wing-finger a wench? Buffalo style?
-
-
-
HGST(Western Digitalの子会社)製 5400 RPM, 500 GB, SATA IIハードドライブが取り出せます。
-
キャディーを固定しているのは、たった1本のネジで、ドライブの交換はとても簡単です。
-
ハードドライブがユーザー自身で交換できるだけでなく、スタンダード2.5インチ SATAドライブが搭載されています。ということは、9.5 mm以内の薄さで、160GB以上の容量という基準をクリアできれば、一般販売されているドライブでストレージをアップグレードできます。
Yes you can use external storage now
-
-
-
デバイス内部へ侵入して、邪悪なボイドステッカーを剥がします。このような修理を妨害する脅威にはびくともしません。この働き者のピンセットの力を借りて、すぐさま‥
-
…ところが、すぐに行く手を遮ぎるトルクスセキュリティネジに遭遇します。
-
幸いなことに、iFixitのPro Techドライバーセットがあれば、このような特殊ネジでも大した問題とはなりません。
-
このネジが接着剤で固定されていないので胸を撫で下ろしますが、このような小さな罠はリペアビリティスコアを考慮する際に無視できない要素となります。
Some PS4 models only have the two (stickered) screws I. The middle the top cover is held in place with 2 tor’s screws under the black plastic hard drive section cover that is removed near the start
You cracked the code
-
-
-
-
-
喜んで仕様書マニュアルの注記を無視して、次に進みます…
-
…そして4本のT9セキュリティトルクスネジを外すと、Sony PlayStation 第4世代モデルのカバーを取り出せます。この美しい内側を眺める瞬間を待ちわびていたので、眼光が開きます。
-
ところが、何も中身は見れません。ぎっしりと詰め込まれた旧モデル内部のノスタルジアだけが蘇ります。どれぐらい変わったのか見てみましょう。
-
-
-
Sonyの設計部課長 鳳 康宏(おおとりやすひろ)氏が行ったPlayStation 4分解で、カスタムデザインの直径85mmの遠心ファンを紹介しています。
-
”吸い込みと吐出しの方向と風量と風圧、これら全てのデザインはPS4限定です。"
-
この独占ビデオの中で、私たちの Chief Information ArchitectであるMiroslav Djuric氏がこのエンジニアリングの素晴らしさを語っています。
Me said it! It must be true!
ME must be short for “Mechanical Engineer” , and they never do anything wrong. :)
S.N.A.
-
-
-
今、カナダでリモート分解をしているiFixitエンジニアがネジを外して、固定ブラケットを取り出します…
-
…そして、Chipworksの仲間と一緒に、言うまでもなくカナダならではのスナックをつまみながら、この分解時間を満喫しているようです。
OMG Tim Hortons!!! its been ages since i lay my hand on those...
Where's the birthday cake timbits?
Yes! Extra large triple triple w/ 3 shots please.
-
-
-
ブラケットとドーナツがなくなったら、電源装置を取り外します。
-
電源ケーブルに仕掛けられた罠はありません。この電源装置は、ケースのすぐ内側に搭載されています。
-
電源装置は100-240ボルトのACアダプタです。つまり、世界中どこでもPS4を脇に置いて楽しめるということです。ただしパワーソケットアダプタをお忘れなく。
I see it's multi voltage, but did your unit state on the back of the box and the unit that it was 100 ~ 240v ?
My unit only says 120v, both on the box and the unit,it could be that you had a multi voltage unit ?
Please confirm for us all
Many thanks
Mine say 110V. I also wonder if it is dual voltage.
Donald -
Can you specify the exact model you tested in the video and what it says on the rear side regarding the voltage?
I bought in US aunt model CUH-1001A. On the rear plastic it says "120V" only, and the manual for CUH-1001A specifications show also only 120V.
Is this the same model as you tested? If so, I can assume my internal power supply is 100-240V as in the tested unit, if not - I may have to buy a voltage transformer.
OK, I trusted some older posts and plugged it in - happy to say its working great and nothing burned :)
I have a model CUH-1001A saying at the bottom "120V 2.1A 60Hz". Working in Israel on 220V.
Amir -
mine says 100V 50-60Hz I bought it in Japan and using in Eurtope with 220/240VAC
I was really afraid before trying. but i managed thanks to this guide and willing to play!! it works! it is definetly dual voltage.
they make them all the same, i guess in the same factory in China, i am wondering about the Blue ray disc, does the region depends by the hardware or the software (i guess the second one) i haven't tryed it yet
Hey i just picked up a PS4 from Japan...CUH 1201B Model...on the box and on the back of the PS4 its clearly written 110v....pls can someone confirm if its actually duel voltage.....these posts are about 3 years old...has someone tried it recently......
hooghan -
i wouldn"t chance there are adapters out there this website is too concerned with canadian doughnuts to tell you there are two screws to remove the psu casing i don't think these people care if you are trying to affect you own repair rather than give money to sony or if your trying to cleanout your fan and any other area that is dust related which isn't fair to the (if you will "not so knowledgeable") consumers of the this website.
and to be clear by not so knowledgeable i meant people who aren't electronically inclined
-
-
-
まだこの電源装置の分解は終わっていません。この宝箱の内側を調べましょう。
-
電源用の筐体を取り外すと、期待に応えて、大型キャパシタが登場します。私たちが願っていたフラックスキャパシタは見当たりません。
-
ということは、私たちはこの電源装置でタイムトラベルはできないようです。がっかり…
-
さて電源装置を取り外せたら、ここでようやくファンのクリーニングができます。
There is a danger here for little kids. The 120 volts for the power supply readily accessible to little fingers and probing metal tools like coins in the hands of children. The ends of the 120 volt wires are exposed, the fuse is exposed which will have 120 volts on BOTH ends, the capacitor is right there along with the power transistors, choke coils, and other things, including the transformers. Many will still be live even when the console is turned off.
Make sure to unplug the unit when there are small children around and the unit is sitting out in the open. When using it, put the back away from where little fingers can reach it.
That’s one of the reasons so many products are “not user serviceable”. So you can’t fail against them when you electrocute yourself. ;)
John clark - 返信
I just got a little shock
jordan28.r - 返信
Name part ? That
-
-
-
Blu-ray/DVDドライブが次の分解ターゲットです。数本のネジで固定されています。
-
残念ながら、PS4はPS3やPS2、PS1と後方互換性がありません。このドライブは、古いディスクを回転させることはできますが、読み込みはできません。
-
奇妙なことに、ミュージック用CDも聴けません。これは単純にソフトウェアの制限によるもので、Sonyは今後のアップデートで修復予定です。
-
しかし今の世の中、光学ドライブが必要な人はいるのでしょうか?クラウドゲームの時代に突入しているからです。
-
事実、Sonyは2014年にGaikai( PlayStation Now)テックによるゲームストリームサービスを開始する予定で、PS4で、PS3のゲームを楽しめます。これはSonyサーバーによる”クラウド”内で処理されて、実際のゲームコンソールにビデオ送信されます。
-
素晴らしいシステムです。しかし、私たちが一番気になっていることを確認しましょう。クラッシュ・バンディクーのゲームはできるのでしょうか?
-
-
-
ここからは光学ドライブとボードの話に移ります。
-
光学ドライブボード上にいくつかチップを発見しました。
-
Renesas SCEI RJ832841FP1
-
Mitsumi 312 3536A
-
ROHM BD7763EFV 325 T62モータードライバIC
-
STM8ED 9H A07 VG MYS 331Z
So, is the optical drive a custom-built Sony component, or is it manufactured by someone else?
Mylar connectors. I HATE Mylar connectors. They are flimsy, prone to popping out when shipping, and are great for making intermittent contacts. The are also hard to get in and out without destroying the wire, the socket, or both.
The pins in my optical drive were not aligned so I disassembled it and realigned the pins. However when I put it back together my ps4 is not turning on
I lost my screws to fix my
Laser deck do you know what screws I need?
Hey there, this is a teardown, not a repair guide, check out our repair manual for the PlayStation 4. You can follow the optical drive replacement guide to find out more about the screws you need, step 12 has the screws I think you're talking about.
I cant seem to find anyway to get new rollers from
-
-
-
マザーボードにアクセスするには、PS4の本体に留められたネジを数本外します。
-
まるで1960年代のビンテージ屋根裏部屋をリフォームしているかのように、パネルを剥がします。
The top cover can be a little stubborn. There are locating clips on the edge opposite the screws that like to hang on. Use the force..
-
-
-
チップで埋め尽くされています!
-
SCEI (Sony Computer Entertainment, Inc.) CXD90026G SoC (AMD "Jaguar"コアとAMD Radeon GPUを含む)
-
Samsung K4G41325FC-HC03 4 Gb (512 MB) GDDR5 RAM (total of 8 x 512 MB = 4 GB)
-
SCEI CXD90025G ネットワークタスク用のセカンダリ/低電力プロセッサ
-
Samsung K4B2G1646E-BCK0 2Gb DDR3 SDRAM
-
Macronix MX25L25635FMI 256Mbシリアルフラッシュメモリ
-
Marvell 88EC060-NN82イーサネットコントローラー
-
SCEI 1327KM44S
Per Chipworks, the 2 Gb (256 MB) DDR3 is used by the dedicated network co-processor. That also seems reasonably apparent from the board layout.
Look at step 21, the other memory chips are on the board's underside.
Where is the temperature sensor?
Seems lime there a samsung fan and scei fan
There are little gray rubber-like things on the RAM… if one of these is missing will it affect anything??
-
-
-
反対側のチップはもっと青いと言われています…
-
Genesys Logic GL3520 USB 3.0ハブコントローラー
-
Samsung K4G41325FC-HC03 4 Gb (512 MB) GDDR5 RAM (total of 8 x 512 MB = 4 GB)
-
International Rectifier 35858 N326P IC2X
-
Macronix 25L1006E CMOSシリアルフラッシュメモリ
-
39A207 1328 E1 3FU
-
-
-
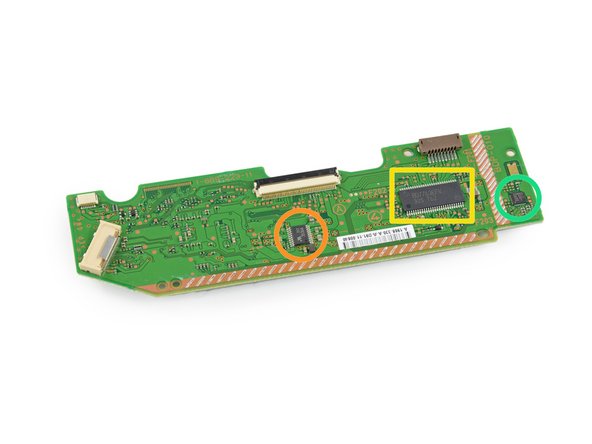
ドア番号1の裏はどうでしょうか?
-
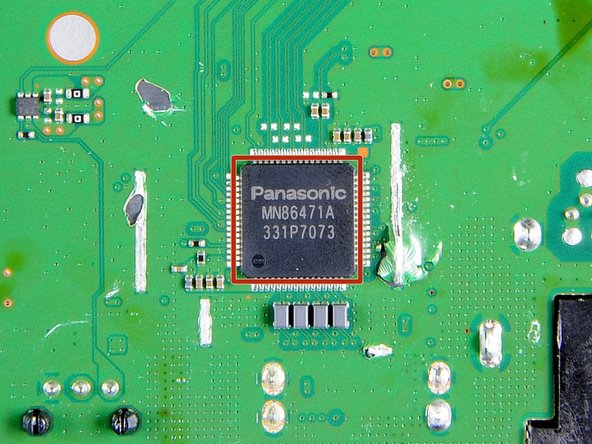
Panasonic MN86471AHDMI Communication LSI
-
ドア番号2は?
-
Marvell Wireless Avastar 88W8797 7 Integrated 2x2 WLAN/Bluetooth/FM Single-Chip SoC
-
Skyworks 2614B 315BB
The Panasonic chip is the HDMI 1.4 transmitter. The HDMI 2.0 version is MN864777.
The linked details suggest that the Marvel chip supports Bluetooth 4, but PS4 specs only say 2.1. Possible for Sony to update this in a later software update?
I would suppose so. We'll have to see about that. So the Marvel chip supports BT LE (Low Energy). That's kinda interesting. Would be awesome for external accessories such as heart rate monitors and different sensors.
Rob Ban -
Look at picture n°1 ... is the board damaged ?? wtf ..
They had to take a metal shield off to see this chip, not surprising if that caused some damage.
frandom -
Sorry but there's a ton of damage around the Panasonic IC and on the Marvel daughterboard... In this condition, it looks like at the very least you'd have a hard time playing HDCP content and connecting the controllers wirelessly?
Is this damage from Chipworks or is this something that occurred during initial take-apart; that is to say, is this something that would happen if one tried at home?
Since they aren't identified previously, its hard to understand how they end up in this condition.
...I vote that iFixit demonstrate how the take-aparts posted affect the product functionality by documenting reassembly and restored function. Without that, the scores only represent how easy it is to disassemble a device.
As far as I can tell the damage is because metal shields that were covering the chips have been removed so that we can see what they are. These shields aren't intended to be removed and aren't relevant to repairability.
frandom -
frandom is correct. Chipworks removed the shields in a quick-n-dirty fashion because we wanted to identify what chips lurked underneath the metal covers. There is no way this PS4 will work afterwards since CW took all the main chips off the board in order to depackage the chips themselves. Consider this PS4 to be sacrificed at the altar of chip investigation.
You could’ve easily avoided all of the board damage if you simply had used a hot air rework station or maybe a soldering iron, some flux and desoldering wick. Sorry guys, but you did a crappy job of removing those shielding cans…
Under normal circumstances you’d be correct, but as Miro mentioned above, board damage is all but irrelevant here since the next step in the analysis is to depackage the individual chips—i.e. remove them from the board, slice them open for a cross-section, grind them down layer by layer, and analyze them under a scanning electron microscope. You can see what the process looks like in our Apple A4 teardown. Trying to keep the board pretty while you harvest all the chips is sort of like asking the demolition crew not to get mud on the carpet as they’re wiring up the building with explosives.
-
-
-
ついに現れたのはPS4の大ファンです!
-
美しさは1つの要素となりますが、このファンにはそれ以上の機能があります。PS3の騒がしい風車に比べると、より賢明で静かに稼働するようにデザインされています。デシベル(騒音)数値を低く保つため、徐々に回転を上げたり、下げたりするようデザインされています。
I wonder what the weight tolerances are if someone would press on the top of the console and possibly damage the fan. I wonder if that is what causes most blue light flashing issues? Any way someone could test that?
hi i recently bougth a ps4 slim 1tb CUH 2016B model. It camed with the cooler broken so i have to replace it. Ive been looking on ebay and i cant find that model of cooler (it looks the same as the one on the video) so im wondering if i could replace it with the cooler of the ps4 CUH-1215A. What do you recomend? What model of cooler will work with a ps4 CUH 2016B? Thanks
There's also the part you should note: The PS4 fan runs like a jet engine, and a boring 747 produces less noise
I need to replace the power supply of the fan (the 3 pin part from the motherboard), but I don't know the part number or how to search for it. My PS4 model is CUH-1004A. Can you please help me? Thank you
-
-
-
分解がついに終了しました。勝利の証としてバラバラになったパーツをテーブルの上にばら撒きました。
-
でも、私たちのお母さん達もこの分解を見ているので、パーツを綺麗に並べ替えます。
-
- 接着剤の使用で解体と組み立てが簡単になることはありません。
- 一般的なハードドライブのため、交換用パーツの入手が簡単です。そしてパーツを交換すれば、保証対象外となります。
- セキュリティネジとボイドシールの存在によって、ユーザー自らがPS4を解体したり修理する勇気を損なわせます。
- クリーニングのためにファンにアクセスするには、デバイスの大部分を解体しなければなりません。パーツの交換はさらに解体が必要です。
- 鋭利なミッドプレーンがあるため、解体の際に注意しなければ、指先を怪我してしまう恐れがあります。


まとめ
リペアビリティのスコア


(10点が最も修理しやすい指標です)
以下の翻訳者の皆さんにお礼を申し上げます:
100%

Midori Doiさんは世界中で修理する私たちを助けてくれています! あなたも貢献してみませんか?
翻訳を始める ›

71 件のコメント
extra 256mB DDR3 chip eh? strange design. sat normally everything is upside down in the case.. and the way it sucks air through the power supply, then through the heatsink and up into the case.. guess the hot air blows out of the front? or is there something on the other side of the bottom cover to guide it towards the back? also saw that replaceable cr2032 battery... that will be dead in 4 years and I don't think anyone's gonna be replacing it.. wonder why they didn't stick in a rechargeable one like the dreamcast. or make it a user changeable one like the wii/wii u
Traditionally, blower fans blow air out of a system (hence the name). So no, it isn't drawing air in through the PSU, that wouldn't make much sense.
Also, I've seen plenty of 10+ year old systems with BIOS batteries that are still fine, so I've no idea where you've got that 4 year life from.
Figuring out the airflow of the PS4 is like doing origami. The air comes in from the top of the back and goes out the bottom of the back. There is a aluminum-mobo-aluminum sandwich about a half inch thick in between.
The air come in through the top slots, over and through the bottom of the sandwich as the mobo is upside down. The air cools the sheet, cools the memory chips by little dimples on the sheet and then is sucked through the sandwich by many small holes in the sheet metal and then through the mobo- yes, there are airholes strategically placed on the the mobo! Look by the battery for most of them that are directly over the fan intake.
Now the air comes to the fan intake via those small holes and a couple of vents over the hard drive. The cutouts over the fan intake are particularly strange, square holes, small round holes, L shaped holes. From there it is out the fan across the top sheet, then the CPU/GPU heatsink, again with memory dimples, and out through the hot parts of the power supply.
You may be right John - from the blower design I'd assumed there were vents on the bottom, but there don't appear to be, at least from the unboxing videos I've seen. Having the intake and exhaust right next to each other is traditionally a no-no for cooling, off the top of my head I can't think of any other piece of consumer electronics that does it like this.
the dreamcast DID have a cr2032, in both the console AND the VMU's
Yes, and the DC one was rechargeable. That’s my point.
King -
Can you tell us if the power supply is multivoltage.
Thanks
This just may be the Droid you're looking for.
can i use ps4 with vga port lcd tv ? (just with cable,no converter)
HDMI doesn't support VGA signals, so you're going to have to convert it.
Any determination on sata 2 vs sata 3?
This is I want to know also...
I see that sony are still leaving massive gaps down the side of the Heatsink which does nothing for airflow efficiency. Some models of the ps3 slim were like this and I did an experiment with a jailbroken one so I could see the temps, with the gap blocked off I got a decent drop in temps.
danguy2009 - 返信
Just a heads up.. I had an intercooler attached to my first ps3 and it burned up. On the second one i put a fan behind the system and it never over heated. I just gave it to my grandson after having it for six years and it still works fine. I am doing the same with my new ps4. Bill2208
Never buy a fan that attaches to your PS3 or PS4, i found that it burns your system up. Instead get a small fan and place it behind the unit and it will cool it just fine. I just gave my Grandson Dustin my 6 year old PS3 it still works great...
Is it something regarding about this?
4G is the density of the RAM. Desnity is in bits and not bytes, so 4G bits per chip = 512MB.
There are 8 chips on the top of the board and 8 on the bottom making a total of 16 giving 8GB of GDDR5 RAM.
For an explanation of part number see http://www.samsung.com/global/business/s....
Yes but it has 4 GB of RAM on both sides of the motherboard. 2 x 4 x 512 MB = 8092 MB (8 GB) of RAM.
This is a great picture guide on how to tear it down. I havent seen many places helping find the best hard drive until I found this guide here - http://boxclash.com/ps4-hard-drive-upgra... there are 5-6 hard drives that work with the PS4 that have high reviews
I wonder what the weight tolerances are if someone would press on the top of the console and possibly damage the fan. I wonder if that is what causes most blue light flashing issues? Any way someone could test that?
SONY does away with ALL conventional ways of pulling heat from the console chips. The first is that the CPU/GPU is facing DOWN towards the bottom of the console. The next is that the heatsink is NOT touching the CPU/GPU chip directly and is also facing down in the case. The high speed graphics chips need to be cooled and it is done by dimpling the two sheet metal panels, 16 dimples in all. The ONLY means by which these SEVENTEEN contacts are made is by some sticky stuff on the graphics chips, thermal paste, and TWO SCREWS. Two screws mounted diagonally from each other and the holes can been seen in the mobo. Give this thermal sheet metal sandwich a good twist, squeeze, or bump and some of these 17 contacts are going to be bent, squeezed, or separated. Any non or poor contact will cause the board to measure overheating, stopping the console.
SONY took a big risk in trying to innovate here and it may be the cause of many of the consoles problems. That and Mylar connectors ( I hate Mylar connectors!)
Uh, you might want to take another look at the teardown pictures. Step 23 very clearly shows the underside of the heatsink plate, along with the thermal paste. As with the Xbox One (and other AMD APUs), the GPU is on the chip, so is cooled by the same cooler. As for your concern over only 2 screws being used to secure the cooler, that's really not going to be an issue for a heatpipe-based cooler like this. Massive, heavy copper heaksinks (like some Zalman ones) are secured with similar 2 screw brackets in PCs without any problems.
For me, the real concerns are that the fan draws air in from underneath the console - I wonder how many of these will end up being used while on carpets, and how much dust will end up getting sucked up. Also, that radiator looks awfully small when compared to the one the Xbox has; that either means more airflow is needed (so potentially noisier) or coping with higher temperatures.
Right is the the other poster and wrong am I! The heatsink not only has a cutout for it AND is held down by the two screws but it also has a bump out that makes better contact with the ALU. I am still trying to wrap my head around a screw that goes through a aluminum sheet, the motherboard, another aluminum sheet and into the heatsink is going to prevent the sheets from moving or bending. I would have to play with it to figure that out. Still, not a single chip gets blown on by the fan on the mobo as they are encased in that very thin sandwich.
I find it interesting that it looks like AMD is going back to a (sort of) shim for both the PS4 and Xbox APUs rather than the heat spreader used on current desktop chips. Was this something specified by MS/Sony I wonder, or something AMD decided? Does it result in better heat transfer?
xtcrefugee - 返信
Where abouts are the light emitting diodes on the ps4? I assume they are Smds on the motherboard, but can't quite tell?
need a replacement power supply unit!!! where can i find one?
Our step by step repair guides will have more information about screw sizes than the teardown!
Quick Question, is it a T9 or T8? I see people on eBay selling T8 for the PS4.
Thanks in advance
The screws are T9 Torx Security.
I took mine apart to clean. It wont turn on now. I did my xbox 1 still works perfect
In step 18 you unscrewed the metal plating to get to the motherboard... unfortunately mine has some screws screwed in backwards, so i can only see the threaded parts of them! how can i get them out? is mine the only one with this problem? is it the fault of some chinese Foxconn worker?
Hi there! I suppose it's possible you have a different model with a different screw pattern, but before you panic, check the motherboard replacement guide, this is a teardown and is not meant to be followed as a repair guide!
Quite possibly the worst guide I've seen on here so far.
This is a teardown, not a guide. If you're looking for instructions, you can find them here.
Very good.
Thanks, you save my day.
I have a PS4 with that will not start when you push the on/off button. put it will start when you load a disk in the disk drive. Is it possible to get a replacement for the on / off button?
You guys use to be so good about showing all the locations of the screws. Well, better look elsewhere.... (I have extra screws, and I need to find out where they go!) Now, I see they replaced the time they took labeling the screws and instead tell us what they are snacking on! SMH! Please stop including USELESS information!
Edit: So I see in other comments, that this is a teardown, not a guide. But when I Google "PS4 disassembly" THIS is what comes up first thing. I guess...... MY BAD!
The screws on the back of the ps4 are NOT t9 screws nor are they t8 screws neither one fits both too big. After 2 trips to lowes home improvement to get the correct one at 20 miles each way twice.
Care to share which driver ended up working for you? There is more than one revision of the PS4; this teardown was for the launch version, which may have used different screws.
"This teardown is not a repair guide. To repair your PlayStation 4, use our service manual."
This might be late but - Does anyone know the dimensions of the RAM? Or any links to RAM heatsink on Amazon?
I have this little black gear with a spring I have no idea where it goes please help
Also it came from the disk drive
Looking thru have 4 black Security screws where shall those be placed?? I have bought a torn Down ps4
That bluetooth chip appears to support 4.0, while the pre-slim PS4s controllers only used 2.1 (and had a lot of interference)? Does anyone know if using the V2 DS4 would form a 4.0 link? Was it just controller side that didn’t support 4.1?
Does anyone have an idea of what the heatsink is made out of?
I’m interested in changing/improving the heatsink.
1. Add a “copper shim” between processor and heatsink with one drop MX4 on both sides.
2. Build out the heatsink with parts from a PC processor heatsink or replace it entirely with a PC heatsink and cut it to fit.
Anyone tried 2.?
My USB ports are not working
Hello, my PS4 Model CUH-1267 only has 2 screws on the back. Can you please explain how to open it. Since a few days it won’t start up again. Starting it, I only get a screen saying “connect the dualshock 4 with a USB-cable an next press the PS-key”, which doesn’t do anything. I got it once in safe mode and tried to reinstall everything, but then it crashed again and now I am stuck! Thanks for your support.
Bob
Sorry, I misread the model it should be CUH-1216B.
I wonder if the playstation 4 supports SSD hard disk.
Hello guys, i have a problem with my ps4, I bought a new hdd, it’s a seagate barracuda 1T and when I plug it in the ps4 it says “error CE-34333-6”. But when I start the ps4 without the hdd it says “error CE-34335-8”. I checked on the internet but no solution, it only says that my hdd is open. like the ps4 can do the difference when there is a hdd so it says “error CE-34333-6” and apparently the hdd is open and when there is no hdd and it says “error CE-34335-8”. if anyone here got the same problem please give me some advice :)
The system will always throw error CE-34335-8 if there’s no HDD inserted, it cannot boot without it. Your other error code indicates the new HDD is faulty.
Is the grounding shield necessary that's on top of the power pack
Hola buenas quería hacerles una pregunta yo desmonte mi Ps4 para limpiarla todo bien hasta aquí la volví a montar y funciona bien solo que el mando no funciona es decir si le pongo auriculares el audio no se escucha y en am los juegos el mando hace lo que quiere solo funciona todo si pego el mando a mi Ps4 literalmente tocándola a medio centímetro no funciona que puede ser? Si me pueden ayudar les agradecería les dejo mi mail por si me quieren escribir ahí. Manolitosoft1@hotmail.com muchas gracias de antemano
Some PS4 models only have a single screw on the back where you have 3 in Step 8.
There is a different method to remove the panel, and I don’t know what it is, but using this guide i was not able to complete the teardown
What model do you have? i think you can find it on the package for example, my ps4 (slim even if they don’t say so on the package) is cuh-2116b
best information
I remember the frustration!! Sitting in filth and diarrhea, trying to disassemble my PS4 without any help and it was impossible. Missing a few screws we lost to the filth but the PS4 runs great again. Thank you for all your help!
Tronald Dump - 返信