この翻訳は、ソースガイドの最新の更新を反映していない可能性があります。 翻訳の更新に協力してください。 または ソースガイドを参照してください。
はじめに
このガイドでは、PS3のブルーレイドライブの読み取り部分の交換修理方法を記載しています。
必要な工具と部品
-
-
-
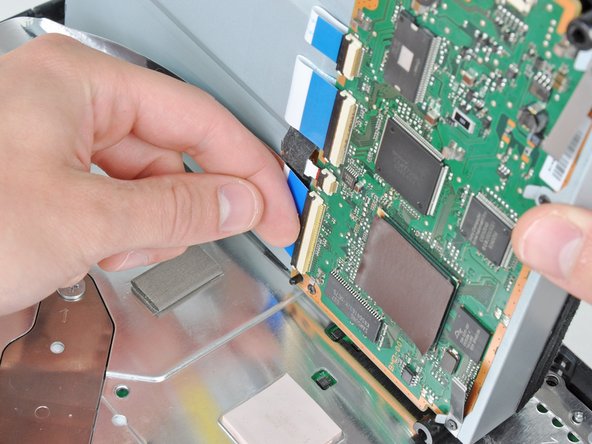
画像のA2リボンケーブルは前のガイドの手順 9で取り外されました。次に、爪先や専用の取り外しツール等を用いてA3、A4、A5のリボンケーブルを外してください。
-
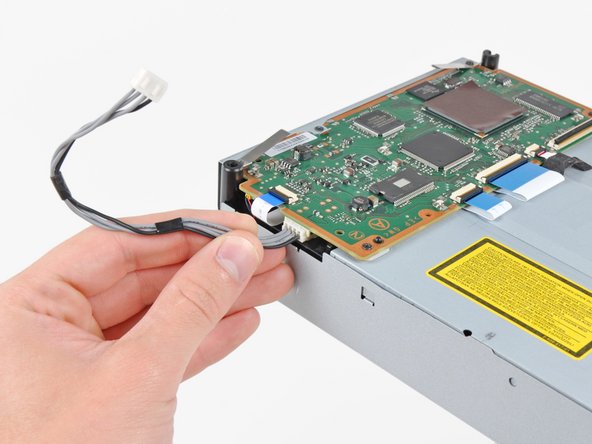
#00のプラスドライバーを用いて画像のネジ9〜13を取り外してください。
-
一部のモデルでは、ネジ11と13がスタビライザーを固定していますので、その場合は注意してください。これらは手順 9の3つ目の写真に示されています。再組立ての為に位置を覚えておいてください。
-
-
この手順は未翻訳です。 翻訳を手伝う。
-
The KES-400AAA laser is known to work with the following models: CECHE03, CECHA03, CECHC03, CECHG03, CECHB0 and CECHC03 but more variants accept the KES-400AAA laser assembly. Please contact the seller for more information. Generally older models with 4 usb ports accept the KES-400AAA while the 2 usb models use the KES-410CA laser assembly.
-
PS3を再組み立てするには、このガイドの手順を逆から行ってください。
PS3を再組み立てするには、このガイドの手順を逆から行ってください。
73 の人々がこのガイドを完成させました。
以下の翻訳者の皆さんにお礼を申し上げます:
80%
これらの翻訳者の方々は世界を修理する私たちのサポートをしてくれています。 あなたも貢献してみませんか?
翻訳を始める ›
29 件のコメント
Perhaps this guide can integrate the procedure for removing a stuck disc? Many YLOD units die with a disc in the drive and some repair service providers charge extra to remove it. What's worse, sometimes it is not your disc! I was going to send it to Sony for my repair except that the disc inside is rented and needs to be extracted right away. The repair providers who charge extra implied to me that they charge extra because the drive needs a disc reinserted if it is going to work again when booted up in a working PS3 (something about rails that would fall without a disc holding them up). I believe that they throw in a blank CD/DVD or one of those clear plastic separator discs that come in recordable disc cake-boxes on the top and bottom of the stack.
If you do these steps you will get to the disk and remove it easily
This tutorial is brilliant and saved my PS3. Thank you.
One comment or question really: Between steps 9 and 10 a heat shield magically appears. In Step 9 when you see the drive being taken off, there's no apparent heat shield.
But in Step 10 we see the heat shield. On my unit, there doesn't appear to be one. So this was - and is - a little confusing. I thought somehow I'd lost the part. (Though in the space I was working, there's just nowhere it could have gone.) Is this a problem to not have this? It's hard to tell from your pics whether the original had a shield or not or if these were two different units.
Thanks
You are correct, the units in steps 9 and 10 are different. Steps 1-9 are part of an original iFixit tear-down, steps 10-15 are my user-created guide which iFixit staff have merged with their own.
There may be some variation between units, if your original disc drive didn't have a heat shield then I wouldn't worry. It doesn't appear that the unit in steps 1-9 from iFixit had one either. Thanks for the feedback, I'm glad the guide helped you fix your issue.
It is not recommended to replace just the laser unit. It is better to replace the drive chassis (metal part, including the rail and disc spindle motor) as an assembly because the height of the rails are calibrated in factory. Unscrewing the rail screws will change the alignment and you can't calibrate it.


