メインコンテンツにスキップ

Plantronics CS50 Headset Microphone Replacement

必要な工具と部品

  1. Plantronics CS50 Headset Microphone Replacement, Battery: 手順 1、 3の画像 1 Plantronics CS50 Headset Microphone Replacement, Battery: 手順 1、 3の画像 2 Plantronics CS50 Headset Microphone Replacement, Battery: 手順 1、 3の画像 3
    • Flip the headset face down.

    • Squeeze both sides of the battery cover.

    • While squeezing, pull the cover up slowly to remove it.

  2. Plantronics CS50 Headset Microphone Replacement: 手順 2、 3の画像 1 Plantronics CS50 Headset Microphone Replacement: 手順 2、 3の画像 2 Plantronics CS50 Headset Microphone Replacement: 手順 2、 3の画像 3
    • Locate and detatch the white connector that connects the wires of the battery to the wires of the headset.

  3. Plantronics CS50 Headset Microphone Replacement, Microphone: 手順 3、 2の画像 1 Plantronics CS50 Headset Microphone Replacement, Microphone: 手順 3、 2の画像 2
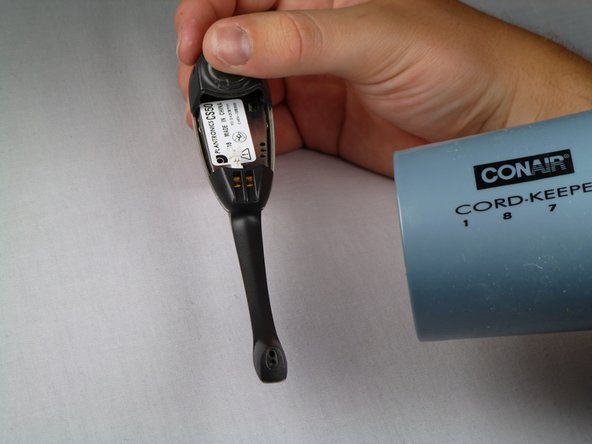
    • Use a hairdryer or heat gun to melt the adhesive along the crevice that joins the black and silver components.

    • Apply additional heat at the tip of the microphone.

  4. Plantronics CS50 Headset Microphone Replacement: 手順 4、 2の画像 1 Plantronics CS50 Headset Microphone Replacement: 手順 4、 2の画像 2
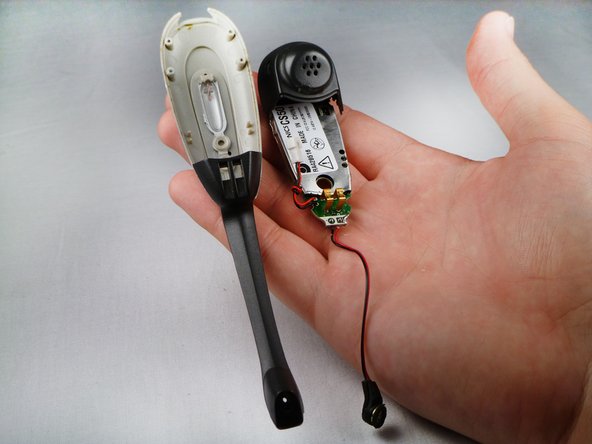
    • After heating the headset, use the plastic opening tool to carefully pry the black cover from the headset.

    • Be aware of the two plastic connectors inside the headset. If the black cover does not come off smoothly, apply additional heat on the connectors.

  5. Plantronics CS50 Headset Microphone Replacement: 手順 5、 2の画像 1 Plantronics CS50 Headset Microphone Replacement: 手順 5、 2の画像 2
    • Remove the microphone from the tip of the plastic.

    • You will have to lift the microphone straight up because it is held in place by a small piece of plastic.

  6. Plantronics CS50 Headset Microphone Replacement: 手順 6、 2の画像 1 Plantronics CS50 Headset Microphone Replacement: 手順 6、 2の画像 2
    • Use the heat gun to melt the adhesive connecting the headset face to the speaker casing.

    • Use the plastic opening tool to separate the speaker casing from the headset face.

    • Add extra heat to the sides to melt the adhesive between the plastic connectors.

  7. Plantronics CS50 Headset Microphone Replacement: 手順 7、 2の画像 1 Plantronics CS50 Headset Microphone Replacement: 手順 7、 2の画像 2
    • Slowly separate the motherboard from the rest of the headset.

  8. Plantronics CS50 Headset Microphone Replacement: 手順 8、 1の画像 1
    • Locate the microphone wires on the bottom of the motherboard.

    • Use a hairdryer or heat gun to melt the glue off of the motherboard.

  9. Plantronics CS50 Headset Microphone Replacement: 手順 9、 1の画像 1
    • Flip the device over.

    • Use a soldering iron to remove the solder that holds the wires to the motherboard.

    • For help soldering, click here.

    • The microphone piece should be completely detached from the motherboard.

終わりに

To reassemble your device, follow these instructions in reverse order. Replace the glue and solder where they are needed.

作成者

5人の作成者と共同で作成されました。

Christopher Alfaro

メンバー登録日: 04/12/12

22 ポイント

1ガイドが承認済み

チーム

Cal Poly, Team 17-29, Amido Spring 2012 Cal Poly, Team 17-29, Amido Spring 2012人のメンバー

CPSU-AMIDO-S12S17G29

4 メンバー

7のガイドは作成済み

0 件のコメント

コメントを追加

統計データ:

過去 24時間: 0

過去 7 日: 1

過去 30 日: 1

今までの合計 1,763