メインコンテンツにスキップ

Pioneer Elite PRO-RO6U Motherboard Replacement

必要な工具と部品

  1. Pioneer Elite PRO-RO6U Motherboard Replacement, Power Supply Cooling Fan: 手順 1、 1の画像 1
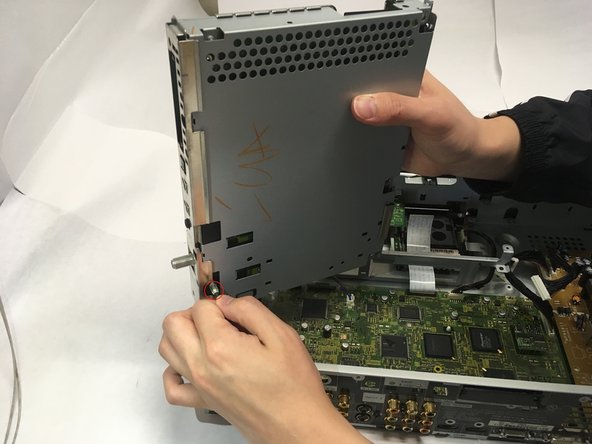
    • Remove the two 6.4 mm Phillips screws on each side of the device's casing.

  2. Pioneer Elite PRO-RO6U Motherboard Replacement: 手順 2、 1の画像 1
    • Remove the two 6.5 mm Phillips screws on the back of the device casing.

  3. Pioneer Elite PRO-RO6U Motherboard Replacement: 手順 3、 1の画像 1
    • Grip the front panel in one hand and the back of the casing in the other. Pull the casing back, and slide it up and away from the inner box.

  4. Pioneer Elite PRO-RO6U Motherboard Replacement: 手順 4、 1の画像 1
    • To replace the back cooling fan, grip the ribbon connector at slot M10 and remove by gently pulling upward.

  5. Pioneer Elite PRO-RO6U Motherboard Replacement: 手順 5、 1の画像 1
    • Remove the two 6.5 mm Phillips mounting screws at the back of the device.

  6. Pioneer Elite PRO-RO6U Motherboard Replacement: 手順 6、 1の画像 1
    • Grip the frame of the cooling fan and slide away from the back wall until the tabs are no longer in the holes of the casing.

    • Lift the cooling fan out of the device.

  7. Pioneer Elite PRO-RO6U Motherboard Replacement, Motherboard: 手順 7、 1の画像 1
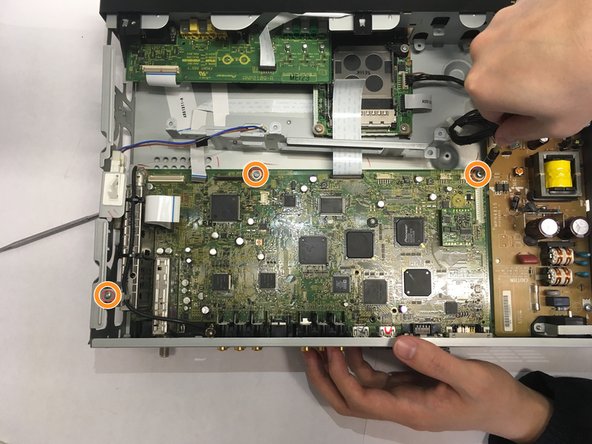
    • To remove the optical drive cooling fan, grip the ribbon connector at M11 and gently remove by pulling away for the slot.

  8. Pioneer Elite PRO-RO6U Motherboard Replacement: 手順 8、 1の画像 1
    • Flip the latch on the ribbon connector upward to allow for cable removal.

    • Grip the ribbon cable and remove by gently pulling away from the unlatched connector.

  9. Pioneer Elite PRO-RO6U Motherboard Replacement: 手順 9、 1の画像 1
    • Remove the two 6.4 mm Phillips mounting screws on the optical drive cooling fan.

  10. Pioneer Elite PRO-RO6U Motherboard Replacement: 手順 10、 1の画像 1
    • Grip the frame of the cooling fan and slide it toward the front panel, then lift out of the device.

  11. Pioneer Elite PRO-RO6U Motherboard Replacement: 手順 11、 1の画像 1
    • Unplug ribbon cables D4 and D5. To unplug D4, flip the gate up and pull the ribbon away.

  12. Pioneer Elite PRO-RO6U Motherboard Replacement: 手順 12、 1の画像 1
    • Remove four 1/4th inch Phillips screws on the back of the casing.

    • Unscrew and remove the nut from the threaded connector.

  13. Pioneer Elite PRO-RO6U Motherboard Replacement: 手順 13、 2の画像 1 Pioneer Elite PRO-RO6U Motherboard Replacement: 手順 13、 2の画像 2
    • The optical drive is still connected by a cable on its bottom side, lift the drive upwards only slightly when first removing from the casing.

    • Pull the optical drive toward the interior of the device and then lift upwards, then pull to remove the cord on the bottom left corner before removing the drive completely.

  14. Pioneer Elite PRO-RO6U Motherboard Replacement: 手順 14、 2の画像 1 Pioneer Elite PRO-RO6U Motherboard Replacement: 手順 14、 2の画像 2
    • Unplug connectors at M1, M4, M7, M8, M9 by gently pulling upward.

    • Remove all 3/8 inch Phillips screws connecting motherboard to casing.

  15. Pioneer Elite PRO-RO6U Motherboard Replacement: 手順 15、 1の画像 1
    • Remove the five 1/4 inch Phillips screws and two 1/8 inch Phillips screws on the back of the casing.

    • Unscrew and remove nut from threaded connector.

  16. Pioneer Elite PRO-RO6U Motherboard Replacement: 手順 16、 1の画像 1
    • Remove four 1/2 inch screws using a nutdriver.

  17. Pioneer Elite PRO-RO6U Motherboard Replacement: 手順 17、 1の画像 1
    • Pinch the securing tabs and lift the motherboard toward the interior of the device to remove it.

  18. Pioneer Elite PRO-RO6U Motherboard Replacement: 手順 18、 1の画像 1
    • Pull it toward the interior of the device and lift it away.

終わりに

To reassemble your device, follow these instructions in reverse order.

作成者

2人の作成者と共同で作成されました。

Cody Carter

メンバー登録日: 01/30/18

1,049 ポイント

6のガイドは作成済み

チーム

Baylor, Team S1-G5, Johnson Spring 2018 Baylor, Team S1-G5, Johnson Spring 2018人のメンバー

BU-JOHNSON-S18S1G5

3 メンバー

6のガイドは作成済み

0 件のコメント

コメントを追加

統計データ:

過去 24時間: 1

過去 7 日: 1

過去 30 日: 4

今までの合計 744