メインコンテンツにスキップ

Philips Sonicare 2 Series Disassembly

必要条件のみ
この修理ガイドは、他のガイドの前提条件として使用されます。それ自体は不完全で、単独で使用されることはありません。

必要な工具と部品

  1. Philips Sonicare 2 Series Disassembly, Philips Sonicare 2 Series Disassembly: 手順 1、 1の画像 1
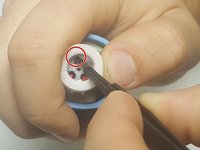
    • Pull upwards to remove the brush head from the top of the device.

  2. Philips Sonicare 2 Series Disassembly: 手順 2、 1の画像 1
    • Remove the 12 mm T8 Torx screw from the bottom of the toothbrush. After removing the screw, pry off the base with a plastic opening tool.

  3. Philips Sonicare 2 Series Disassembly: 手順 3、 2の画像 1 Philips Sonicare 2 Series Disassembly: 手順 3、 2の画像 2
    • Remove the internal electronic mechanism from the housing by prying the red clips shown in the figure. This removes the charging port.

    • Be very careful not to damage the charging port during this step. Otherwise you will have to solder this part back to the device as shown in the second figure.

  4. Philips Sonicare 2 Series Disassembly: 手順 4、 1の画像 1
    • Next you will be able to remove the internal electronic mechanism as shown in the figure.

  5. Philips Sonicare 2 Series Disassembly: 手順 5、 1の画像 1
    • Remove the white battery cover as shown in the figure.

  6. Philips Sonicare 2 Series Disassembly: 手順 6、 1の画像 1
    • Remove the white circuit board cover as shown. This cover will require you to pry off the piece from the groves .

終わりに

To reassemble your device, follow these instructions in reverse order.

作成者

6人の作成者と共同で作成されました。

Jonathan Jarvis

メンバー登録日: 04/01/16

515 ポイント

4のガイドは作成済み

チーム

IUPUI, Team S6-G2, Baechle Fall 2017 IUPUI, Team S6-G2, Baechle Fall 2017人のメンバー

IUPUI-BAECHLE-F17S6G2

3 メンバー

8のガイドは作成済み

0 件のコメント

コメントを追加

統計データ:

過去 24時間: 1

過去 7 日: 16

過去 30 日: 19

今までの合計 108