メインコンテンツにスキップ

Philips HD9252 Transformer Replacement

必要な工具と部品

  1. Philips HD9252 Transformer Replacement, Top: 手順 1、 1の画像 1
    • Insert a nylon spudger underneath the top of the device.

    • Leverage the tool and pop off each of the eight tabs holding the plastic cover in place.

  2. Philips HD9252 Transformer Replacement: 手順 2、 1の画像 1
    • Remove the four 12.4 mm screws in each of the corners using a JIS #1 screwdriver.

  3. Philips HD9252 Transformer Replacement: 手順 3、 1の画像 1
    • Remove the top by lifting it upwards and setting it down.

  4. Philips HD9252 Transformer Replacement, Transformer: 手順 4、 1の画像 1
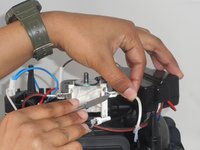
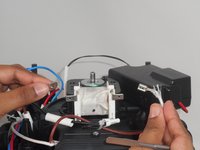
    • Remove the two 39.5 mm screws attached to the black piece of the transformer using a JIS #1 screwdriver.

  5. Philips HD9252 Transformer Replacement: 手順 5、 1の画像 1
    • Remove the top piece, using a Phillips #2 screwdriver, to get the whole transformer.

  6. Philips HD9252 Transformer Replacement: 手順 6、 2の画像 1 Philips HD9252 Transformer Replacement: 手順 6、 2の画像 2
    • Remove the brown and white wire attached to the transformer using a spudger.

    • Disconnect both the brown and white cables.

  7. Philips HD9252 Transformer Replacement: 手順 7、 1の画像 1
    • Replace the transformer.

終わりに

To reassemble your device, follow these instructions in reverse order.

作成者

2人の作成者と共同で作成されました。

Zach Person

メンバー登録日: 02/14/24

421 ポイント

4のガイドは作成済み

チーム

University of Memphis, Team 3-1, Sneed Spring 2024 University of Memphis, Team 3-1, Sneed Spring 2024人のメンバー

UM-SNEED-S24S3G1

4 メンバー

5のガイドは作成済み

0 件のコメント

コメントを追加

統計データ:

過去 24時間: 0

過去 7 日: 7

過去 30 日: 28

今までの合計 96