メインコンテンツにスキップ

Philips Emerson CoughAssist CA Series Disassembly

医療機器
この修理ガイドは医療機器メーカーからの是認を得ておらず、iFixitと医療機器メーカーは提携していません。

必要な工具と部品

  1. Philips Emerson CoughAssist CA Series Disassembly, Philips Emerson CoughAssist CA Series Disassembly: 手順 1、 1の画像 1
    • First, remove the two 16mm pan head screws (1) directly under the front panel of the ventilator. (Page 3).

    • Next, remove the two 16mm flat head screws (3) from the back panel of the ventilator. (Page 3).

    • Lift off the top cover (2) of the device. (Page 3).

  2. Philips Emerson CoughAssist CA Series Disassembly: 手順 4、 2の画像 1 Philips Emerson CoughAssist CA Series Disassembly: 手順 4、 2の画像 2
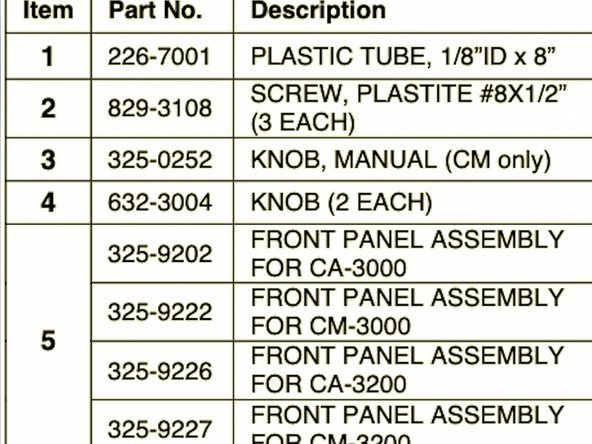
    • Now remove the "Inhale flow" control knob (4) and "Inhale pressure" knob (4), by loosening the setscrew on each before pulling off. If you have a CM model, carefully remove the Manual Control Lever (3) by prying it off with the screwdriver. (Page 3).

  3. Philips Emerson CoughAssist CA Series Disassembly: 手順 5、 1の画像 1
    • Unscrew the three 12.7mm plastite screws ( 2) holding the panel assembly to the lower housing. A long Phillips screwdriver is very helpful for access to the three screws. (Page 3)

    • The front control panel (5) should now be loose. Carefully slide it forwards to remove. (Page 4).

終わりに

To reassemble your device, follow these instructions in reverse order.

作成者

3人の作成者と共同で作成されました。

Zachary Stednitz

メンバー登録日: 04/07/20

292 ポイント

2のガイドは作成済み

チーム

Cal Poly, Team S11-G18, Paton Spring 2020 Cal Poly, Team S11-G18, Paton Spring 2020人のメンバー

CPSU-PATON-S20S11G18

3 メンバー

3のガイドは作成済み

0 件のコメント

コメントを追加

統計データ:

過去 24時間: 0

過去 7 日: 3

過去 30 日: 15

今までの合計 241