メインコンテンツにスキップ

Philips Dynamic Bass Boost AZ 1038 12 Speaker Replacement

必要な工具と部品

  1. Philips Dynamic Bass Boost AZ 1038 12 Speaker Replacement, Speaker: 手順 1、 2の画像 1 Philips Dynamic Bass Boost AZ 1038 12 Speaker Replacement, Speaker: 手順 1、 2の画像 2
    • Take the radio off the net (remove the power cable) and remove the batteries if necessary

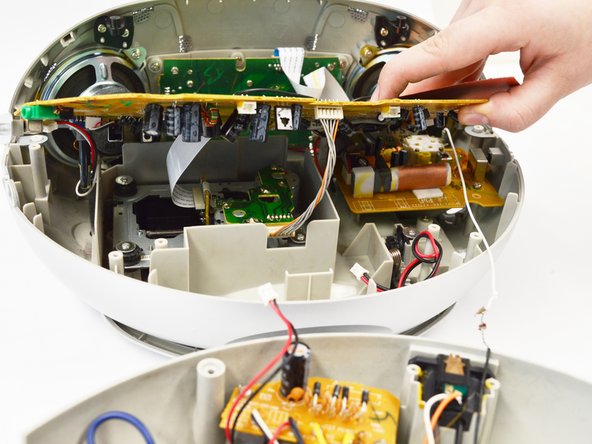
    • Turn the radio upside down.

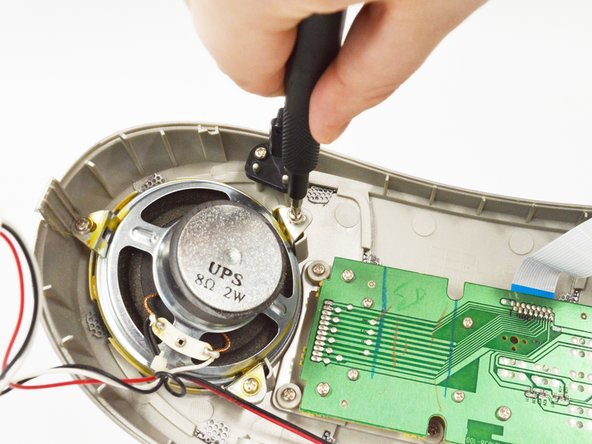
    • On the places indicated by the red circles, 6 14.8mm Phillips #0 screws need to be removed using a Phillips 00 screwdriver.

  2. Philips Dynamic Bass Boost AZ 1038 12 Speaker Replacement: 手順 2、 2の画像 1 Philips Dynamic Bass Boost AZ 1038 12 Speaker Replacement: 手順 2、 2の画像 2
    • The bottom can be removed. Attention: the bottom of the radio is still connected to the upper part because of two connections between the PCB’s.

    • Attention: there is one PCB in the upper part, and one in the bottom, which are still connected to each other

  3. Philips Dynamic Bass Boost AZ 1038 12 Speaker Replacement: 手順 3、 3の画像 1 Philips Dynamic Bass Boost AZ 1038 12 Speaker Replacement: 手順 3、 3の画像 2 Philips Dynamic Bass Boost AZ 1038 12 Speaker Replacement: 手順 3、 3の画像 3
    • Next the different screws indicated in the picture need to be removed.

    • The 5 9.5mm Phillips #0 screws indicated by the red circles need to be removed using a Phillips 00 screwdriver.

    • One 7.4mm Phillips #02 screw indicated by the blue circle needs to be removed using a Phillips 02 screwdriver

  4. Philips Dynamic Bass Boost AZ 1038 12 Speaker Replacement: 手順 4、 2の画像 1 Philips Dynamic Bass Boost AZ 1038 12 Speaker Replacement: 手順 4、 2の画像 2
    • The two connectors indicated by the red arrows need to be removed next.

    • They can be removed by gently pulling, like shown in the picture

    • Then the radio should look like shown in the second picture.

  5. Philips Dynamic Bass Boost AZ 1038 12 Speaker Replacement: 手順 5、 2の画像 1 Philips Dynamic Bass Boost AZ 1038 12 Speaker Replacement: 手順 5、 2の画像 2
    • Then one contact needs to be removed that is not attached at the large PCB, like the rest, but at a smaller PCB connected to the upper part of the casing

    • Pull in the direction of the arrow.

  6. Philips Dynamic Bass Boost AZ 1038 12 Speaker Replacement: 手順 6、 2の画像 1 Philips Dynamic Bass Boost AZ 1038 12 Speaker Replacement: 手順 6、 2の画像 2
    • Then two more contacts need to be removed, in the same way that the other contacts are removed.

    • Both these contacts can be found at the back side of the PCB, and are also attached at that place.

  7. Philips Dynamic Bass Boost AZ 1038 12 Speaker Replacement: 手順 7、 1の画像 1
    • Then the PCB is only connected with these flat white wires. They can be detached by softly pulling on them.

  8. Philips Dynamic Bass Boost AZ 1038 12 Speaker Replacement: 手順 8、 1の画像 1
    • Now the conductor for the antenna can be removed, by pulling softly.

    • The conductor can be found at the yellow PCB in the upper part of the casing.

  9. Philips Dynamic Bass Boost AZ 1038 12 Speaker Replacement: 手順 9、 1の画像 1
    • Next we will remove the front of the casing from the upper part of the casing.

    • Two 13.7mm Phillips #02 screws need to be removed with a Phillips 00 screwdriver, on the picture the right screw is shown.

  10. Philips Dynamic Bass Boost AZ 1038 12 Speaker Replacement: 手順 10、 2の画像 1 Philips Dynamic Bass Boost AZ 1038 12 Speaker Replacement: 手順 10、 2の画像 2
    • After the screws are removed, the front can be removed by pulling it upwards.

  11. Philips Dynamic Bass Boost AZ 1038 12 Speaker Replacement: 手順 11、 2の画像 1 Philips Dynamic Bass Boost AZ 1038 12 Speaker Replacement: 手順 11、 2の画像 2
    • The speaker is screwed to the front of the casing with three 12.1mm Phillips #0 screws, as can be seen in the picture. Remove these screws with a Phillips 00 screwdriver.

  12. Philips Dynamic Bass Boost AZ 1038 12 Speaker Replacement: 手順 12、 1の画像 1
    • Right now, the speaker is only attached by glue. Remove the glue by using something sharp, like a spudger, to break it.

  13. Philips Dynamic Bass Boost AZ 1038 12 Speaker Replacement: 手順 13、 1の画像 1
    • To attach a new speaker, the old one needs to be removed by unsoldering it.

    • Turn on your soldering iron, and wait until it has the right temperature.

    • Keep the soldering iron against the contact, like shown in the photo. The wires will easily come off.

    • Attention: Make sure you do not touch the soldering iron, it will be hot. Also make sure you do not melt any plastic parts.

  14. Philips Dynamic Bass Boost AZ 1038 12 Speaker Replacement: 手順 14、 1の画像 1
    • The last step is soldering the new speaker on. For this you need solder.

    • Melt the wires to the contacts of the new speaker, by melting some solder over the wired, touching the contact of the speaker.

    • Make sure to attach the black wire to the negative contact of the speaker (indicated on the speaker) and the white wire to the positive contact.

終わりに

To reassemble your device, follow these instructions in reverse order.

作成者

2人の作成者と共同で作成されました。

Suzanne Spiering

メンバー登録日: 12/05/16

101 ポイント

1ガイドが承認済み

チーム

0 件のコメント

コメントを追加

統計データ:

過去 24時間: 0

過去 7 日: 0

過去 30 日: 2

今までの合計 590