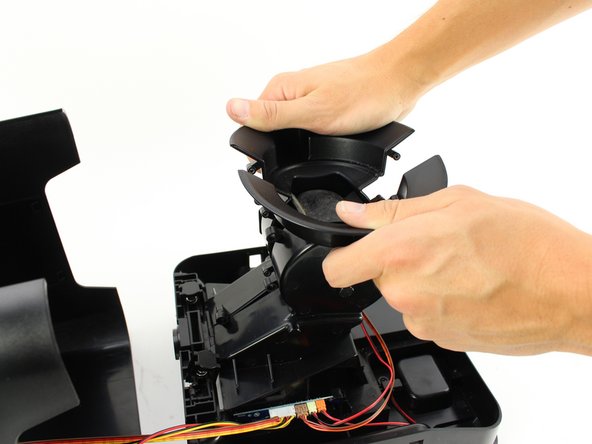
メインコンテンツにスキップ

Petnet SmartFeeder SF10E Food Dispensing Wheel Replacement

必要な工具と部品

  1. Petnet SmartFeeder SF10E Food Dispensing Wheel Replacement, Food Dispensing Wheel: 手順 1、 3の画像 1 Petnet SmartFeeder SF10E Food Dispensing Wheel Replacement, Food Dispensing Wheel: 手順 1、 3の画像 2 Petnet SmartFeeder SF10E Food Dispensing Wheel Replacement, Food Dispensing Wheel: 手順 1、 3の画像 3
    • Eject the SmartBowl by pressing the button located at the front of the SmartFeeder base.

  2. Petnet SmartFeeder SF10E Food Dispensing Wheel Replacement: 手順 2、 3の画像 1 Petnet SmartFeeder SF10E Food Dispensing Wheel Replacement: 手順 2、 3の画像 2 Petnet SmartFeeder SF10E Food Dispensing Wheel Replacement: 手順 2、 3の画像 3
    • Remove the food tub by twisting it counter-clockwise with both hands and lifting it up.

  3. Petnet SmartFeeder SF10E Food Dispensing Wheel Replacement: 手順 3、 1の画像 1
    • Remove the black plastic gasket from the top of the SmartFeeder by placing your fingers on the side of it and lifting up.

    • It should come off very easily.

  4. Petnet SmartFeeder SF10E Food Dispensing Wheel Replacement: 手順 4、 3の画像 1 Petnet SmartFeeder SF10E Food Dispensing Wheel Replacement: 手順 4、 3の画像 2 Petnet SmartFeeder SF10E Food Dispensing Wheel Replacement: 手順 4、 3の画像 3
    • Flip over the SmartFeeder by using both hands.

    • Partially open the outer case of the SmartFeeder by wedging an iFixit Opening Tool on each side.

  5. Petnet SmartFeeder SF10E Food Dispensing Wheel Replacement: 手順 5、 2の画像 1 Petnet SmartFeeder SF10E Food Dispensing Wheel Replacement: 手順 5、 2の画像 2
    • Turn the SmartFeeder on its side and with one hand on the base, carefully pull out the central section.

    • Place the bottom piece of the device right-side up.

  6. Petnet SmartFeeder SF10E Food Dispensing Wheel Replacement: 手順 6、 1の画像 1
    • Remove the eight 11mm screws from the central pillar using a Phillips #1 screwdriver.

  7. Petnet SmartFeeder SF10E Food Dispensing Wheel Replacement: 手順 7、 2の画像 1 Petnet SmartFeeder SF10E Food Dispensing Wheel Replacement: 手順 7、 2の画像 2
    • Pull apart the two sides of the central pillar at the top by using both hands.

    • The two sides will not completely separate at the base.

    • With the two halves partially separated, pull out the rubber wheel with your hand.

    • A small black rectangular piece may fall out of the chute when the halves are partially separated. Reattach this by reaching into the chute and putting the pins from the piece into the holes on the side of the chute.

終わりに

To reassemble your device, follow these instructions in reverse order.

ある他の人がこのガイドを完成しました。

作成者

4人の作成者と共同で作成されました。

Louis Squitieri

メンバー登録日: 10/08/18

157 ポイント

1ガイドが承認済み

チーム

Cal Poly, Team S13-G7, White Fall 2018 Cal Poly, Team S13-G7, White Fall 2018人のメンバー

CPSU-WHITE-F18S13G7

4 メンバー

5のガイドは作成済み

コメント 1 件

Always nice to have a link to part so we know where to buy

David - 返信

コメントを追加

統計データ:

過去 24時間: 0

過去 7 日: 0

過去 30 日: 1

今までの合計 1,217