メインコンテンツにスキップ

Pantech Matrix Motherboard Replacement

必要な工具と部品

  1. Pantech Matrix Motherboard Replacement, Phone Orientation: 手順 1、 1の画像 1
    • Place phone with screen side facing toward you.

  2. Pantech Matrix Motherboard Replacement, Phone Orientation: 手順 2、 1の画像 1
    • Flip phone over so screen side is now facing down.

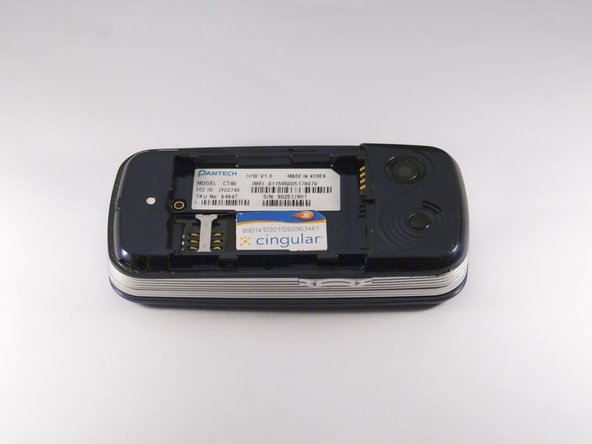
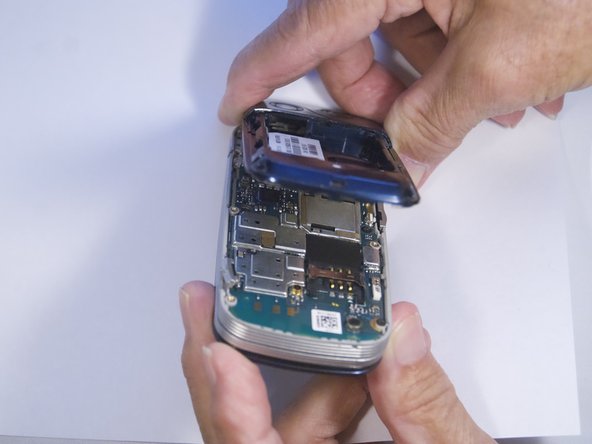
  3. Pantech Matrix Motherboard Replacement, Remove Back Cover: 手順 3、 2の画像 1 Pantech Matrix Motherboard Replacement, Remove Back Cover: 手順 3、 2の画像 2
    • Gently slide the backside phone cover off exposing the battery underneath.

  4. Pantech Matrix Motherboard Replacement, Lift Battery: 手順 4、 1の画像 1
    • Carefully lift the battery up from where the spudger is pointed.

  5. Pantech Matrix Motherboard Replacement, Remove Battery: 手順 5、 1の画像 1
    • Remove the battery from its dock.

  6. Pantech Matrix Motherboard Replacement, Slide SIM Card Out: 手順 6、 3の画像 1 Pantech Matrix Motherboard Replacement, Slide SIM Card Out: 手順 6、 3の画像 2 Pantech Matrix Motherboard Replacement, Slide SIM Card Out: 手順 6、 3の画像 3
    • Slide the SIM Card out of its dock.

  7. Pantech Matrix Motherboard Replacement, Remove Phone Screws: 手順 7、 2の画像 1 Pantech Matrix Motherboard Replacement, Remove Phone Screws: 手順 7、 2の画像 2
    • Use a Phillips screwdriver to remove the four 2mm Phillips #000 screws from each corner of the device.

  8. Pantech Matrix Motherboard Replacement, Remove Phone Casing: 手順 8、 2の画像 1 Pantech Matrix Motherboard Replacement, Remove Phone Casing: 手順 8、 2の画像 2
    • Rotate the phone so the base is facing you.

    • Use spudger to separate phone casing and inside as shown.

    • Remove the casing carefully and set aside.

  9. Pantech Matrix Motherboard Replacement, Remove Camera Screws: 手順 9、 2の画像 1 Pantech Matrix Motherboard Replacement, Remove Camera Screws: 手順 9、 2の画像 2
    • Place phone with exposed motherboard facing you.

    • Use a Phillips screwdriver to remove the five 2mm Phillips #000 screws holding the camera in place.

  10. Pantech Matrix Motherboard Replacement, Expose Keypad: 手順 10、 1の画像 1
    • Carefully lift up the motherboard to expose the back of the keypad.

  11. Pantech Matrix Motherboard Replacement, Remove Keypad: 手順 11、 2の画像 1 Pantech Matrix Motherboard Replacement, Remove Keypad: 手順 11、 2の画像 2
    • Use spudger to gently pry the keypad away from the rest of the phone.

  12. Pantech Matrix Motherboard Replacement, Remove Motherboard: 手順 12、 3の画像 1 Pantech Matrix Motherboard Replacement, Remove Motherboard: 手順 12、 3の画像 2 Pantech Matrix Motherboard Replacement, Remove Motherboard: 手順 12、 3の画像 3
    • Grip the motherboard and gently pull to separate it from the rest of the phone.

終わりに

To reassemble your device, follow these instructions in reverse order.

ある他の人がこのガイドを完成しました。

作成者

3人の作成者と共同で作成されました。

Zeel Patel

メンバー登録日: 10/13/14

1,078 ポイント

9のガイドは作成済み

0 件のコメント

コメントを追加

統計データ:

過去 24時間: 0

過去 7 日: 1

過去 30 日: 1

今までの合計 200