メインコンテンツにスキップ

Pandigital Super Nova Screen Replacement

必要な工具と部品

  1. Pandigital Super Nova Screen Replacement, Battery: 手順 1、 1の画像 1
    • Remove the screw covers from each corner of the back side of the device.

    • Set aside.

  2. Pandigital Super Nova Screen Replacement: 手順 2、 2の画像 1 Pandigital Super Nova Screen Replacement: 手順 2、 2の画像 2
    • Using a Philips screwdriver, remove all four .15 mm screws from each corner.

    • Set aside.

  3. Pandigital Super Nova Screen Replacement: 手順 3、 1の画像 1
    • Using the plastic opening tool, remove the back cover of the device.

  4. Pandigital Super Nova Screen Replacement: 手順 4、 1の画像 1
    • Remove the three .11 mm screws that hold the battery in place.

    • Set aside.

  5. Pandigital Super Nova Screen Replacement: 手順 5、 2の画像 1 Pandigital Super Nova Screen Replacement: 手順 5、 2の画像 2
    • Unplug the battery and remove from device.

    • Avoid touching the motherboard as it is fragile.

  6. Pandigital Super Nova Screen Replacement, Front Facing Camera: 手順 6、 2の画像 1 Pandigital Super Nova Screen Replacement, Front Facing Camera: 手順 6、 2の画像 2
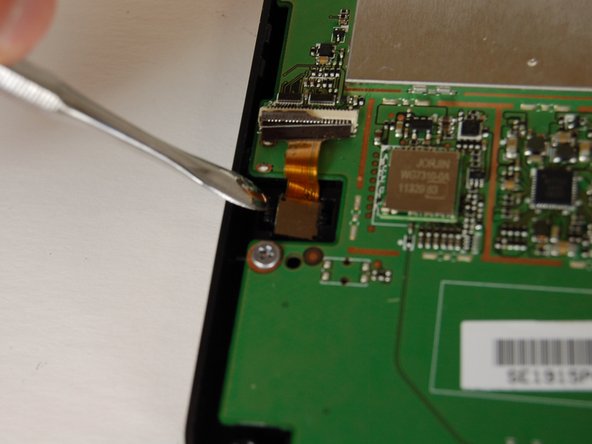
    • Use a metal pry tool to separate the camera and the small clip that holds it in place.

    • Do NOT touch the MotherBoard with your bare hands. There is risk of short circuiting the device. Use nitrile gloves to prevent this.

  7. Pandigital Super Nova Screen Replacement: 手順 7、 2の画像 1 Pandigital Super Nova Screen Replacement: 手順 7、 2の画像 2
    • Use a pair of small tweezers to gently pull the camera connector out of the motherboard.

  8. Pandigital Super Nova Screen Replacement, Screen: 手順 8、 2の画像 1 Pandigital Super Nova Screen Replacement, Screen: 手順 8、 2の画像 2
    • Use a screwdriver to remove the six .15 mm screws that hold the motherboard in place. Set aside.

  9. Pandigital Super Nova Screen Replacement: 手順 9、 3の画像 1 Pandigital Super Nova Screen Replacement: 手順 9、 3の画像 2 Pandigital Super Nova Screen Replacement: 手順 9、 3の画像 3
    • Remove the eleven screws that hold the screen to the base. Eight are .15 mm and three are .11 mm.

  10. Pandigital Super Nova Screen Replacement: 手順 10、 2の画像 1 Pandigital Super Nova Screen Replacement: 手順 10、 2の画像 2
    • Remove the motherboard from the tablet using a nylon spudger.

    • A regular black nylon spudger should be used to avoid damaging the motherboard.

  11. Pandigital Super Nova Screen Replacement: 手順 11、 2の画像 1 Pandigital Super Nova Screen Replacement: 手順 11、 2の画像 2
    • Use tweezers to carefully remove the connector between the screen to the tablet.

  12. Pandigital Super Nova Screen Replacement: 手順 12、 2の画像 1 Pandigital Super Nova Screen Replacement: 手順 12、 2の画像 2
    • Use a pry tool to carefully separate the motherboard from the hard casing.

    • Excessive force in this step can damage your device.

  13. Pandigital Super Nova Screen Replacement: 手順 13、 1の画像 1
    • Lift the motherboard out of the tablet.

    • Remove the second connector between the screen and the motherboard.

  14. Pandigital Super Nova Screen Replacement: 手順 14、 3の画像 1 Pandigital Super Nova Screen Replacement: 手順 14、 3の画像 2 Pandigital Super Nova Screen Replacement: 手順 14、 3の画像 3
    • Pry the silver screen box from away from the device.

    • Open each of the four clips securing the screen box to open it.

  15. Pandigital Super Nova Screen Replacement: 手順 15、 2の画像 1 Pandigital Super Nova Screen Replacement: 手順 15、 2の画像 2
    • Lift the screen out of its protective box.

    • If the protective box is damaged, it will also need replacing.

終わりに

To reassemble your device, follow these instructions in reverse order.

2 の人々がこのガイドを完成させました。

作成者

3人の作成者と共同で作成されました。

sterling hannsz

メンバー登録日: 10/10/16

267 ポイント

2のガイドは作成済み

チーム

Texas Tech, Team 1-2, Bennett Fall 2016 Texas Tech, Team 1-2, Bennett Fall 2016人のメンバー

TTU-BENNETT-F16S1G2

4 メンバー

6のガイドは作成済み

0 件のコメント

コメントを追加

統計データ:

過去 24時間: 0

過去 7 日: 2

過去 30 日: 6

今までの合計 255