メインコンテンツにスキップ

Panasonic Lumix DMC-ZS25 Speaker Replacement

必要な工具と部品

  1. Panasonic Lumix DMC-ZS25 Speaker Replacement, Speaker: 手順 1、 3の画像 1 Panasonic Lumix DMC-ZS25 Speaker Replacement, Speaker: 手順 1、 3の画像 2 Panasonic Lumix DMC-ZS25 Speaker Replacement, Speaker: 手順 1、 3の画像 3
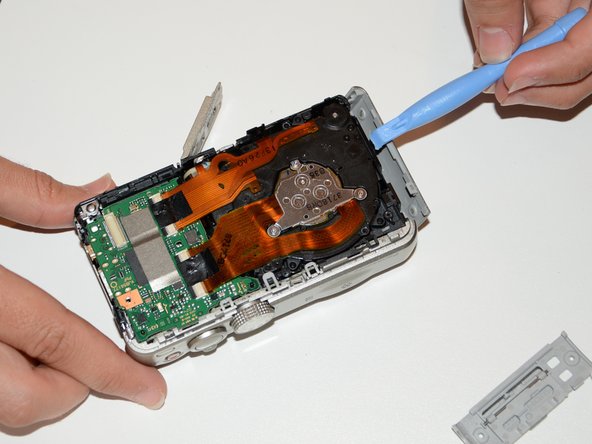
    • Remove the four 3.4 mm screws from the right and left sides of your Panasonic Lumix Camera.

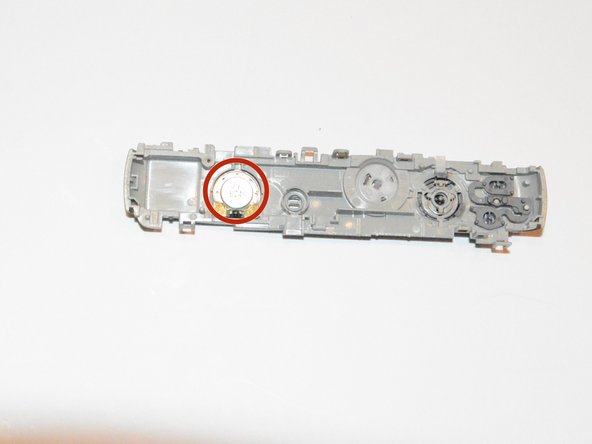
    • Remove the two 2.6 mm screws located next to the battery.

  2. Panasonic Lumix DMC-ZS25 Speaker Replacement: 手順 2、 1の画像 1
    • Use the plastic opening tool to lift off the rear cover of your device. Go gently to avoid breaking anything.

    • The easiest place to open your device is from the HDMI port.

    • Gently does it.

  3. Panasonic Lumix DMC-ZS25 Speaker Replacement: 手順 3、 3の画像 1 Panasonic Lumix DMC-ZS25 Speaker Replacement: 手順 3、 3の画像 2 Panasonic Lumix DMC-ZS25 Speaker Replacement: 手順 3、 3の画像 3
    • Use a spudger to lift the LCD ribbon cable locking bar by angling it up, then withdraw the ribbon.

    • Take care not to break it.

    • Use the plastic opening tool at the bottom right hand side of the button board to lift it up and out.

    • The buttons board comes out with a "click" as it snaps out of a connector below.

  4. Panasonic Lumix DMC-ZS25 Speaker Replacement: 手順 4、 2の画像 1 Panasonic Lumix DMC-ZS25 Speaker Replacement: 手順 4、 2の画像 2
    • The LCD is retained by a clip on the left hand side, which you can release with a plastic opening too.

    • Lift the LCD from the left hand side, disengaging it at the right hand side from two small tabs.

  5. Panasonic Lumix DMC-ZS25 Speaker Replacement: 手順 5、 2の画像 1 Panasonic Lumix DMC-ZS25 Speaker Replacement: 手順 5、 2の画像 2
    • Remove the two 4.2 mm screws in order to remove the inner cover located beneath the screen.

    • Having removed the screws, use the plastic opening tool to lift off the inner cover, releasing it from clips on the top and bottom edges.

  6. Panasonic Lumix DMC-ZS25 Speaker Replacement: 手順 6、 2の画像 1 Panasonic Lumix DMC-ZS25 Speaker Replacement: 手順 6、 2の画像 2
    • Remove the side covers using the plastic opening tool.

  7. Panasonic Lumix DMC-ZS25 Speaker Replacement: 手順 7、 2の画像 1 Panasonic Lumix DMC-ZS25 Speaker Replacement: 手順 7、 2の画像 2
    • After removing the side covers, you will be able to pull off the front cover.

    • Be careful when you pull the front cover to avoid breaking anything.

  8. Panasonic Lumix DMC-ZS25 Speaker Replacement: 手順 8、 1の画像 1
    • To remove the top cover, you need to remove a 3.7 mm screw as shown.

  9. Panasonic Lumix DMC-ZS25 Speaker Replacement: 手順 9、 3の画像 1 Panasonic Lumix DMC-ZS25 Speaker Replacement: 手順 9、 3の画像 2 Panasonic Lumix DMC-ZS25 Speaker Replacement: 手順 9、 3の画像 3
    • Release the top cover by lifting several tabs with the plastic opening tool. Go gently to avoid breaking them.

  10. Panasonic Lumix DMC-ZS25 Speaker Replacement: 手順 10、 3の画像 1 Panasonic Lumix DMC-ZS25 Speaker Replacement: 手順 10、 3の画像 2 Panasonic Lumix DMC-ZS25 Speaker Replacement: 手順 10、 3の画像 3
    • With the top cover removed the speaker can be very easily removed or replaced.

終わりに

To reassemble your device, follow these instructions in reverse order.

作成者

2人の作成者と共同で作成されました。

Abdulaziz Alotaibi

メンバー登録日: 01/21/15

176 ポイント

1ガイドが承認済み

チーム

USF Tampa, Team 9-5, Brown Winter 2015 USF Tampa, Team 9-5, Brown Winter 2015人のメンバー

USFT-BROWN-W15S9G5

3 メンバー

7のガイドは作成済み

コメント 1 件

In step 5, comparing it with the similar DMC-TZ35 I rather think there should be 3 screws, not 2. A 3rd hole can be seen at the bottom.

Philip Le Riche - 返信

コメントを追加

統計データ:

過去 24時間: 0

過去 7 日: 0

過去 30 日: 1

今までの合計 752