メインコンテンツにスキップ

Panasonic Lumix DMC-ZS1 Door Replacement

必要な工具と部品

  1. Panasonic Lumix DMC-ZS1 Door Replacement, Exterior Screw removal: 手順 1、 3の画像 1 Panasonic Lumix DMC-ZS1 Door Replacement, Exterior Screw removal: 手順 1、 3の画像 2 Panasonic Lumix DMC-ZS1 Door Replacement, Exterior Screw removal: 手順 1、 3の画像 3
    • Remove the battery and memory card from the unit

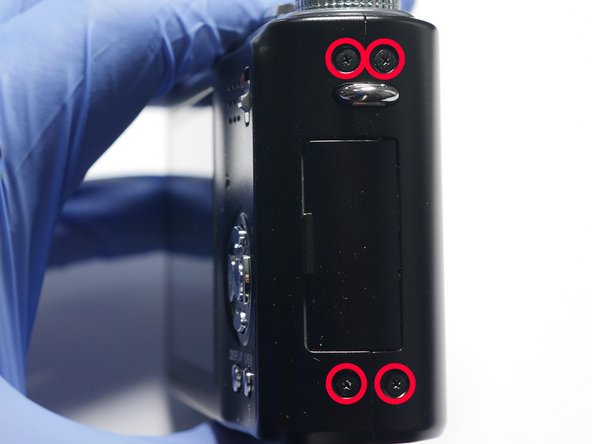
    • Remove 6 (0.3mm) screws from the sides of the unit

    • Remove 5 (0.3mm) screws from the bottom of the unit

  2. Panasonic Lumix DMC-ZS1 Door Replacement: 手順 2、 2の画像 1 Panasonic Lumix DMC-ZS1 Door Replacement: 手順 2、 2の画像 2
    • Lift up slightly the rear cover.

    • Do not remove rear cover yet. It is still attached to the Main PCB.

    • Flip up the cable clamps using a spudger or other device. Careful not to break the clamps. Release flex cables and remove back cover.

  3. Panasonic Lumix DMC-ZS1 Door Replacement: 手順 3、 3の画像 1 Panasonic Lumix DMC-ZS1 Door Replacement: 手順 3、 3の画像 2 Panasonic Lumix DMC-ZS1 Door Replacement: 手順 3、 3の画像 3
    • Release the 3 metal clips from the rear cover and remove the LCD

  4. Panasonic Lumix DMC-ZS1 Door Replacement, Door: 手順 4、 3の画像 1 Panasonic Lumix DMC-ZS1 Door Replacement, Door: 手順 4、 3の画像 2 Panasonic Lumix DMC-ZS1 Door Replacement, Door: 手順 4、 3の画像 3
    • Complete the following review guide: LCD removal

    • Remove the front cover

    • Use tweezers or a thin object to push door pin thru enough to grab from the other side.

    • Keep door closed during this procedure so you will not loose the spring.

  5. Panasonic Lumix DMC-ZS1 Door Replacement: 手順 5、 3の画像 1 Panasonic Lumix DMC-ZS1 Door Replacement: 手順 5、 3の画像 2 Panasonic Lumix DMC-ZS1 Door Replacement: 手順 5、 3の画像 3
    • Try to keep the door closed during this procedure.

    • Pull out door pin using needle nose pliers or other tool.

    • Notice spring positioning. This will help you re-install your replacement door

    • If you are having trouble installing, try to keep the spring in place by using a small piece of tape.

    • Replacement Door

終わりに

To reassemble your device, follow these instructions in reverse order.

ある他の人がこのガイドを完成しました。

作成者

2人の作成者と共同で作成されました。

Sales Cameraparts4you

メンバー登録日: 07/01/16

3,150 ポイント

20のガイドは作成済み

0 件のコメント

コメントを追加

統計データ:

過去 24時間: 0

過去 7 日: 0

過去 30 日: 1

今までの合計 141