メインコンテンツにスキップ

Panasonic Lumix DMC-FZ1000 Screen Replacement

必要な工具と部品

  1. Panasonic Lumix DMC-FZ1000 Screen Replacement, Screen: 手順 1、 2の画像 1 Panasonic Lumix DMC-FZ1000 Screen Replacement, Screen: 手順 1、 2の画像 2
    • Swing out the screen on the back of your camera by 90 degrees.

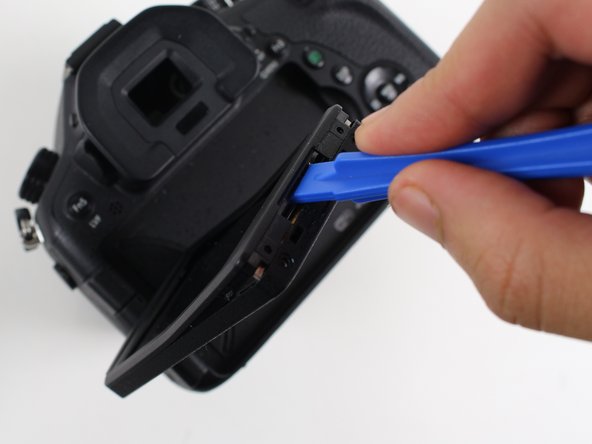
    • Remove the two 2.2 mm Phillips #00 screws on the outside edge of the screen.

  2. Panasonic Lumix DMC-FZ1000 Screen Replacement: 手順 2、 2の画像 1 Panasonic Lumix DMC-FZ1000 Screen Replacement: 手順 2、 2の画像 2
    • Rotate the screen clockwise by 90 degrees, so that the glass faces the viewfinder.

    • Remove the 4.1 mm Phillips #00 screw on the inside edge of the screen.

  3. Panasonic Lumix DMC-FZ1000 Screen Replacement: 手順 3、 2の画像 1 Panasonic Lumix DMC-FZ1000 Screen Replacement: 手順 3、 2の画像 2
    • Rotate the screen clockwise by another 180 degrees, so that the glass faces the bottom of the camera.

    • Remove the second 4.1 mm Phillips #00 screw on the inside edge of the screen.

  4. Panasonic Lumix DMC-FZ1000 Screen Replacement: 手順 4、 3の画像 1 Panasonic Lumix DMC-FZ1000 Screen Replacement: 手順 4、 3の画像 2 Panasonic Lumix DMC-FZ1000 Screen Replacement: 手順 4、 3の画像 3
    • In this step you will pry off the two sides of the screen's plastic casing. Do not yank off the side that holds the glass screen. If you do, you will tear the electronic ribbon attached to the screen and the screen axle.

    • Use a plastic opening tool to pry open the plastic screen casing. It might be easiest to start prying near the screen mount, and then work your way around the casing.

    • Hold on to the side that houses the glass screen. Set down the side that says LUMIX.

  5. Panasonic Lumix DMC-FZ1000 Screen Replacement: 手順 5、 3の画像 1 Panasonic Lumix DMC-FZ1000 Screen Replacement: 手順 5、 3の画像 2 Panasonic Lumix DMC-FZ1000 Screen Replacement: 手順 5、 3の画像 3
    • Do not yank out the electronic ribbon attached to the screen and the screen mount, or you may damage it. To properly detach this ZIF connector ribbon, see this technique on disconnecting ZIF connectors.

    • Pull to disconnect from the screen the ZIF connector ribbon attached to the screen axle.

    • Remove the screen and its casing from the screen axle.

    • Pull out the screen from its plastic casing.

終わりに

To reassemble your device, follow these instructions in reverse order.

6 の人々がこのガイドを完成させました。

作成者

1人の作成者と共同作成されました。

Robseth Taas

メンバー登録日: 01/07/16

1,781 ポイント

5のガイドは作成済み

チーム

Cal Poly, Team 70-5, Forte Winter 2016 Cal Poly, Team 70-5, Forte Winter 2016人のメンバー

CPSU-FORTE-W16S70G5

4 メンバー

15のガイドは作成済み

5 件のコメント

thank for this tuto... my screen is dark , so I use it to see if it was a problem of bad contact.. unfortunatly not !...

I just had somes difficulties to understand how to rebuild the screen ( the screen axle in the empty plastic casing first and then, the screem in the plastic casing, all on a table to have our 2 hands to reconnect the connector ribbon...

thank you

phil voyageur - 返信

Thank you for this tutorial. I dropped my camera and the screen cracked. I bought a screen from a vendor on eBay. [|The screen needed another ZIF connector to disconnect and connect, which is not shown in this titorial. But I figured that out.]

Yasuhiko Obara - 返信

Is this screen used in any other device where the price for ‘that device’ is a lot less than this FZ1000 screen? I can’t wrap my head around why a replacement LCD is so expensive. Even without backlight. And the display board is $150+ Just robbery.

Conservative View - 返信

Thank you for sharing, Screen is now working , great content - thanks Kevin

Kevin Timoney 1 - 返信

Thank you for helping me to disconnect the LCD screen. Does anyone know from where I can obtain a new screen? Thanks!

Ken Sobel - 返信

コメントを追加

統計データ:

過去 24時間: 2

過去 7 日: 23

過去 30 日: 97

今までの合計 4,911