メインコンテンツにスキップ

Panasonic Lumix DMC-FZ1000 Motherboard Replacement

必要な工具と部品

  1. Panasonic Lumix DMC-FZ1000 Motherboard Replacement, Battery: 手順 1、 3の画像 1 Panasonic Lumix DMC-FZ1000 Motherboard Replacement, Battery: 手順 1、 3の画像 2 Panasonic Lumix DMC-FZ1000 Motherboard Replacement, Battery: 手順 1、 3の画像 3
    • Slide the switch on the bottom of your camera from the right (LOCK) to the left (OPEN).

    • The battery door will swing open.

  2. Panasonic Lumix DMC-FZ1000 Motherboard Replacement: 手順 2、 2の画像 1 Panasonic Lumix DMC-FZ1000 Motherboard Replacement: 手順 2、 2の画像 2
    • Pull down on the lever that holds the battery.

    • The battery will pop out of its casing.

  3. Panasonic Lumix DMC-FZ1000 Motherboard Replacement: 手順 3、 1の画像 1
    • Pull out the battery.

  4. Panasonic Lumix DMC-FZ1000 Motherboard Replacement, Motherboard: 手順 4、 3の画像 1 Panasonic Lumix DMC-FZ1000 Motherboard Replacement, Motherboard: 手順 4、 3の画像 2 Panasonic Lumix DMC-FZ1000 Motherboard Replacement, Motherboard: 手順 4、 3の画像 3
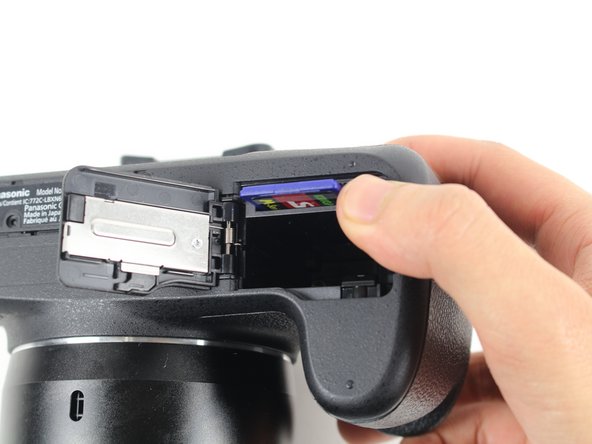
    • Push in on the SD card inside the battery housing.

    • The SD card will pop out.

    • Pull out the SD card.

    • Close the battery housing door.

    Il faut modifier “Étape 4 Carte mère” par “Étape 4 Carte mémoire”, mais je n’y arrive pas.

    Jojo Demonnom - 返信

  5. Panasonic Lumix DMC-FZ1000 Motherboard Replacement: 手順 5、 3の画像 1 Panasonic Lumix DMC-FZ1000 Motherboard Replacement: 手順 5、 3の画像 2 Panasonic Lumix DMC-FZ1000 Motherboard Replacement: 手順 5、 3の画像 3
    • Remove the two 5.2 mm Phillips #00 screws that are 1) below the label and 2) above the tripod mount hole on the bottom of the camera.

    • You may ignore the screw below the tripod mount hole.

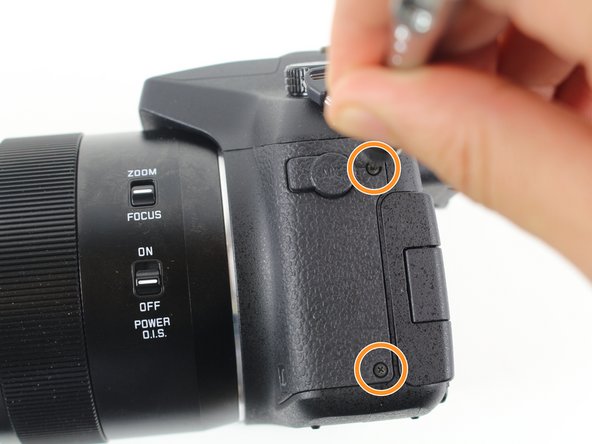
    • Remove the two 5.5 mm Phillips #00 screws on the side of the camera with the MIC jack.

    • Remove the two 7.0 mm Phillips #00 screws that are 1) above and 2) below the HDMI panel.

    • You may ignore the screw that goes through the leather material to the right of the HDMI panel.

    Quitar también los Phillips #?? zona de abajo del visor, desmontar ,y , quitar otros 2 phillips #?? interiores.

    blufs - 返信

    • There are two screws that hold the eye piece on to the main housing, just underneath. Remove these. Once these have been removed, gently pull and remove the eye piece and remove the now accessible top two screws.

  6. Panasonic Lumix DMC-FZ1000 Motherboard Replacement: 手順 7、 3の画像 1 Panasonic Lumix DMC-FZ1000 Motherboard Replacement: 手順 7、 3の画像 2 Panasonic Lumix DMC-FZ1000 Motherboard Replacement: 手順 7、 3の画像 3
    • Do not yank off the back plate. If you do, you will tear the electronic ribbons attached to the inside of the camera and the back plate.

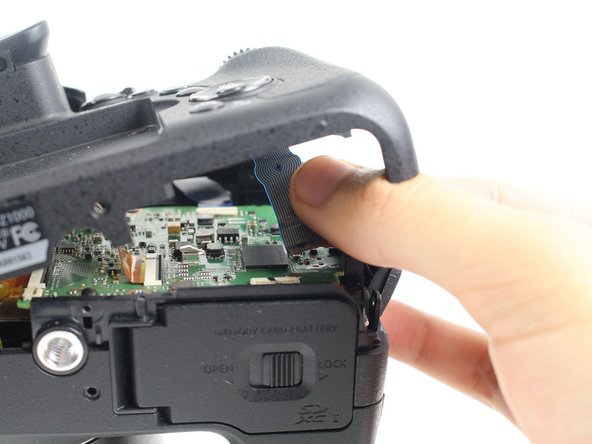
    • Gently lift up the back plate, being careful not to damage any ribbons.

    • Do not yank out the electronic ribbons attached to the motherboard and the back plate, or you may damage them. To properly detach these ZIF connector ribbons, see this technique on disconnecting ZIF connectors.

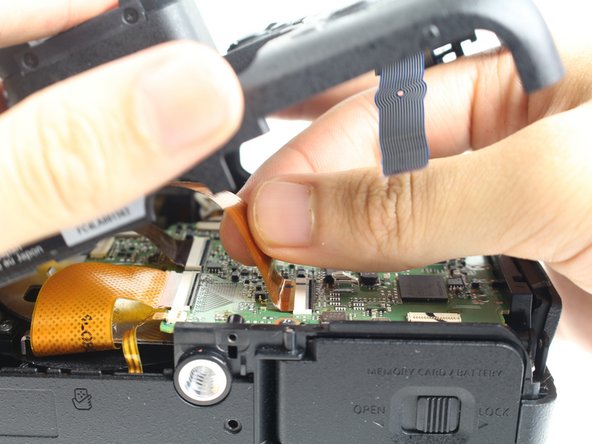
    • Pull to disconnect from the motherboard the two ZIF connector ribbons attached to the back plate.

    • Set aside the back plate.

    The eyepiece needs to be removed!

    Remove the phillips screws from the bottom of the eyepiece, remove the eyepiece and remove the two screws at the top of the eyepiece

    bailout00 - 返信

  7. Panasonic Lumix DMC-FZ1000 Motherboard Replacement: 手順 8、 1の画像 1
    • Do not yank out the electronic ribbons attached to the motherboard, or you may damage them. To properly detach these ZIF connector ribbons, see this technique on disconnecting ZIF connectors.

    • Pull to disconnect from the motherboard the seven ZIF connector ribbons.

  8. Panasonic Lumix DMC-FZ1000 Motherboard Replacement: 手順 9、 1の画像 1
    • Remove the four 5.2 mm Phillips #00 screws at the corners of the motherboard.

  9. Panasonic Lumix DMC-FZ1000 Motherboard Replacement: 手順 10、 3の画像 1 Panasonic Lumix DMC-FZ1000 Motherboard Replacement: 手順 10、 3の画像 2 Panasonic Lumix DMC-FZ1000 Motherboard Replacement: 手順 10、 3の画像 3
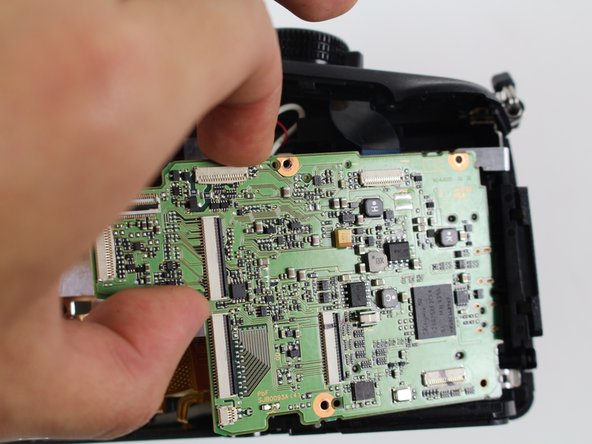
    • Firmly grasp the left side of the motherboard.

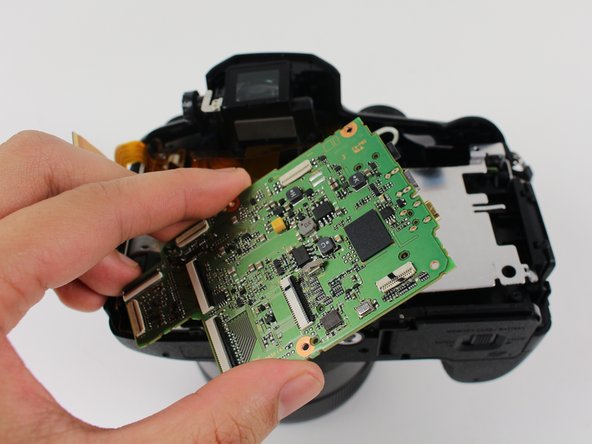
    • Pull out the motherboard.

    • If you find it difficult to remove the motherboard, pull it away from the HDMI panel while pulling it out.

    FZ1000 MK2: I could not remove the motherboard by itself but it came off easily together with the metal plate.

    Francesco Nardone - 返信

終わりに

To reassemble your device, follow these instructions in reverse order.

8 の人々がこのガイドを完成させました。

作成者

4人の作成者と共同で作成されました。

Robseth Taas

メンバー登録日: 01/07/16

1,781 ポイント

5のガイドは作成済み

チーム

Cal Poly, Team 70-5, Forte Winter 2016 Cal Poly, Team 70-5, Forte Winter 2016人のメンバー

CPSU-FORTE-W16S70G5

4 メンバー

15のガイドは作成済み

3 件のコメント

Where do you buy a motherboard for this camera?

Pekka Liemola - 返信

This article is useless, since the motherboards are not available anywhere.

Pete Schliebner - 返信

Actually, Panasonic does have the part for sale. <https://panasonic.encompass.com/item/102...>

Jeffry Long - 返信

コメントを追加

統計データ:

過去 24時間: 1

過去 7 日: 15

過去 30 日: 66

今までの合計 6,929