メインコンテンツにスキップ

Panasonic Lumix DMC-F7 Back Case Replacement

必要な工具と部品

  1. Panasonic Lumix DMC-F7 Back Case Replacement, Battery: 手順 1、 1の画像 1
    • Slide the lock switch to the right so that it is in the unlocked position.

    • Use your finger to slide the battery hatch in the direction of the downward arrow so that the hatch is open.

    • Both battery and memory card should now be visible.

  2. Panasonic Lumix DMC-F7 Back Case Replacement: 手順 2、 1の画像 1
    • Open the battery hatch and then the black cover to expose the battery compartment.

    • The camera used to create these repair guides did not have a battery and memory card.

    • Remove the battery.

    • When installing the new battery, ensure it is in the same orientation as before.

  3. Panasonic Lumix DMC-F7 Back Case Replacement, Back Case: 手順 3、 1の画像 1
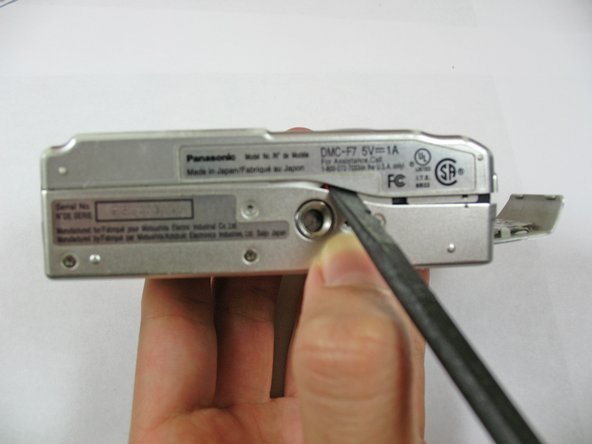
    • Using the Phillips #00 screwdriver, remove the two 2.8 mm screws located under the hatch.

  4. Panasonic Lumix DMC-F7 Back Case Replacement: 手順 4、 1の画像 1
    • Use the Phillips #00 screwdriver to remove the three 2.8 mm screws on the bottom of the camera.

  5. Panasonic Lumix DMC-F7 Back Case Replacement: 手順 5、 1の画像 1
    • Use the Phillips #00 screwdriver to remove the two 2.8 mm screws on the side of the camera.

  6. Panasonic Lumix DMC-F7 Back Case Replacement: 手順 6、 2の画像 1 Panasonic Lumix DMC-F7 Back Case Replacement: 手順 6、 2の画像 2
    • Use a spudger to pry open the case at all sides.

  7. Panasonic Lumix DMC-F7 Back Case Replacement: 手順 7、 2の画像 1 Panasonic Lumix DMC-F7 Back Case Replacement: 手順 7、 2の画像 2
    • Be careful not to damage the ribbon cable when opening. Ensure it is still attached.

    • Use your fingers to carefully remove the back casing from the front of the camera.

  8. Panasonic Lumix DMC-F7 Back Case Replacement: 手順 8、 1の画像 1
    • Place the camera on a flat surface with the front side facing down.

    • Use the spudger to flip up the retaining flap and slide the ribbon cable out of the connector.

    • Hold down on the camera's metal casing with one hand. Using your other hand, remove the back case from the rest of the camera.

終わりに

To reassemble your device, follow these instructions in reverse order.

ある他の人がこのガイドを完成しました。

作成者

14人の作成者と共同で作成されました。

Alex Penman

メンバー登録日: 01/28/11

463 ポイント

4のガイドは作成済み

チーム

Cal Poly, Team 7-35, Regan Winter 2011 Cal Poly, Team 7-35, Regan Winter 2011人のメンバー

CPSU-REGAN-W11S7G35

4 メンバー

10のガイドは作成済み

0 件のコメント

コメントを追加

統計データ:

過去 24時間: 2

過去 7 日: 2

過去 30 日: 2

今までの合計 893