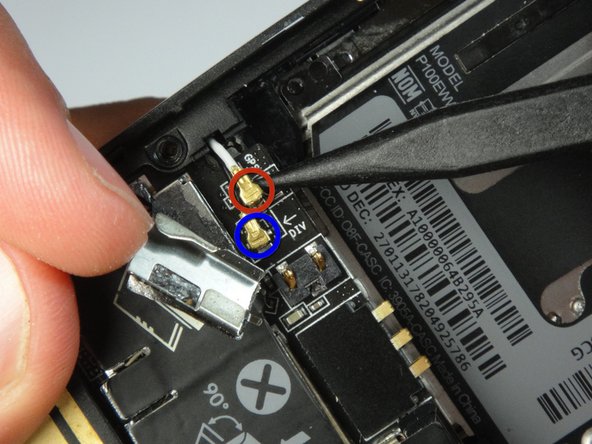
メインコンテンツにスキップ

Palm Pre Antenna Replacement

アーカイブされたガイド
このガイドは将来的な使用のためにのみ保存されてます。ご自身の修理作業には更新バージョンをご利用ください。

必要な工具と部品

  1. Palm Pre Antenna Replacement, Antenna: 手順 1、 2の画像 1 Palm Pre Antenna Replacement, Antenna: 手順 1、 2の画像 2
    • First the back panel must be removed to reveal the battery.

    • Remove the battery pack.

  2. Palm Pre Antenna Replacement: 手順 2、 2の画像 1 Palm Pre Antenna Replacement: 手順 2、 2の画像 2
    • Remove the six T5 screws necessary to separate the backplate from the phone.

    • There is one screw in the upper right that is concealed by a small sticker labeled "Palm."

    • Additionally, there are interlocking tabs securing the back plate around the edges.

    • Use the opening tool to carefully go around the phone releasing these tabs.

  3. Palm Pre Antenna Replacement: 手順 3、 2の画像 1 Palm Pre Antenna Replacement: 手順 3、 2の画像 2
    • Lift the metal flap marked in red to reveal the antenna connectors.

    • Carefully pry these the antennas from their connections, this can be done quite easily.

    • Take note of which colored wire is attached to each connection. The white wire corresponds to GPS, while the black wire corresponds to DIV, or diversity antenna.

終わりに

To reassemble your device, follow these instructions in reverse order.

作成者

8人の作成者と共同で作成されました。

iDeleted

メンバー登録日: 07/07/10

2,101 ポイント

39のガイドは作成済み

0 件のコメント

コメントを追加

統計データ:

過去 24時間: 0

過去 7 日: 0

過去 30 日: 0

今までの合計 342