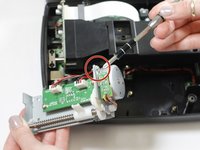
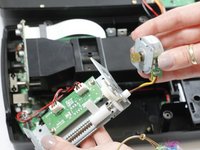
メインコンテンツにスキップ

Pacific Image Electronics CS3600 Motor Replacement

必要な工具と部品

  1. Pacific Image Electronics CS3600 Motor Replacement, Motor: 手順 1、 2の画像 1 Pacific Image Electronics CS3600 Motor Replacement, Motor: 手順 1、 2の画像 2
    • To start, open the device by removing the 5, 5mm x 9mm screws, with a Phillips J1 screwdriver.

  2. Pacific Image Electronics CS3600 Motor Replacement: 手順 2、 1の画像 1
    • Next, remove the 5 9mm x 5mm screws from the circled spots with a Phillips J1 screwdriver.

  3. Pacific Image Electronics CS3600 Motor Replacement: 手順 3、 1の画像 1
    • Once the screws are removed, carefully lift the motor casing out of the device.

    • The plastic piece circled acts as a clamp, lift the casing up and towards you to detach the casing.

  4. Pacific Image Electronics CS3600 Motor Replacement: 手順 4、 2の画像 1 Pacific Image Electronics CS3600 Motor Replacement: 手順 4、 2の画像 2
    • Now, with the motor casing in hand, remove the two 9mm x 5mm screw and washer at the top of the motor casing using a J1 screwdriver.

    • Gently pull the motor away from the casing to expose the wires.

  5. Pacific Image Electronics CS3600 Motor Replacement: 手順 5、 1の画像 1
    • Carefully desolder the wires from their contact point on the circuit board.

    • You have now successfully removed the motor!

終わりに

To reassemble your device, follow these instructions in reverse order.

作成者

3人の作成者と共同で作成されました。

Alessia Carlton

メンバー登録日: 03/21/17

201 ポイント

2のガイドは作成済み

チーム

Texas Tech, Team S46-G2, Bennett Spring 2017 Texas Tech, Team S46-G2, Bennett Spring 2017人のメンバー

TTU-BENNETT-S17S46G2

3 メンバー

10のガイドは作成済み

0 件のコメント

コメントを追加

統計データ:

過去 24時間: 1

過去 7 日: 2

過去 30 日: 2

今までの合計 221