メインコンテンツにスキップ

必要な工具と部品

この分解は修理ガイドでは ありません。 お持ちのPSP 300xを修理する際は、iFixitの修理ガイドをご利用ください。

  1. PSP 300xの分解, PSP 300xの分解: 手順 1、 2の画像 1 PSP 300xの分解, PSP 300xの分解: 手順 1、 2の画像 2
    • 1番目の画像は、PSP-3000を前面から見た画像です。2番目の画像は、背面から見た画像です。

  2. PSP 300xの分解: 手順 2、 2の画像 1 PSP 300xの分解: 手順 2、 2の画像 2
    • PSP裏面の左側からカバーを持ち上げて、バッテリーが見える状態にします。

    • バッテリーの上部を爪で引き上げて、取り出します。

  3. PSP 300xの分解: 手順 3、 3の画像 1 PSP 300xの分解: 手順 3、 3の画像 2 PSP 300xの分解: 手順 3、 3の画像 3
    この手順で使用する道具:
    Metal Spudger Set
    $7.99
    購入する
    • スパッジャーや爪を使って(スパッジャーセットはiFixit で購入できます)Metal Spudger Set

    • #0プラスドライバーを使い(ドライバーはiFixit http://www.ifixit.com/Tools#0-Phillips で購入できます)、PSP背面のネジを4本すべて外します。

    • バッテリー裏面 2本

    • PSPの右側 2本

  4. PSP 300xの分解: 手順 4、 2の画像 1 PSP 300xの分解: 手順 4、 2の画像 2
    • PSP上端からネジを2本外します。

    • PSPの向きを変え、下端からネジを1本外します。

  5. PSP 300xの分解: 手順 5、 2の画像 1 PSP 300xの分解: 手順 5、 2の画像 2
    • PSPのアウターケースの間にスパッジャーを差し込み、Rトリガーからスライドさせて慎重にケースをこじ開けます。

    • アウターケースを完全に取り外します。

  6. この手順は未翻訳です。 翻訳を手伝う。

    PSP 300xの分解: 手順 6、 3の画像 1 PSP 300xの分解: 手順 6、 3の画像 2 PSP 300xの分解: 手順 6、 3の画像 3
    • Push the homebar to the right to release the tab on the right side of the LCD screen.

    • DO NOT completely remove the homebar, as it is still connected by ribbon cables.

    • Slowly begin to lift the LCD screen off the PSP from the top edge.

    • Again, the LCD screen is attached by ribbon cables, so do not remove it completely.

  7. この手順は未翻訳です。 翻訳を手伝う。

    PSP 300xの分解: 手順 7、 3の画像 1 PSP 300xの分解: 手順 7、 3の画像 2 PSP 300xの分解: 手順 7、 3の画像 3
    • Using a spudger or fingernail, flip the small brown locks on the four ribbon cable connectors up.

    • WARNING! Be carefull removing the small ribbion from the LCD connector, it is very delicate. Using a spudger lift the black plastic up, NOT the white part on the connector!

    • Pull all four ribbon cables out, and remove the LCD screen and homebar from the PSP.

  8. PSP 300xの分解: 手順 8、 3の画像 1 PSP 300xの分解: 手順 8、 3の画像 2 PSP 300xの分解: 手順 8、 3の画像 3
    • PSP上端から小サイズの金属バーを取り外します(これは、LCDスクリーンを固定するのに必要です。)。

    • PSPからボタンパッドを取り外します。

  9. PSP 300xの分解: 手順 9、 3の画像 1 PSP 300xの分解: 手順 9、 3の画像 2 PSP 300xの分解: 手順 9、 3の画像 3
    • Lトリガーを留めているネジを外します。

    • Lトリガーを固定している白プラスチック片を外します。

    • PSPからLトリガーを取り外します。

  10. この手順は未翻訳です。 翻訳を手伝う。

    PSP 300xの分解: 手順 10、 3の画像 1 PSP 300xの分解: 手順 10、 3の画像 2 PSP 300xの分解: 手順 10、 3の画像 3
    • Unscrew the 'R' trigger and remove both pieces. (Refer to step nine by applying the procedures to this, the right, side)

  11. PSP 300xの分解: 手順 11、 2の画像 1 PSP 300xの分解: 手順 11、 2の画像 2
    • PSP左下の角に留めてあるネジを外します。

    • リボンケーブルを切断しないように注意し、スパッジャーを使い、Lトリガーの下から接着ボタンを剥がします。

  12. PSP 300xの分解: 手順 12、 3の画像 1 PSP 300xの分解: 手順 12、 3の画像 2 PSP 300xの分解: 手順 12、 3の画像 3
    • スパッジャーや指の爪を使って、リボンケーブルのブラウンロックを跳ね上げます。

    • コネクタからケーブルの接続を外し、PSPから黒いかけら全体を取り外します。

    • アナログスティックからネジを外します。

  13. PSP 300xの分解: 手順 13、 3の画像 1 PSP 300xの分解: 手順 13、 3の画像 2 PSP 300xの分解: 手順 13、 3の画像 3
    • アナログスティックをメインボードに接続しているリボンケーブルのロックを解除し、接続を外します。

    • PSPからアナログスティックを取り外します。

  14. この手順は未翻訳です。 翻訳を手伝う。

    PSP 300xの分解: 手順 14、 3の画像 1 PSP 300xの分解: 手順 14、 3の画像 2 PSP 300xの分解: 手順 14、 3の画像 3
    • Unlock and remove the ribbon cable from the power switch on the right side of the PSP.

    • Unscrew and remove the screw from the yellow power jack.

    • Carefully bend back the black tab holding the power jack in place and start pulling the plug up to release it from this clip.

  15. PSP 300xの分解: 手順 15、 1の画像 1
    • 電源ジャックをマザーボードに接続しているプラグを引き抜きます。

    • 電源ジャックを取り外します。

  16. この手順は未翻訳です。 翻訳を手伝う。

    PSP 300xの分解: 手順 16、 2の画像 1 PSP 300xの分解: 手順 16、 2の画像 2
    • Push the black tab at the bottom of the speaker over.

    • The speaker should pop out of place, and you should be able to remove it easily.

  17. PSP 300xの分解: 手順 17、 3の画像 1 PSP 300xの分解: 手順 17、 3の画像 2 PSP 300xの分解: 手順 17、 3の画像 3
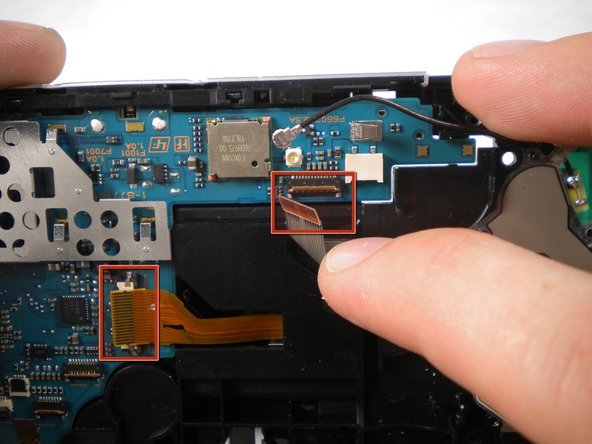
    • プラグからワイヤレスアンテナケーブルを引き抜きます。

    • 2本のリボンケーブルのロックを解除し、マザーボードから取り外します。

  18. PSP 300xの分解: 手順 18、 2の画像 1 PSP 300xの分解: 手順 18、 2の画像 2
    • パワースイッチボードのネジを外します。

    • スイッチアセンブリ/ボードを取り外します。

  19. この手順は未翻訳です。 翻訳を手伝う。

    PSP 300xの分解: 手順 19、 2の画像 1 PSP 300xの分解: 手順 19、 2の画像 2
    • Unlock and remove one last ribbon cable from the bottom edge of the PSP.

    • Remove the screw from the bottom left corner of the PSP.

  20. この手順は未翻訳です。 翻訳を手伝う。

    PSP 300xの分解: 手順 20、 2の画像 1 PSP 300xの分解: 手順 20、 2の画像 2
    • Lift the silver rim on the right side of the PSP up and off.

    • Lift the silver rim on the left side of the PSP up and off.

  21. この手順は未翻訳です。 翻訳を手伝う。

    PSP 300xの分解: 手順 21、 3の画像 1 PSP 300xの分解: 手順 21、 3の画像 2 PSP 300xの分解: 手順 21、 3の画像 3
    • Lift the motherboard up slowly starting from the bottom of the PSP, being careful not to damage the port on top.

    • Pull the motherboard out and remove it from the PSP.

    • The specific motherboard model of this PSP-3000 is TA-090

  22. PSP 300xの分解: 手順 22、 2の画像 1 PSP 300xの分解: 手順 22、 2の画像 2
    • PSP背面上部の白いプラスチック片を引き抜きます。

    • バネを引き抜き、PSPから取り外します。

  23. この手順は未翻訳です。 翻訳を手伝う。

    PSP 300xの分解: 手順 23、 3の画像 1 PSP 300xの分解: 手順 23、 3の画像 2 PSP 300xの分解: 手順 23、 3の画像 3
    この手順で使用する道具:
    Tweezers
    $4.99
    購入する
    • Open the UMD (disk drive) and locate the two small black rubber squares wedged in the space between the casing and the metal drive hinge on either side.

    • Pull these out using a pair of tweezers.

  24. この手順は未翻訳です。 翻訳を手伝う。

    PSP 300xの分解: 手順 24、 2の画像 1 PSP 300xの分解: 手順 24、 2の画像 2
    • Remove the metal piece from the drive.

    • Grabbing the PSP with both hands, gently pinch the UMD lid towards the right side (the side without the battery).

    • Pull up and the the left side carefully to remove the lid from the PSP. (The casing may have to flex a little bit to allow this)

  25. PSP 300xの分解: 手順 25、 2の画像 1 PSP 300xの分解: 手順 25、 2の画像 2
    • UMDドライブのネジを4本外します。

    • ドライブを取り出します。

  26. この手順は未翻訳です。 翻訳を手伝う。

    PSP 300xの分解: 手順 26、 3の画像 1 PSP 300xの分解: 手順 26、 3の画像 2 PSP 300xの分解: 手順 26、 3の画像 3
    • Enjoy the eye-candy.

以下の翻訳者の皆さんにお礼を申し上げます:

en jp

60%

railgunさんは世界中で修理する私たちを助けてくれています! あなたも貢献してみませんか?
翻訳を始める ›

作成者

7人の作成者と共同で作成されました。

mbnewsom

メンバー登録日: 10/28/09

3,118 ポイント

11のガイドは作成済み

9 件のコメント

Can you get me in pdf

Aayush - 返信

Does a PSP have any bearings inside of it?

Brooke Payne - 返信

No ball bearings. Thumbsticks are probably just Lubed plastics rubbing against eachother

mahonen -

Thank you very much for the guide.

C. JONES - 返信

This has inspired me to build my own PSP. I had one as a child, and want one now for the nostalgia. Thanks!

Sheenyl Hassan - 返信

コメントを追加

統計データ:

過去 24時間: 18

過去 7 日: 199

過去 30 日: 811

今までの合計 88,933