メインコンテンツにスキップ

P775DM3 Replacement WLAN Card

必要な工具と部品

  1. P775DM3 Replacement WLAN Card, Keyboard: 手順 1、 2の画像 1 P775DM3 Replacement WLAN Card, Keyboard: 手順 1、 2の画像 2
    • Unscrew the two screws circled in red

  2. P775DM3 Replacement WLAN Card: 手順 2、 3の画像 1 P775DM3 Replacement WLAN Card: 手順 2、 3の画像 2 P775DM3 Replacement WLAN Card: 手順 2、 3の画像 3
    • Press a paper clip in the three places marked in red

    • Lift the keyboard and feel free to put some strength

  3. P775DM3 Replacement WLAN Card: 手順 3、 2の画像 1 P775DM3 Replacement WLAN Card: 手順 3、 2の画像 2
    • Disconnect the three framed connectors in red

  4. P775DM3 Replacement WLAN Card: 手順 4、 2の画像 1 P775DM3 Replacement WLAN Card: 手順 4、 2の画像 2
    • Pull the white drawer in the direction of the arrow to unlock the connector

    • Disconnect the red circled connector

  5. P775DM3 Replacement WLAN Card: 手順 5、 2の画像 1 P775DM3 Replacement WLAN Card: 手順 5、 2の画像 2
    • Pull the black drawer in the direction of the arrow to unlock the connector

    • Disconnect the red circled connector

  6. P775DM3 Replacement WLAN Card: 手順 6、 3の画像 1 P775DM3 Replacement WLAN Card: 手順 6、 3の画像 2 P775DM3 Replacement WLAN Card: 手順 6、 3の画像 3
    • Lift the flap that holds the connector circled in red

    • Disconnect the red circled connector

    • Remove the keyboard

  7. P775DM3 Replacement WLAN Card, WLAN card removal: 手順 7、 3の画像 1 P775DM3 Replacement WLAN Card, WLAN card removal: 手順 7、 3の画像 2 P775DM3 Replacement WLAN Card, WLAN card removal: 手順 7、 3の画像 3
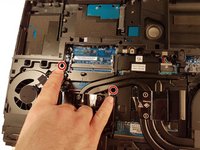
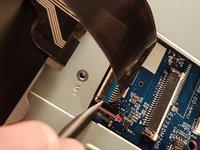
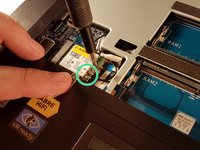
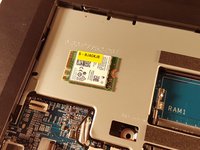
    • Unscrew the screw circled in red.

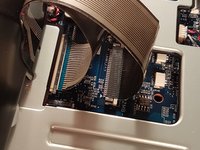
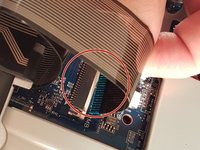
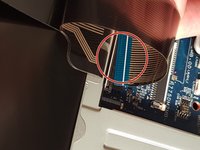
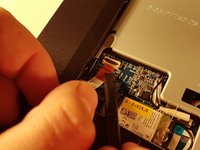
    • Disconnect the two connectors circled in green.

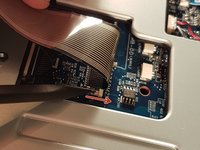
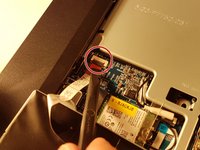
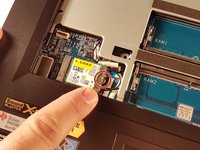
    • Remove the WLAN card.

終わりに

To reassemble your device follow the following instructions in reverse order

以下の翻訳者の皆さんにお礼を申し上げます:

fr en

100%

これらの翻訳者の方々は世界を修理する私たちのサポートをしてくれています。 あなたも貢献してみませんか?
翻訳を始める ›

作成者

3人の作成者と共同で作成されました。

Felice Suglia

メンバー登録日: 06/15/13

30,908 ポイント

264のガイドは作成済み

0 件のコメント

コメントを追加

統計データ:

過去 24時間: 2

過去 7 日: 6

過去 30 日: 10

今までの合計 228