メインコンテンツにスキップ

Oster 16-Speed Blender Fan and Motor Replacement

必要な工具と部品

  1. Oster 16-Speed Blender Fan and Motor Replacement, Fan and Motor: 手順 1、 2の画像 1 Oster 16-Speed Blender Fan and Motor Replacement, Fan and Motor: 手順 1、 2の画像 2
    • Remove the Blender Container from the Blender Base.

  2. Oster 16-Speed Blender Fan and Motor Replacement: 手順 2、 2の画像 1 Oster 16-Speed Blender Fan and Motor Replacement: 手順 2、 2の画像 2
    • Flip the blender so the bottom is facing you.

  3. Oster 16-Speed Blender Fan and Motor Replacement: 手順 3、 3の画像 1 Oster 16-Speed Blender Fan and Motor Replacement: 手順 3、 3の画像 2 Oster 16-Speed Blender Fan and Motor Replacement: 手順 3、 3の画像 3
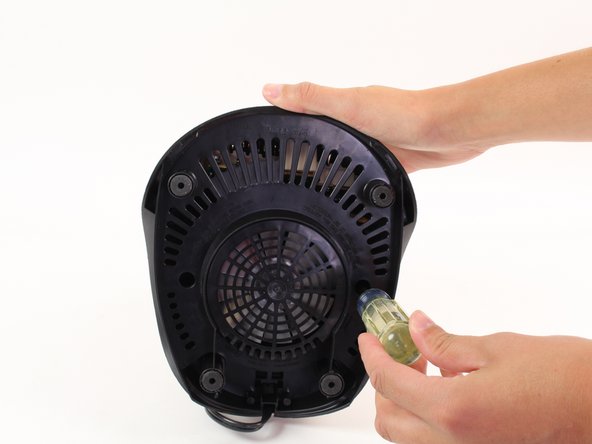
    • Unscrew the 16mm screws located on the plastic bottom from the blender base using a Phillips #2 screwdriver.

    Is it possible to get a replacement base. Just the plastic cover? I can't seem to find mine and it is cracked and broken yet still works.

    Blendin life - 返信

  4. Oster 16-Speed Blender Fan and Motor Replacement: 手順 4、 2の画像 1 Oster 16-Speed Blender Fan and Motor Replacement: 手順 4、 2の画像 2
    • Remove the plastic bottom from the base of the blender.

  5. Oster 16-Speed Blender Fan and Motor Replacement: 手順 5、 2の画像 1 Oster 16-Speed Blender Fan and Motor Replacement: 手順 5、 2の画像 2
    • Holding the center of the fan, grip the knob in the center of the top of the blender with a wrench and twist the wrench counterclockwise.

  6. Oster 16-Speed Blender Fan and Motor Replacement: 手順 6、 1の画像 1
    • Carefully remove the motor and fan from the base of the blender.

  7. Oster 16-Speed Blender Fan and Motor Replacement: 手順 7、 3の画像 1 Oster 16-Speed Blender Fan and Motor Replacement: 手順 7、 3の画像 2 Oster 16-Speed Blender Fan and Motor Replacement: 手順 7、 3の画像 3
    • Now, gently pull the white wire that is connected to the base and the motor.

    • Be careful, as there is a spring behind the contact points, that might try to shoot out and hurt you.

  8. Oster 16-Speed Blender Fan and Motor Replacement: 手順 8、 3の画像 1 Oster 16-Speed Blender Fan and Motor Replacement: 手順 8、 3の画像 2 Oster 16-Speed Blender Fan and Motor Replacement: 手順 8、 3の画像 3
    • Now, turn the motor over, and remove the black wire from the motor.

    • Again, be warned as the is another spring that wants to shoot out and hurt you here as well.

  9. Oster 16-Speed Blender Fan and Motor Replacement: 手順 9、 2の画像 1 Oster 16-Speed Blender Fan and Motor Replacement: 手順 9、 2の画像 2
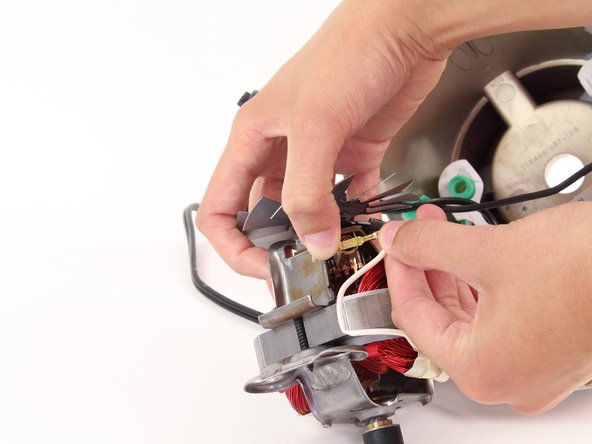
    • Now de-solder the yellow wire from circuit board. De-solder the wire following these instructions.

    • Be careful, as there is another, black wire, nearby that you do not want to de-solder.

終わりに

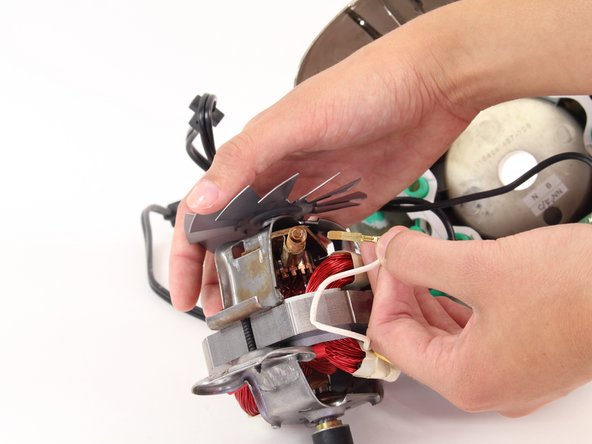
Now the fan and motor are ready for replacement. To reassemble your device, follow these instructions in reverse order.

2 の人々がこのガイドを完成させました。

作成者

2人の作成者と共同で作成されました。

Dana

メンバー登録日: 04/14/14

773 ポイント

5のガイドは作成済み

チーム

Cal Poly, Team 12-37, Maness Spring 2014 Cal Poly, Team 12-37, Maness Spring 2014人のメンバー

CPSU-MANESS-S14S12G37

4 メンバー

5のガイドは作成済み

2 件のコメント

My blender would not blend smoothly. It use to make an unusually loud noise when I put the cup and start the motor. I realized the motor had a "play" making me believe it was not tightened enough. I took a look at the pics on this page and then realized it was assembled wrongly. The white rubber used to absorb the movement was placed after the motor was inserted. Thanks to all who have contributed to this Oster page.

Arturo Acosta - 返信

Good day

i took apart my whole oster blender took the electric board out and all the button pieces came out. I have no idea what order they go in or how to put it back. There was a small spring that fell out as well as a Small plastic piece with 2 small springs in it. Can u please help?

Philip paiva - 返信

コメントを追加

統計データ:

過去 24時間: 2

過去 7 日: 10

過去 30 日: 37

今までの合計 9,201