メインコンテンツにスキップ

OnePlus X Rear Facing Camera Replacement

必要な工具と部品

  1. OnePlus X Rear Facing Camera Replacement, Rear Panel: 手順 1、 2の画像 1 OnePlus X Rear Facing Camera Replacement, Rear Panel: 手順 1、 2の画像 2
    • Power off the phone by pressing the button on the right side of the phone, it will be the smaller button.

    • Press and hold the button down for a few seconds, until the option "Power Off" appears on the screen.

    • Select "Power Off" on the screen to turn off the phone.

  2. OnePlus X Rear Facing Camera Replacement: 手順 2、 3の画像 1 OnePlus X Rear Facing Camera Replacement: 手順 2、 3の画像 2 OnePlus X Rear Facing Camera Replacement: 手順 2、 3の画像 3
    • Insert a SIM card removal tool into the small hole located on the top right corner of the phone, just above the volume buttons.

    • If you do not have the original packaging or a SIM card removal tool, you may use a straightened out paperclip or something similar.

    • Push the removal tool into the hole and the tray should pop out.

    • Remove the SIM tray from the phone.

  3. OnePlus X Rear Facing Camera Replacement: 手順 3、 3の画像 1 OnePlus X Rear Facing Camera Replacement: 手順 3、 3の画像 2 OnePlus X Rear Facing Camera Replacement: 手順 3、 3の画像 3
    • Put on heat-resistant gloves and place the phone on a surface that will not catch fire or melt.

    • Using a heat gun, apply slow and even heat to the edges of the back panel.

    • DO NOT stay on one spot for too long, the heat gun can damage the phone if the heat is applied to the same area for a long period of time.

    • While heating the back panel, use a Jimmy to test if the adhesive is soft enough to allow the panel to separate from the device.

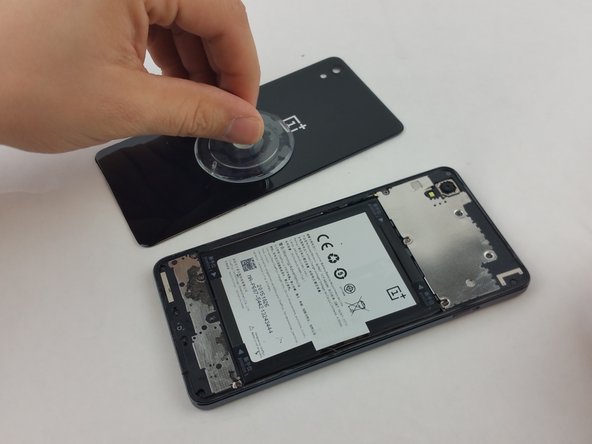
    • Carefully detach the back panel, using opening picks to hold the panel apart from the device.

    • Once most of the edges are separated from the device, attach a suction cup to the back panel.

  4. OnePlus X Rear Facing Camera Replacement: 手順 4、 3の画像 1 OnePlus X Rear Facing Camera Replacement: 手順 4、 3の画像 2 OnePlus X Rear Facing Camera Replacement: 手順 4、 3の画像 3
    • Press the suction cup to the back panel to secure it.

    • With the help of the suction cup, pull up on the panel to completely detach it from the device.

    • Use the suction cup to safely remove the panel from the device. As you work around the panel's edges, the lingering heat may cause the remaining adhesive to reattach the panel to the device, be sure to lift the back panel before the glue has time to set back.

  5. OnePlus X Rear Facing Camera Replacement, Battery: 手順 5、 3の画像 1 OnePlus X Rear Facing Camera Replacement, Battery: 手順 5、 3の画像 2 OnePlus X Rear Facing Camera Replacement, Battery: 手順 5、 3の画像 3
    • Using a PH000 screwdriver, remove the following seven screws circled with red and orange:

    • Four (longer) PH000 screws

    • Three shorter PH000 screws

    • Once all of the screws are removed, proceed to using a plastic spudger to pry the metal cover off.

    • There are two clips near the bottom, right above the battery, so start by prying on the bottom edge of the plate.

  6. OnePlus X Rear Facing Camera Replacement: 手順 6、 2の画像 1 OnePlus X Rear Facing Camera Replacement: 手順 6、 2の画像 2
    • Once the metal cover is removed, locate the battery connector wire, which clips into the motherboard.

    • Using a plastic spudger, gently pry on the clip to release it.

    • This will cut power to the phone, and prevent any power running to any of the components which is important while working on the phone.

  7. OnePlus X Rear Facing Camera Replacement: 手順 7、 3の画像 1 OnePlus X Rear Facing Camera Replacement: 手順 7、 3の画像 2 OnePlus X Rear Facing Camera Replacement: 手順 7、 3の画像 3
    • On the battery, locate a clear tab. This will be used to pull the battery out.

    • Firmly grasp the clear tab and pull up and away from the phone to remove the battery.

    • Take your time during this step, as you do not want to apply too much force and damage the battery.

    • There is an adhesive underneath the battery so it might be useful to utilize the black plastic spudger to get between the battery and the phone to pry the battery up but be very careful not to break the ribbon cables underneath the battery.

    • Continue to pull slowly on the battery, until it is completely free from the phone.

  8. OnePlus X Rear Facing Camera Replacement, Rear Facing Camera: 手順 8、 3の画像 1 OnePlus X Rear Facing Camera Replacement, Rear Facing Camera: 手順 8、 3の画像 2 OnePlus X Rear Facing Camera Replacement, Rear Facing Camera: 手順 8、 3の画像 3
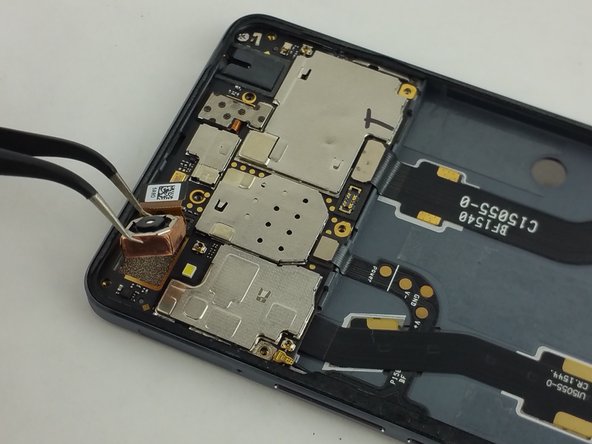
    • Locate the camera on the motherboard, near the top-left of the phone.

    • The camera is connected to the motherboard with a cable that is just to the right of the camera.

    • Using a plastic pry tool, gently unclip the cable from the motherboard.

    • After disconnecting the camera, use a pair of precision tweezers to lift the camera and remove it from the phone.

    • Make sure not to touch the camera, as it may smudge the lens and will be very difficult to clean.

終わりに

To reassemble your device, follow these instructions in reverse order.

作成者

3人の作成者と共同で作成されました。

Luis Castro

メンバー登録日: 02/07/16

2,061 ポイント

4のガイドは作成済み

チーム

USF Tampa, Team 3-6, Wollert Spring 2016 USF Tampa, Team 3-6, Wollert Spring 2016人のメンバー

USFT-WOLLERT-S16S3G6

2 メンバー

10のガイドは作成済み

コメント 1 件

How to fixed anather android

Nihaz Chand - 返信

コメントを追加

統計データ:

過去 24時間: 0

過去 7 日: 0

過去 30 日: 1

今までの合計 1,992