はじめに
OnePlus 6はまた新たに次のモデルを登場させましたーそしてスマートフォンのモデル番号はきちんと5から6と1つ加えられました。OnePlus 6は誌上ではとても素晴らしいモデルとして取り上げられてしますが、実際にこの高度なスペックをもつモデルは分解テーブルに載せられるとどうなのでしょうか?修理をテーマにした簡単な算数をしてみたい方は私たちの分解に是非参加してください。
分解アクションをもっと見たいですか?私たちの
Facebook + Instagram + Twitter+Twitter日本語版 = 分解への近道です!
必要な工具と部品
ビデオの概要
-
-
OnePlusは次から次へと最新モデルを登場させることで知られていますが、最新モデルから販売価格を差し引いても、6に搭載されたスペックにがっかりすることはありません。
-
6.28インチSamsung製AMOLEDディスプレイ、2280 x 1080解像度(402 ppi)、 2.5D Gorilla Glass 5
-
Octa-core, 64ビット Qualcomm Snapdragon 845プロセッサ、6 GBもしくは8 GB LPDDR4X RAM
-
デュアルメインカメラ、16 MP (ƒ/1.7 with OIS)と20 MP (ƒ/1.7)モジュール式; 16 MP (ƒ/2.0) セルフィーカメラ
-
64 GB, 128 GBまたは256 GBの組み込み式ストーレッジ
-
USB Type-Cと3.5 mmオーディオポート
-
OxygenOS based on Android Oreo 8.1
-
-
-
裏側に回るとApple製品と同じカメラの突起が確認できます。カメラは指紋認証センサーと並列しており、このデザインはAndroidの有名な最新モデルを思い起こさせます。
-
カメラはNFC製ですか? アドバイスありがとうございますーこれから行う”非公認分解”で確認するよう念頭に置いておきます。
-
下側にはヘッドホンジャック(やった‼︎)とUSB Type-Cが付いています。
-
-
-
X線画像があれば、暗闇の中を進む必要はありません。私たちの親友であるCreative Electronがこのスマートフォンの全体図を映し出してくれました。
-
全体を見渡すとスタンダートな構造に見えます。ただし、アラートスライダを機能させるための巨大なスライド式メカニズムのものがあります。リニアアクチュエーターのようなものではないかと推測しますが真相は分かりません。
-
バーチャルな内部検査に満足したまま、SIMカードトレイに移ります。ここにOnePlus 6の噂の防水機能ーつまり完全ゴム製ガスケットの証拠を見つけました。
-
-
-
十分な長さがある指紋認証センサケーブルが搭載された赤いブラケットを取り外します。するとOnePlusが親切にも教えてくれているNFCアンテナが確認できます。
-
このバッテリーを取り出しやすくしてくれるグリーンのタブには "由此拉起可拆出电池"と書いてあります。日本語訳すると”バッテリーを取り出すにはこのタブを上向きに引っ張ります”と書かれています。
-
ラベルの表記内容は異なるものの、このバッテリーを取り外すにはプルタブを引っ張りることです。しかも少量の接着剤のみ付けれれています。ここでライバルから1つポイントアップです。
-
しかしながら、バッテリー容量は他の競争相手と比べると少し少ない結果です。OnePlusは12.70 Whであるのに対し、Galaxy S9+は13.48 Wh、Google Pixel 2 XLは13.6 Whです。
-
-
-
-
9本のプラスネジを外しても、プラスチックアンテナフレームは固定されたままです。しかし、液体侵入インジケーターの後ろにある隠れた10本目のネジを外すと内部にアクセスできます。
-
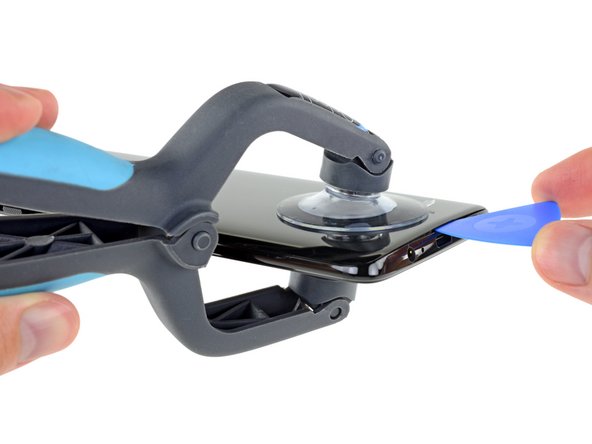
プラスチックのミッドフレームの下に大型のスライド式メカニズムを見つけました。これを詳細に点検しましょう。
-
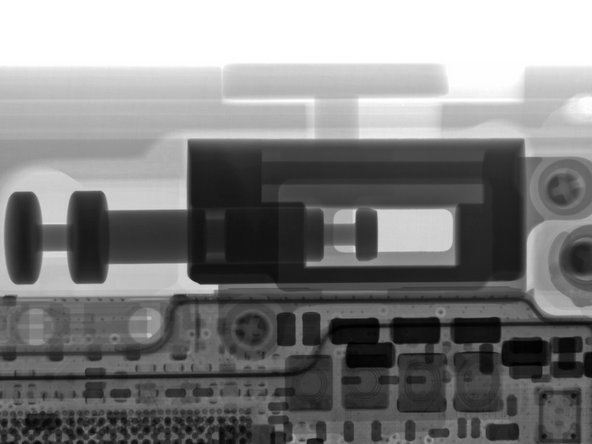
このスライド式ボタンは頑丈なメタル製プランジャーを動かします。これは基板に半田付けされた機械式スイッチを裏返す役割をしています。X線画像でみるとよりはっきりと確認できます。
The switch design is a result of the small (narrow) switch needing to move a slider with very distinct detente points. Moving that plunger keeps the switch moving more linearly (more of a push/pull, as opposed to a lever-action, which puts angular stress) and ensures easier finding/stopping the middle position. Very clever design.
Now that we have an entirely logical answer, here’s a decidedly more illogical but fun possibility:
I’m going to go with a more off-the-wall and Goldberg-ian idea - the metal plunger is designed to be used with a docking station with a moveable magnet to simultaneously help align the phone for wireless charging and also allow the docking station to move the alert switch in response to a pre-programmed user schedule. Entirely unnecessary and far from pragmatic but, woah! Right?!
-
-
-
デバイス本体と基板を繋げているコネクタの全てが外れました。スライドを取り出してチップを確認しましょう。
-
Samsung K3UH7H70MM-AGCJ8 GB LPDDR4X DRAM (Qualcomm Snapdragon 845に積層)
-
Samsung KLUDG4U1EA-B0C1 128 GB組み込み式ユニバーサルフラッシュストレージ
-
Qualcomm WCD9341 Aqsticオーディオコディック
-
Qualcomm QDM3620, QDM3670, QDM3671ダイバーシティ受信用モジュール
-
NXP Q3303 NFCコントローラー
-
Qualcomm PMI8998 PMIC
-
Maxim Integrated MAX98928 オーディオアンプ
Can i get this part replaced?
Can I replace my 64gb memory chip with 128gb?
Is it practical?
-
-
-
IC認識、パート2 :
-
Skyworks SKY85814-11 WiFiデュアルバンドの802.11acフロントエンドモジュール
-
Qualcomm QET4100 エンベロープトラッカー
-
8 Kbフラッシュ付きSTMicroelectronics STM8S003F3 8ビット マイクロコントローラー
-
Bosch Sensortec BMI160 3軸加速度センサー/ジャイロスコープ
-
Texas Instruments TPS65633B AMOLED ディスプレイ電源供給
-
Texas Instruments TXS0104E 4ビット双方向電圧レベル変換器
-
Knowles MEMSマイクロフォン
-
-
-
IC認識、パート3:
-
Maxim Integrated MAX14743 デュアルSPDT アナログスイッチ
-
ON Semiconductor FSUSB42UMXとNL3S2223 2ポート 480 Mbps USB 2.0アナログスイッチ
-
ON Semiconductor FPF2280 OVPロードスイッチ
-
Texas Instruments LP5907SNX-2.8 250 mA LDOレギュレータ
-
ON Semiconductor NCP114AMX300TCG and NCP114AMX180TxG 150 mA LDOレギュレータ
-
ON Semiconductor NCP140AMXD330TCG 300 mA LDO レギュレータ
-
ON Semiconductor DC-DCコンバーター
-
-
-
基板の点検を終える前に、防水機能について話をしましょう。防水機能が幾つかあります!全てのフレックスケーブル用ソケット周辺に黒色のシリコン製シールが付いています。これは前モデルのOnePlus 5でもありました。そしてiPhone 6s以降のモデルにも同じような機能がついています。
-
デバイス下側の端、ラウドスピーカーアセンブリの下に移りましょう。スピーカーグリル、USB Cポートやモジュール式ヘッドホンジャック周辺にも沢山のガスケットが使用されています。
That’s funny. I decided to give the pool jumping a try, OP6 in my pocket for about 1 minute. Screen died :(
-
-
-
さて元に戻ってカメラについて少しお話ししましょう。
-
同時に、このリアカメラは20 MP Sony IMX 376Kセンサを搭載しており、これは旧モデルのOnePlus 5Tから復活しました。セルフィーカメラは16 MP IMX 371でOnePlus 5以降、使用されています。
-
デバイス本体下側の端では、小さな副基板を裏返してカシス(筐体)に残されたものを点検します。
-
OLEDパネルはしっかりと接着剤で固定されていますーダメージなしでは取り出せないでしょう。ということは、ディスプレイを取り出した時にはダメージが入っているということです。この方法しかないということは、修理し難いデザインとしか言いようがありません。
Slightly incorrect as this isn't the first OnePlus to have OIS. The OnePlus 3 and 3T had it as well.
Thanks for the correction, I updated the step to reflect that.
I’m surprised how you go on to make a universal claim about the camera saying “reviews have found it to be lackluster versus the competition”, with the “review” from theverge as your only source, when this definitely isn’t the general consensus across the review-sphere.
@mtaki14 Fair point! Amended to say early reviews have been mixed, with links to several reviewers who feel the OnePlus 6 camera compares favorably with the Pixel 2 and iPhone X.
-
-
-
これで終了です!このモデルから集めた数多くのパーツを一言でまとめるなら、”12”でしょう。
-
ここでこのモデルの修理難易度スコアを付けてみましょう。
I having oneplus 6 8GB + 128GB variant and I need main mother board for it, my phone keep on restarting and the WiFi is not connecting.. any suggestions pls
-
- バッテリーはデバイス本体を開けると直接アクセスできます。バッテリーには少量の接着剤しか付けられていません。その上、便利なバッテリー用プルタブが付いています。
- 多くのコンポーネントはモジュール式で個別に交換ができます。
- 全てのネジ状ファスナーには様々なサイズのプラスネジが使用されています。
- 多くの修理に共通することですが、デザインにディスプレイの交換は配慮されていません。そのため交換作業にはかなりの労力が必要です。
- フロントと裏面のガラスはひび割れの確率が倍増します。ー例えば、ワイヤレス充電機能の便利さがないとしてもです。
- 全ての修理に取り掛かるためのアクセスポイントには、膨大な量の接着剤が使用されています。


まとめ
リペアビリティのスコア


(10点が最も修理しやすい指標です)
以下の翻訳者の皆さんにお礼を申し上げます:
94%

Midori Doiさんは世界中で修理する私たちを助けてくれています! あなたも貢献してみませんか?
翻訳を始める ›

20 件のコメント
I can’t fully grasp what that huge plunger is doing, even with your description and images. I’m 100% confused
I’d guess it’s there for better alignment. The detent on the 3T that I have works well, but there is some play introduced because the slider can roll slightly on the head of the switch, giving it some slop.
Is the vibrator a linear system or a rotating one? I remember seeing a casing similar to this one on the S6 and S7 (which gave strong, quiet vibration) but it could just be a circular rotating assembly like on the original Nexus 5 (which was honestly horrible.) I’m hoping it’s the former, as that would be a significant upgrade over the standard barrel motor vibrator on previous Oneplus phones.
The vibrating motor looks like a rotating one from the pictures above (Step 11 picture).
So there is no heat sink or heat pipe here as we see these days with those Samsung flagships!
I want to know how can we put back the back glass with adhesive
It’s will be a little difficult for this since it bonded with a very high force adhesive.
Qing Liu -
Thanks for video ) I'm interesting, Oneplus 6 mirror/midnight models have the same as color and material frames (not battery cover) or not?
Hi i have a oneplus 6, i bought when its release, after that phon droped in swiming pool now i can’t see anything on screen but still i am getting calls and vibrate ring tune all working fine but can’t see anything on screen, can someone help me with this situation.
Your display is gone. Now you have two possibilities: You can get a display from an online store and do it yourself, or you can send your phone to OnePlus, the replacements are actually not as expensive as in case of Samsung and Apple for example.
The chances are that OnePlus will deny to repair your phone though. By repairing your phone they have to guarantee the working of the replaced part, which in case of water damage is really unpredictable. After water damage every device could die any minute, technically. Most brands refuse to replace anything on water damaged devices.
Trying to fix my girlfriend's phone for her birthday - which is tomorrow!
Replaced the screen on the OnePlus six - was very careful so thought I'd done a good job. When I plug the phone in it vibrates and responds to pushes of the power and volume buttons, but I see nothing on the screen. What do I do?
Check the connection cables. Probably either the cable plug on the screen or on the Mobo are damaged. If that doesn't work send it to OP. As long as it hasn't got water damage they will repair it
Helyx -
I am curious to know how waterproof is the device. Any improvements over the 6?
Can i replace Volume button?
I dropped my oneplus 6 in the water and screen wasn’t going on so i bought a replacement and fixed it my self and now the screen works again :) Now my 2nd problem is that i dont have any sound from the bottom speaker and i bought a replacement but no luck so i guess its tied to something on the motherboard? Call speaker and headphone jack still works so i have no clue on what to do next and hope someone on here can help me?!?
I snapped the connector of the white cable connected to the motherboard. Does anyone know what it does?
Aidan Chui - 返信
io nell'aprire la cover ho strappato quel piccolo cavetto bianco che corre lungo tutto il telefono, a che cosa serve?????