メインコンテンツにスキップ

OnePlus 5 ドーターボードの交換

必要な工具と部品

  1. OnePlus 5 ドーターボードの交換, SIMカードトレイ: 手順 1、 3の画像 1 OnePlus 5 ドーターボードの交換, SIMカードトレイ: 手順 1、 3の画像 2 OnePlus 5 ドーターボードの交換, SIMカードトレイ: 手順 1、 3の画像 3
    • SIMカード取り出しツール、ビット、またはまっすぐに伸ばしたクリップを、SIMカードトレイの下にある小さな穴に挿入します。

    • しっかりと押し込んでトレイを取り出します。

    • 再組み立ての際、SIMトレイの挿入向きが正しいか確認してください。

  2. OnePlus 5 ドーターボードの交換, バックカバー: 手順 2、 1の画像 1
    • デバイス下端にあるUSB-Cポートの両側に留められた、2本の長さ2.6 mm T2ネジを外します。

    What are the reference of the screws ? They are missing in the one I bought !

    Yôken Asakura - 返信

    Hi Yôken,

    They help hold the back cover on. Most of the time, the clips are enough to hold the phone together.

    Arthur Shi -

    Just FYI, for whatever reason my brand new OnePlus 5 had 0,8 mm stars screws instead of T2 Torx.

    strixaluco - 返信

    Same here, T2 doesn’t fit the screws on my Oneplus 5. More like T1’s

    Shaze An - 返信

    Definitely T2 for me. Do watch out during assembly. I have a feeling that it’s easy to strip these.

    Juno Grégoire - 返信

    T2 for me too. It was missing in my kit and iFixit sent it later when I asked them about it.

    Gitanshu Sardana - 返信

  3. OnePlus 5 ドーターボードの交換: 手順 3、 3の画像 1 OnePlus 5 ドーターボードの交換: 手順 3、 3の画像 2 OnePlus 5 ドーターボードの交換: 手順 3、 3の画像 3
    • このオープニング手順を誤ると、ディスプレイパネルが破損する危険性が高くなります。

    • 以下の4つの手順では、リアケースをプラスチックフレームからこじ開ける方法を示しています。こじ開ける前に、まず手順に目を通してください。

    • デバイス本体とスクリーンの間には2種類の継ぎ目があります。

    • ディスプレイパネルの継ぎ目: この継ぎ目はディスプレイアセンブリの一部です。この継ぎ目をこじ開けないでください。ディスプレイパネルが分離し、損傷する可能性があります。

    • フレームの継ぎ目:プラスチックフレームと裏蓋の継ぎ目です。この継ぎ目だけをこじ開けます。

    • フレームをリアケースに固定する12個のクリップがあります。以下の手順でバックカバーをこじ開ける際、その位置に注意してください。

  4. OnePlus 5 ドーターボードの交換: 手順 4、 2の画像 1 OnePlus 5 ドーターボードの交換: 手順 4、 2の画像 2
    • 作業中、誤ってデバイスの電源を入れないようにしてください。誤って電源を入れてしまった場合、分解を再開する前にデバイスの電源を切ってください。

    • 吸盤カップをディスプレイの下端付近に装着します。

    • 安定した強い力で吸盤を上方に引っ張ります。

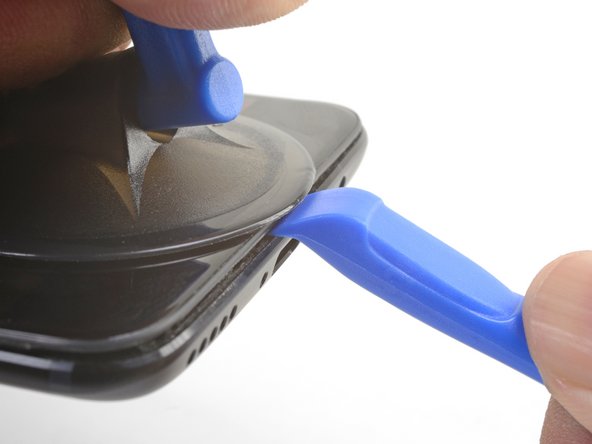
    • オープニングツールの先端を吸盤近くのフレームの継ぎ目にまっすぐ押し込み、エッジがプラスチックフレームとバックカバー先端の間に挟まるようにします。

    • かなりしっかりと固定されているため、この作業にはかなりの力が必要になります。先端が傷んでいない新しいオープニングツールを使うことをおすすめします。

    I found pushing open the frame seam at the corner works better than pushing from the middle like it is shown in the pictures

    Mark - 返信

    I found the suction cup to be more of a hindrance and kept hitting the power button, making it necessary to stop and turn the phone off again. I watched a youtube video where the person didn't use a suction cup at all and decided to try that. I also found that a guitar pick type spudger worked far better than the one shown in the picture. If you're having trouble getting it started, I suggest trying those two things.

    Brett Gersekowski - 返信

  5. OnePlus 5 ドーターボードの交換: 手順 5、 3の画像 1 OnePlus 5 ドーターボードの交換: 手順 5、 3の画像 2 OnePlus 5 ドーターボードの交換: 手順 5、 3の画像 3
    • オープニングツールの端が所定の位置に固定されたら、ツールをデバイス下端に沿って慎重にスライドさせます。

    • ツール先端端をデバイスの縫い目の内側に保ちながら、開口工具を携帯電話の左隅に注意深くスライドします。

    This was extremely difficult & took a lot of force. I needed a thin flat metal spudger and wrecked a couple of plastic ones in the process. I left a few scratches along the join in the process. It would be easier if I had something to hold the phone, in my hand I kept turning it on by accident.

    David Hoffman - 返信

    what was the metal spudger did you use? I am having trouble as well. I cannot seem to pry the back cover and it feels like it is shut tightly, there are no crevices I can pry into. What was your strategy may I ask?

    Azure Shoti -

    At first, I slightly opened the body with a plastic tool, but it was not enough to actually open the back cover. Then I used a thin metal screwdriver for this. It was difficult but nothing special. Just be sure that you are opening the correct seam between the body and the screen and don’t make sudden moves. I bent nothing, everything came back in place when reassembled.

    ivan -

    Same as David here: the plastic opening tools/guitar picks were doing nothing (not even creating the first "crack") . In the end I managed to open it using Jimmy (the metal knife/spudger), but not without scratching the whole metal cover.

    Nessuno Nessuno - 返信

  6. OnePlus 5 ドーターボードの交換: 手順 6、 2の画像 1 OnePlus 5 ドーターボードの交換: 手順 6、 2の画像 2
    • オープニングツールを持ち上げて、フレームから最初のクリップを解放します。

  7. OnePlus 5 ドーターボードの交換: 手順 7、 3の画像 1 OnePlus 5 ドーターボードの交換: 手順 7、 3の画像 2 OnePlus 5 ドーターボードの交換: 手順 7、 3の画像 3
    • 開口ツールを長辺に沿ってスライドさせ続け、途中でクリップを外します。

    • フロントカメラ付近の左上隅にある最後のクリップは凹んでおり、外すのが難しい場合があります。時間をかけて、スパッジャーの平らな端やオープニングピックを使ってください。

    If you have difficulties with the last clip on the upper left. Try to go round the other side (right side), beginning at the bottom. This worked very well for me after having some difficulties with the clip near the front camera.

    Sebastian - 返信

  8. OnePlus 5 ドーターボードの交換: 手順 8、 1の画像 1
    • デバイス下端と左端が解放された状態で、フレームを軽く動かして上端と右端のクリップを外します。

    • フレームは長いフレックスケーブルでバックカバーに接続されたままです。バックカバーは取り外さないでください。

    • 再組み立ての際、バックカバーを固定する前にここで作業を一時停止し、デバイスの機能をテストしてください。

    • バックカバーの再インストール方法

    • フレームの上端をバックカバーに合わせ、上部のクリップが所定の位置にはまることを確認します。

    • デバイス長辺側に沿ってしっかりと握り、残りのクリップを所定の位置にはめ込みます。

    Reinstalling the back cover stumped me for a second… If you’re struggling with aligning the top edge of the frame, remember that the camera is going to look off/pointed a bit too low until you actually clip the frame back in.

    Really stupid but it was the only thing that tripped me up in this guide.

    Roger - 返信

  9. OnePlus 5 ドーターボードの交換: 手順 9、 3の画像 1 OnePlus 5 ドーターボードの交換: 手順 9、 3の画像 2 OnePlus 5 ドーターボードの交換: 手順 9、 3の画像 3
    • クリップをすべて外した状態で、ディスプレイが下向きになるようにデバイスを裏返します。

    • バックカバーを回転させ、露出したフレームの上にのせます。

    • バックカバーとフレームをつなぐフレックスケーブルにストレスを与えないように注意してください。

  10. OnePlus 5 ドーターボードの交換: 手順 10、 2の画像 1 OnePlus 5 ドーターボードの交換: 手順 10、 2の画像 2
    • バッテリーの上にあるケーブルブラケットを固定している2.6 mmのプラスネジを外します。

    • ケーブルブラケットを持ち上げて取り外します。

    • ブラケットを再び取り付けるには、一方の端を所定の位置に合わせ、ブラケットを少し曲げてもう一方の端を所定の位置にバネで固定します。

  11. OnePlus 5 ドーターボードの交換: 手順 11、 2の画像 1 OnePlus 5 ドーターボードの交換: 手順 11、 2の画像 2
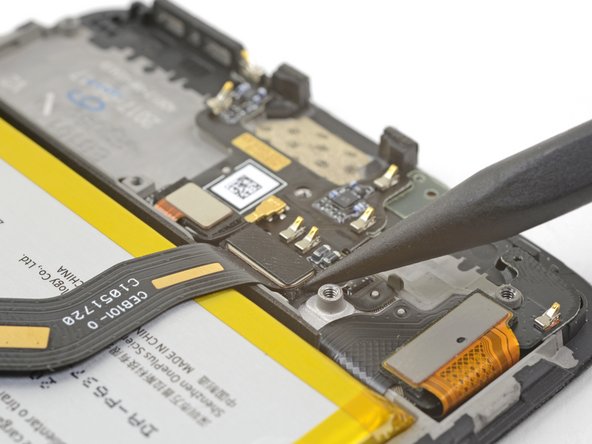
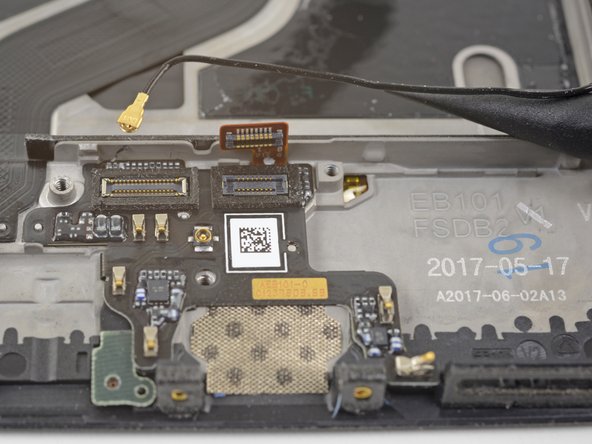
    • スパジャーの先でバックカバーフレックスケーブルをこじ り上げ、ソケットから外します。

    • このようなプレスコネクターを再装着するには、慎重に位置を合わせ、カチッと音がするまで片側を押し下げ、反対側も同様に押し下げます。真ん中は押さないでください。コネクタの位置がずれていると、ピンが曲がって永久的な損傷を与える可能性があります。

    If it is damaged permanently is there a solution for it?

    Run River - 返信

    If the flex cable pins are damaged, the flex cable can be replaced.

    If the connecter pins (on the motherboard) are damaged, you might need to do microsoldering (or contact a microsoldering company) to replace the damaged connector.

    Brendan -

  12. OnePlus 5 ドーターボードの交換: 手順 12、 1の画像 1
    • バックカバーを取り外します。

  13. OnePlus 5 ドーターボードの交換, OnePlus 5のバッテリーの接続の外し方: 手順 13、 2の画像 1 OnePlus 5 ドーターボードの交換, OnePlus 5のバッテリーの接続の外し方: 手順 13、 2の画像 2
    • スパッジャーの先端を使って、ソケットからバッテリーコネクタを持ち上げて、接続を外します。

  14. OnePlus 5 ドーターボードの交換, ラウドスピーカー: 手順 14、 1の画像 1
    • ラウドスピーカーをフレームに固定している2.6mmプラスネジを6本外します。

  15. OnePlus 5 ドーターボードの交換: 手順 15、 2の画像 1 OnePlus 5 ドーターボードの交換: 手順 15、 2の画像 2
    • ラウドスピーカーアセンブリの角にスパッジャーの平面側先端を差し込み、少しこじ開けるとラウドスピーカーが凹みから外れます。

  16. OnePlus 5 ドーターボードの交換: 手順 16、 1の画像 1
    • ラウドスピーカーを外す

    • ラウドスピーカーを再装着するには、ラウドスピーカーの下端をフレームに合わせ、アセンブリを所定の位置に押し込みます。

    • 再装着の際、ラウドスピーカーアセンブリ下のディスプレイケーブルコネクターがしっかりと固定されていることを確認してください。

  17. OnePlus 5 ドーターボードの交換, OnePlus 5 相互接続ケーブルの外し方: 手順 17、 3の画像 1 OnePlus 5 ドーターボードの交換, OnePlus 5 相互接続ケーブルの外し方: 手順 17、 3の画像 2 OnePlus 5 ドーターボードの交換, OnePlus 5 相互接続ケーブルの外し方: 手順 17、 3の画像 3
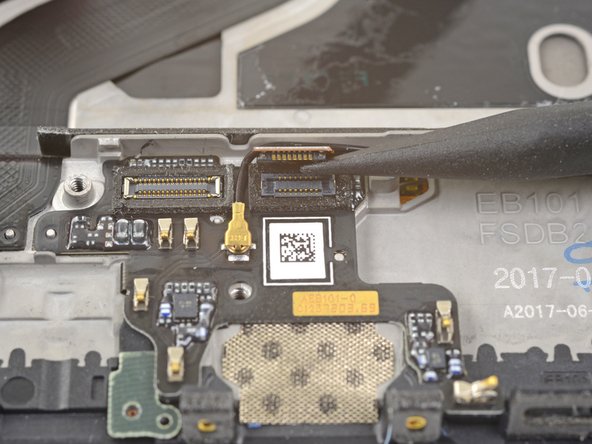
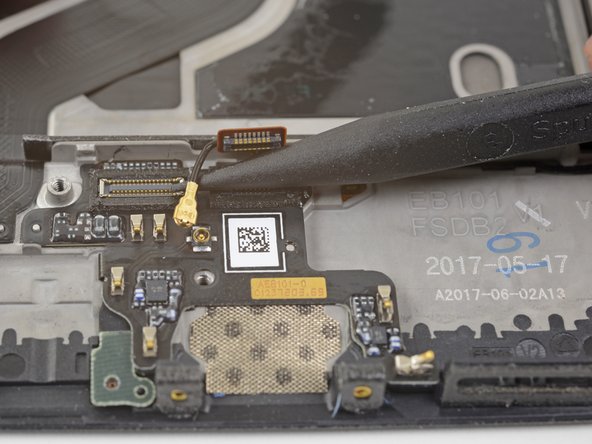
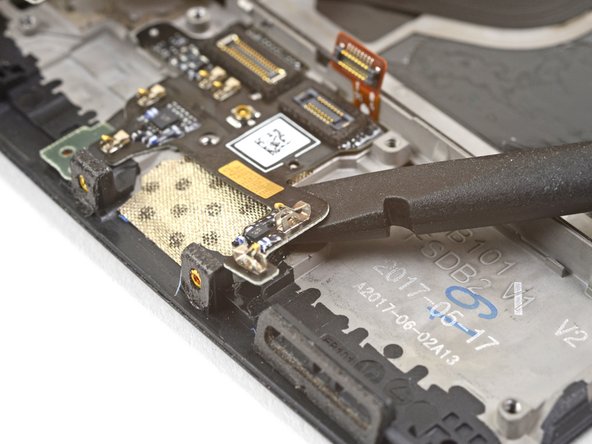
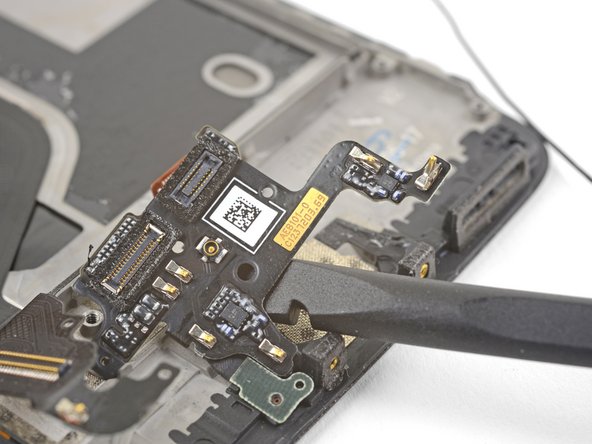
    • スパッジャー先端で相互接続フレックスケーブルをこじ上げ、ソケットから外します。

    • バッテリーを交換する場合は、相互接続ケーブルをデバイスから離して折り曲げ、輪ゴムやテープで邪魔にならないように固定します。

    What if you’re NOT replacing the battery?

    e nigma - 返信

    This step is used in multiple guides, and not all of them require the cable to be bent away. You can just leave it sitting there, disconnected.

    Arthur Shi -

    This image seems to show the daughterboard removed but there is no corresponding previous step. I see no way to remove the interconnect flex cable without removing the daughterboard. Possibly the volume switch can be removed with the cable still connected but I'm not confident enough to try this so will remove the daughterboard.

    David Hoffman - 返信

    David,

    Thanks for bringing this up. That's indeed a procedural error! I've added the missing steps in the affected guides.

    Arthur Shi -

  18. OnePlus 5 ドーターボードの交換, ドーターボード: 手順 18、 2の画像 1 OnePlus 5 ドーターボードの交換, ドーターボード: 手順 18、 2の画像 2
    • ドーターボードのソケットから指紋スキャナーコネクターをこじあけ、接続を外します。

  19. OnePlus 5 ドーターボードの交換: 手順 19、 3の画像 1 OnePlus 5 ドーターボードの交換: 手順 19、 3の画像 2 OnePlus 5 ドーターボードの交換: 手順 19、 3の画像 3
    • アンテナ相互接続ケーブルの下にスパッジャーの先を入れ、こじ上げてドーターボード上のソケットから外します。

    • アンテナ相互接続ケーブルをドーターボードの邪魔にならないように配線してください。

  20. OnePlus 5 ドーターボードの交換: 手順 20、 2の画像 1 OnePlus 5 ドーターボードの交換: 手順 20、 2の画像 2
    • スパッダーの平らな方の端をマイクボードの下に差し込み、少しねじってボードの接着剤を剥がします。

  21. OnePlus 5 ドーターボードの交換: 手順 21、 3の画像 1 OnePlus 5 ドーターボードの交換: 手順 21、 3の画像 2 OnePlus 5 ドーターボードの交換: 手順 21、 3の画像 3
    • ドーターボードの右端付近の下に、スパッジャーの平面側先端またはオープニングピックの先をスライドさせます。

    • ドーターボードをゆっくりとこじ開け、凹みから緩めます。

    • ドーターボードが大きく曲がり始めたら、いったん停止し、別の角度からこじ開けます。

  22. OnePlus 5 ドーターボードの交換: 手順 22、 3の画像 1 OnePlus 5 ドーターボードの交換: 手順 22、 3の画像 2 OnePlus 5 ドーターボードの交換: 手順 22、 3の画像 3
    • ドーターボードの下にスパッジャーの平面側先端を差し込みますが、今度は下側からアプローチします。

    • ドーターボードを凹みから外すために、スパッジャーを少しひねり、スライドさせます。

  23. OnePlus 5 ドーターボードの交換: 手順 23、 1の画像 1
終わりに

デバイスを再組み立てするには、これらのインストラクションを逆の順番に従って作業を進めてください。

e-wasteを処理する場合は、認可済みリサイクルセンターR2を通じて廃棄してください。

修理がうまく進みませんか?ベーシックなトラブルシューティングを試してみるか、OnePlus 5のアンサーコミュニティを参照してください。

ある他の人がこのガイドを完成しました。

以下の翻訳者の皆さんにお礼を申し上げます:

en jp

100%

Midori Doiさんは世界中で修理する私たちを助けてくれています! あなたも貢献してみませんか?
翻訳を始める ›

作成者

1人の作成者と共同作成されました。

Arthur Shi

メンバー登録日: 01/03/18

249,876 ポイント

503のガイドは作成済み

チーム

iFixit iFixit人のメンバー

Staff

135 メンバー

16,732のガイドは作成済み

コメント 1 件

Thank you so much.

Yasin Sil - 返信

コメントを追加

統計データ:

過去 24時間: 0

過去 7 日: 4

過去 30 日: 12

今までの合計 1,384