メインコンテンツにスキップ

Olympus VR-350 Back Plate Replacement

必要な工具と部品

  1. Olympus VR-350 Back Plate Replacement, Front Plate: 手順 1、 2の画像 1 Olympus VR-350 Back Plate Replacement, Front Plate: 手順 1、 2の画像 2
    • Remove the two 4mm screws from each side of the camera with a Phillips PH000 screwdriver.

  2. Olympus VR-350 Back Plate Replacement: 手順 2、 1の画像 1
    • Remove the four 4mm screws from the bottom of the camera with a Phillips PH000 screwdriver.

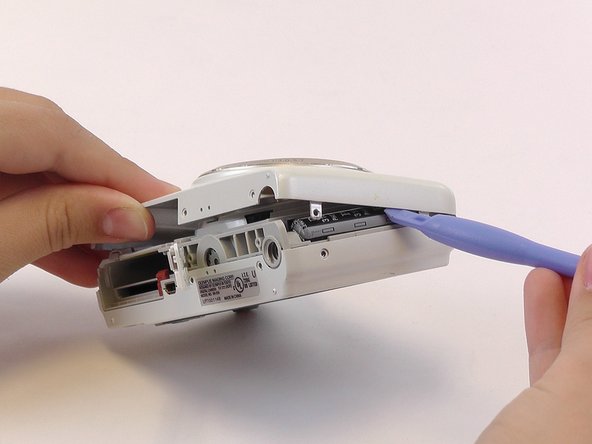
  3. Olympus VR-350 Back Plate Replacement: 手順 3、 3の画像 1 Olympus VR-350 Back Plate Replacement: 手順 3、 3の画像 2 Olympus VR-350 Back Plate Replacement: 手順 3、 3の画像 3
    • Use the plastic opening tools and your fingers to pry the front plate from the camera.

    • You might need to open the battery cover to remove the front plate.

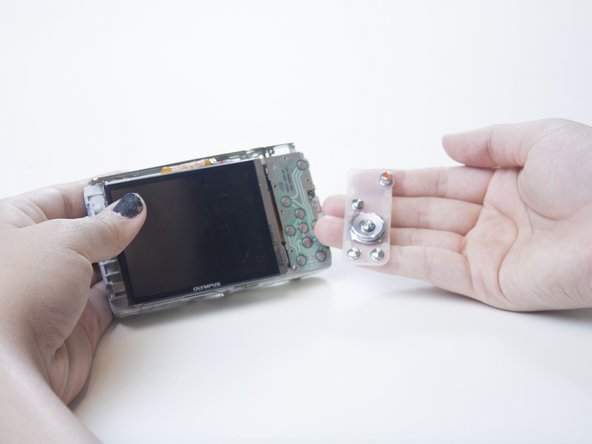
  4. Olympus VR-350 Back Plate Replacement, Back Plate: 手順 4、 2の画像 1 Olympus VR-350 Back Plate Replacement, Back Plate: 手順 4、 2の画像 2
    • Use your fingers to pry open the back cover.

    • When you remove the back of the camera, the button membrane might fall out. Don’t lose this sheet.

    • The LCD screen is connected to the body of the camera by an orange ribbon cable. Don’t pull this ribbon cable out.

終わりに

To reassemble your device, follow these instructions in reverse order.

作成者

3人の作成者と共同で作成されました。

Adri

メンバー登録日: 02/23/15

456 ポイント

3のガイドは作成済み

チーム

USF Tampa, Team 1-3, Leahy Winter 2015 USF Tampa, Team 1-3, Leahy Winter 2015人のメンバー

USFT-LEAHY-W15S1G3

3 メンバー

10のガイドは作成済み

0 件のコメント

コメントを追加

統計データ:

過去 24時間: 0

過去 7 日: 4

過去 30 日: 13

今までの合計 668