メインコンテンツにスキップ

Olympus Tough TG-1 Lens Box Replacement

必要な工具と部品

  1. Olympus Tough TG-1 Lens Box Replacement, Top of Camera: 手順 1、 1の画像 1
    • The top of the camera does not contain screws. You do not need to remove anything from the top of the camera.

  2. Olympus Tough TG-1 Lens Box Replacement, Plug Side: 手順 2、 3の画像 1 Olympus Tough TG-1 Lens Box Replacement, Plug Side: 手順 2、 3の画像 2 Olympus Tough TG-1 Lens Box Replacement, Plug Side: 手順 2、 3の画像 3
    • Remove the two 5 mm screws on the side of the camera with the plug.

    • Open the compartment door and remove both 6 cm screws inside of the compartment door. This will allow you to remove the tan piece held by the screws.

  3. Olympus Tough TG-1 Lens Box Replacement, Bottom: 手順 3、 1の画像 1
    • Turn the camera so that you are looking at the bottom of the camera.

    • Remove the two 4 mm screws from the bottom of the camera.

    • The screws are different. The rear screw is has an unthreaded shank to locate the outer shell while screwing into the inner frame.

  4. Olympus Tough TG-1 Lens Box Replacement, Front Panel: 手順 4、 3の画像 1 Olympus Tough TG-1 Lens Box Replacement, Front Panel: 手順 4、 3の画像 2 Olympus Tough TG-1 Lens Box Replacement, Front Panel: 手順 4、 3の画像 3
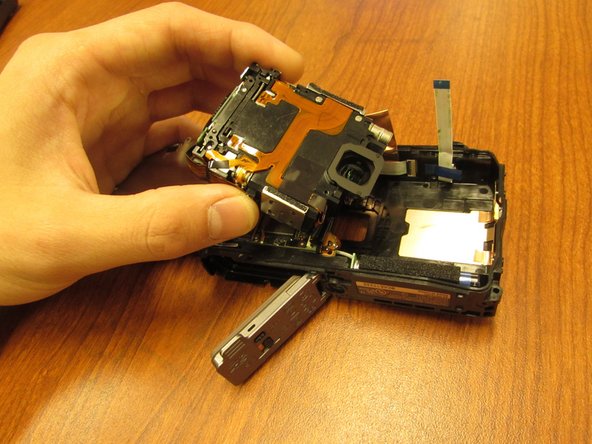
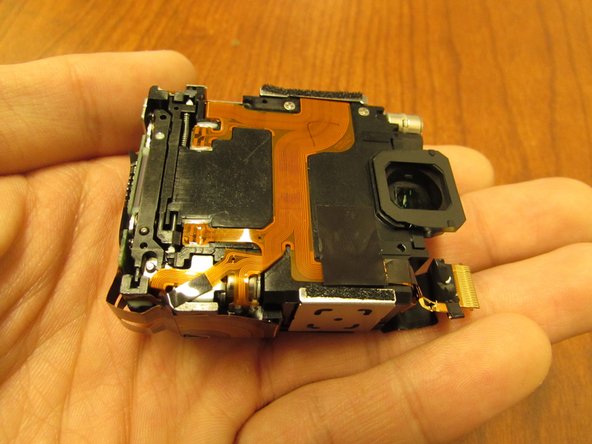
    • Use the plastic opening tool to remove both components of the front panel. This includes the black part on the outside of the front panel and the main silver panel.

    • Once every screw and panel is removed, you can replace the backplate to make your camera weatherproof again.

  5. Olympus Tough TG-1 Lens Box Replacement, Opening the Internal Case: 手順 5、 3の画像 1 Olympus Tough TG-1 Lens Box Replacement, Opening the Internal Case: 手順 5、 3の画像 2 Olympus Tough TG-1 Lens Box Replacement, Opening the Internal Case: 手順 5、 3の画像 3
    • Using the plastic opening tools, carefully open the case.

    • Do not tear the white circuit ribbon.

  6. Olympus Tough TG-1 Lens Box Replacement, Opening the Screen's Protective Cover: 手順 6、 3の画像 1 Olympus Tough TG-1 Lens Box Replacement, Opening the Screen's Protective Cover: 手順 6、 3の画像 2 Olympus Tough TG-1 Lens Box Replacement, Opening the Screen's Protective Cover: 手順 6、 3の画像 3
    • Using the screwdriver, remove the ten 3mm anchor screws.

    • Using the plastic opening tool, open the protective cover so that the screen is exposed.

  7. Olympus Tough TG-1 Lens Box Replacement, Unclipping the Screen from the Circuit Ribbon: 手順 7、 1の画像 1
    • Carefully unclip the screen from its circuit ribbon.

  8. Olympus Tough TG-1 Lens Box Replacement, Lens Box: 手順 8、 1の画像 1
    • Locate the lens box attached to the motherboard.

  9. Olympus Tough TG-1 Lens Box Replacement: 手順 9、 3の画像 1 Olympus Tough TG-1 Lens Box Replacement: 手順 9、 3の画像 2 Olympus Tough TG-1 Lens Box Replacement: 手順 9、 3の画像 3
    • Lift the copper foiled ribbon away from the lens box.

    • Detach the box by unclipping the ribbons connected to the motherboard.

    • Lift the box out of the camera.

終わりに

To reassemble your device, follow these instructions in reverse order.

作成者

6人の作成者と共同で作成されました。

Richard Yacobellis

メンバー登録日: 01/21/15

225 ポイント

2のガイドは作成済み

チーム

USF Tampa, Team 4-6, Brown Winter 2015 USF Tampa, Team 4-6, Brown Winter 2015人のメンバー

USFT-BROWN-W15S4G6

4 メンバー

12のガイドは作成済み

0 件のコメント

コメントを追加

統計データ:

過去 24時間: 3

過去 7 日: 3

過去 30 日: 15

今までの合計 1,414