メインコンテンツにスキップ

Olympus TG-820 iHS Motherboard Replacement

必要な工具と部品

  1. Olympus TG-820 iHS Motherboard Replacement, Battery: 手順 1、 1の画像 1
    • Orient camera to look directly at battery compartment side as shown.

  2. Olympus TG-820 iHS Motherboard Replacement: 手順 2、 3の画像 1 Olympus TG-820 iHS Motherboard Replacement: 手順 2、 3の画像 2 Olympus TG-820 iHS Motherboard Replacement: 手順 2、 3の画像 3
    • Locate the two latches on the battery compartment.

    • First, move the "lock" switch left to reveal red indicator.

    • Next, move the "cover latch" switch downward to reveal red indicator.

    • You have to move the switches in that order for the compartment to unlatch.

  3. Olympus TG-820 iHS Motherboard Replacement: 手順 3、 2の画像 1 Olympus TG-820 iHS Motherboard Replacement: 手順 3、 2の画像 2
    • Allow the battery compartment latch to completely open.

    • Insert battery with the writing face up.

    • The bigger slot is for the battery. The smaller slot is for the memory card.

    • Battery not shown.

  4. Olympus TG-820 iHS Motherboard Replacement, Back Case: 手順 4、 1の画像 1
    • Orient the camera so you are looking at the bottom.

    • Remove the three 3.85mm Phillips #00 screws from the bottom of the camera.

  5. Olympus TG-820 iHS Motherboard Replacement: 手順 5、 1の画像 1
    • Orient the camera so you are looking at the side plate.

    • Remove the two 3.15mm Phillips #00 screws from the side plate of the camera.

  6. Olympus TG-820 iHS Motherboard Replacement: 手順 6、 2の画像 1 Olympus TG-820 iHS Motherboard Replacement: 手順 6、 2の画像 2
    • Orient the camera so you are looking at the front plate.

    • Remove the two 3.8mm with the Phillips H1.5 from the front plate.

    • Remove the "Olympus" plate.

  7. Olympus TG-820 iHS Motherboard Replacement: 手順 7、 1の画像 1
    • Remove face plate.

  8. Olympus TG-820 iHS Motherboard Replacement: 手順 8、 3の画像 1 Olympus TG-820 iHS Motherboard Replacement: 手順 8、 3の画像 2 Olympus TG-820 iHS Motherboard Replacement: 手順 8、 3の画像 3
    • Locate three small black screws inside of the battery compartment.

    • Remove the 3.85mm Phillips #00 screw on the far left side.

    • Remove the two 5mm Phillips #00 screws on the right side

  9. Olympus TG-820 iHS Motherboard Replacement: 手順 9、 3の画像 1 Olympus TG-820 iHS Motherboard Replacement: 手順 9、 3の画像 2 Olympus TG-820 iHS Motherboard Replacement: 手順 9、 3の画像 3
    • Orient the camera to be look at the top.

    • Remove the 5.4mm Phillips #00 screw on the top left side.

    • Remove the 7.4mm Phillips #00 screw next to the "ON/OFF" label.

    • Pry off top button plate with black nylon spudger.

  10. Olympus TG-820 iHS Motherboard Replacement: 手順 10、 2の画像 1 Olympus TG-820 iHS Motherboard Replacement: 手順 10、 2の画像 2
    • Rotate to bottom of camera and locate bottom latch.

    • Wedge black nylon spudger in between bottom latch and camera base to release LCD Screen from camera.

    • Push firmly apart.

    • Some buttons might fall out.

  11. Olympus TG-820 iHS Motherboard Replacement: 手順 11、 3の画像 1 Olympus TG-820 iHS Motherboard Replacement: 手順 11、 3の画像 2 Olympus TG-820 iHS Motherboard Replacement: 手順 11、 3の画像 3
    • Orient the camera to the LCD screen side that is now wedged open.

    • Locate the white ribbon cable and pull out from motherboard.

    • Locate the brown ribbon cable and pull out from motherboard.

  12. Olympus TG-820 iHS Motherboard Replacement, Motherboard: 手順 12、 2の画像 1 Olympus TG-820 iHS Motherboard Replacement, Motherboard: 手順 12、 2の画像 2
    • Remove the four 3mm Phillips #000 screws.

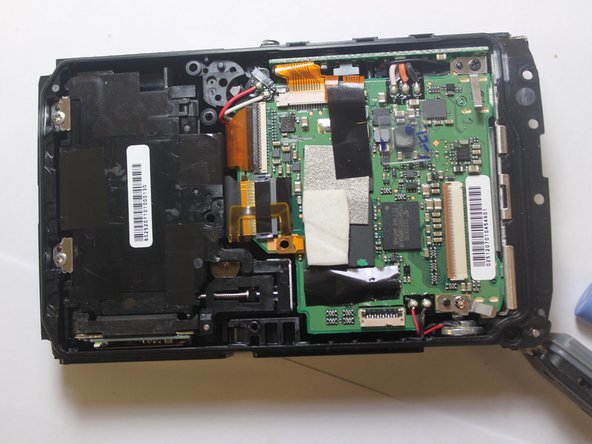
    • Use tweezers to remove metal plate

    • There is now full access to the motherboard which you can replace components on by soldering.

終わりに

To reassemble your device, follow these instructions in reverse order.

作成者

3人の作成者と共同で作成されました。

Larissa Knight

メンバー登録日: 03/21/16

549 ポイント

5のガイドは作成済み

チーム

Clemson, Team 7-2, Benson Spring 2016 Clemson, Team 7-2, Benson Spring 2016人のメンバー

CLEM-BENSON-S16S7G2

4 メンバー

16のガイドは作成済み

0 件のコメント

コメントを追加

統計データ:

過去 24時間: 0

過去 7 日: 1

過去 30 日: 9

今までの合計 811