メインコンテンツにスキップ

Olympus Stylus Tough-8010 Lens Replacement

必要な工具と部品

  1. Olympus Stylus Tough-8010 Lens Replacement, Camera Casing: 手順 1、 3の画像 1 Olympus Stylus Tough-8010 Lens Replacement, Camera Casing: 手順 1、 3の画像 2 Olympus Stylus Tough-8010 Lens Replacement, Camera Casing: 手順 1、 3の画像 3
    • Remove the front three screws (3.2mm) using a type T-6 head screwdriver.

    • Take off smaller front cover.

    • Carefully remove larger front cover.

  2. Olympus Stylus Tough-8010 Lens Replacement: 手順 2、 3の画像 1 Olympus Stylus Tough-8010 Lens Replacement: 手順 2、 3の画像 2 Olympus Stylus Tough-8010 Lens Replacement: 手順 2、 3の画像 3
    • Remove two screws (4.1mm) on the top of the camera using a #000 Phillips head screwdriver.

    • Using a #000 Phillips head screwdriver remove two screws (7.9mm) near the control panel and set aside the metal connector.

    • Although the third photo shows the side panel casing being removed, it is normally secured by a screw under the front framework. You'll need to follow the next two steps to remove the framework and access the screw before you can remove the side casing as shown here.

  3. Olympus Stylus Tough-8010 Lens Replacement: 手順 3、 3の画像 1 Olympus Stylus Tough-8010 Lens Replacement: 手順 3、 3の画像 2 Olympus Stylus Tough-8010 Lens Replacement: 手順 3、 3の画像 3
    • Using a #000 Philips head screwdriver remove the two screws (4.1mm) on the right side of the camera.

    • Remove two screws (4.1mm) on the bottom of the camera using a #000 head Phillips screwdriver.

    • Remove the single screw (3.2mm) on the front of the camera using a #000 Phillips head.

  4. Olympus Stylus Tough-8010 Lens Replacement: 手順 4、 2の画像 1 Olympus Stylus Tough-8010 Lens Replacement: 手順 4、 2の画像 2
    • Carefully remove the font panel piece from the rest of the camera.

    • Carefully remove the top/side plastic piece.

    • If the the camera and flash buttons fall out of their slots set them aside.

    • If you haven't already done so, remove the side casing as mentioned in Step 3. It is secured by a single screw near the bottom corner.

  5. Olympus Stylus Tough-8010 Lens Replacement: 手順 5、 3の画像 1 Olympus Stylus Tough-8010 Lens Replacement: 手順 5、 3の画像 2 Olympus Stylus Tough-8010 Lens Replacement: 手順 5、 3の画像 3
    • Remove four screws (9.4mm) on the front of the camera using a Phillips #000

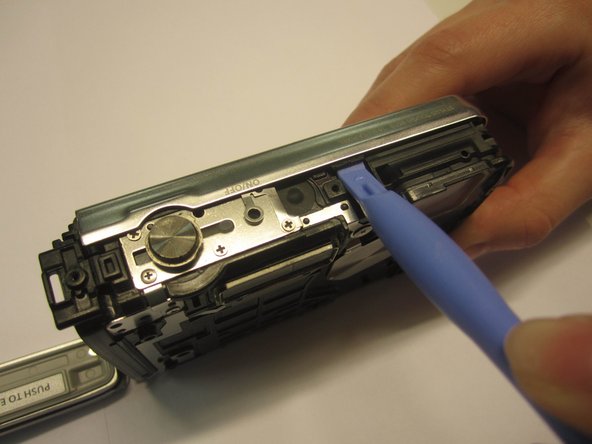
    • Use the plastic opening tool to release the holding clip.

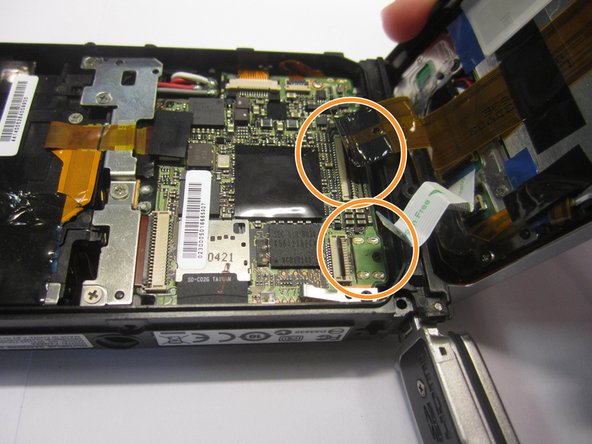
    • Using tweezers separate the plastic strips from their connectors located on the main circuit board by lifting the small, black flaps on the connectors and pulling on the ribbons.

  6. Olympus Stylus Tough-8010 Lens Replacement, Lens: 手順 6、 2の画像 1 Olympus Stylus Tough-8010 Lens Replacement, Lens: 手順 6、 2の画像 2
    • Remove any tape on the flash component on the left.

    • Using tweezers, disconnect the plastic strip from its connector on the motherboard by lifting the plastic black flap on the connector and pulling the ribbon.

    • Using a #000 Philips head screwdriver remove four screws (4.1mm) on the metal plate.

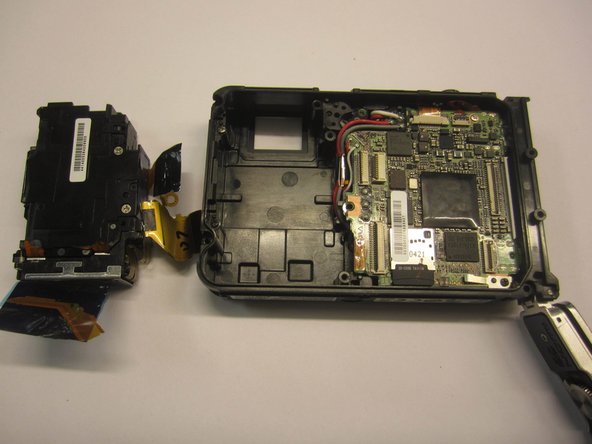
    • Gently lift the flash components out of the camera casing.

終わりに

To reassemble your device, follow these instructions in reverse order.

作成者

3人の作成者と共同で作成されました。

Luke Visser

メンバー登録日: 03/23/15

476 ポイント

4のガイドは作成済み

チーム

Baylor, Team 7-15, Williams Spring 2015 Baylor, Team 7-15, Williams Spring 2015人のメンバー

BU-WILLIAMS-S15S7G15

3 メンバー

12のガイドは作成済み

コメント 1 件

Hi Luke

DO you know where we can purchase new lens module from

Ian

ian5york - 返信

コメントを追加

統計データ:

過去 24時間: 0

過去 7 日: 6

過去 30 日: 14

今までの合計 608