メインコンテンツにスキップ

Olympus Stylus 1030 SW Flash Assembly Replacement

必要な工具と部品

  1. Olympus Stylus 1030 SW Flash Assembly Replacement, Flash Assembly: 手順 1、 3の画像 1 Olympus Stylus 1030 SW Flash Assembly Replacement, Flash Assembly: 手順 1、 3の画像 2 Olympus Stylus 1030 SW Flash Assembly Replacement, Flash Assembly: 手順 1、 3の画像 3
    • Remove the three screws in the corner of the front plate using a Phillips #00 screwdriver.

    • Lift up on the plate until it comes off the rest of the camera.

  2. Olympus Stylus 1030 SW Flash Assembly Replacement: 手順 2、 3の画像 1 Olympus Stylus 1030 SW Flash Assembly Replacement: 手順 2、 3の画像 2 Olympus Stylus 1030 SW Flash Assembly Replacement: 手順 2、 3の画像 3
    • Use the Phillips #00 screwdriver to remove the two screws on both of the side plates of the camera.

  3. Olympus Stylus 1030 SW Flash Assembly Replacement: 手順 3、 1の画像 1
    • Remove the screw using the Phillips #00 screwdriver from the bottom of the camera.

  4. Olympus Stylus 1030 SW Flash Assembly Replacement: 手順 4、 2の画像 1 Olympus Stylus 1030 SW Flash Assembly Replacement: 手順 4、 2の画像 2
    • Turn the camera so the short side without the av port is facing you.

    • Remove both of the screws on this side using the Phillips #00 screwdriver.

    • Remove the front case.

  5. Olympus Stylus 1030 SW Flash Assembly Replacement: 手順 5、 3の画像 1 Olympus Stylus 1030 SW Flash Assembly Replacement: 手順 5、 3の画像 2 Olympus Stylus 1030 SW Flash Assembly Replacement: 手順 5、 3の画像 3
    • Face the camera so the short side with the AV port facing you. Use your Phillips #00 screwdriver to remove the single screw.

    • Turn your camera so the other short side is facing you. Use the Phillips #00 screwdriver to remove the two screws on the silver parts.

    • Face the bottom of your camera towards you and remove the single screw using the Phillips #00 screwdriver.

  6. Olympus Stylus 1030 SW Flash Assembly Replacement: 手順 6、 3の画像 1 Olympus Stylus 1030 SW Flash Assembly Replacement: 手順 6、 3の画像 2 Olympus Stylus 1030 SW Flash Assembly Replacement: 手順 6、 3の画像 3
    • Open the battery door and use your Phillips #00 screwdriver to remove the screw in the middle of the opening.

    • Use the spudger to pry at the rear case until it comes off.

  7. Olympus Stylus 1030 SW Flash Assembly Replacement: 手順 7、 2の画像 1 Olympus Stylus 1030 SW Flash Assembly Replacement: 手順 7、 2の画像 2
    • Flip the camera so the front is facing you.

    • Use your Phillips #00 screwdriver to remove the three screws located in the corners on this side.

  8. Olympus Stylus 1030 SW Flash Assembly Replacement: 手順 8、 1の画像 1
    • Turn the camera so you are looking at the top.

    • Use your Phillips #00 screwdriver to remove the single screw.

  9. Olympus Stylus 1030 SW Flash Assembly Replacement: 手順 9、 3の画像 1 Olympus Stylus 1030 SW Flash Assembly Replacement: 手順 9、 3の画像 2 Olympus Stylus 1030 SW Flash Assembly Replacement: 手順 9、 3の画像 3
    • Use your spudger to gently pry at the side of the LCD screen and the cover over it.

    • Gently take it apart, using caution with the motherboard and battery.

  10. Olympus Stylus 1030 SW Flash Assembly Replacement: 手順 10、 3の画像 1 Olympus Stylus 1030 SW Flash Assembly Replacement: 手順 10、 3の画像 2 Olympus Stylus 1030 SW Flash Assembly Replacement: 手順 10、 3の画像 3
    • Use your Phillips #00 screwdriver to remove the three screws.

  11. Olympus Stylus 1030 SW Flash Assembly Replacement: 手順 11、 3の画像 1 Olympus Stylus 1030 SW Flash Assembly Replacement: 手順 11、 3の画像 2 Olympus Stylus 1030 SW Flash Assembly Replacement: 手順 11、 3の画像 3
    • Use your Phillips #00 screwdriver to remove the three screws.

  12. Olympus Stylus 1030 SW Flash Assembly Replacement: 手順 12、 1の画像 1
    • Pull the foam to the side gently and use your Phillips #00 screwdriver to remove the single screw.

  13. Olympus Stylus 1030 SW Flash Assembly Replacement: 手順 13、 1の画像 1
    この手順で使用する道具:
    Tweezers
    $4.99
    購入する
    • Use your tweezers to gently pull the motherboard out of the camera.

  14. Olympus Stylus 1030 SW Flash Assembly Replacement: 手順 14、 2の画像 1 Olympus Stylus 1030 SW Flash Assembly Replacement: 手順 14、 2の画像 2
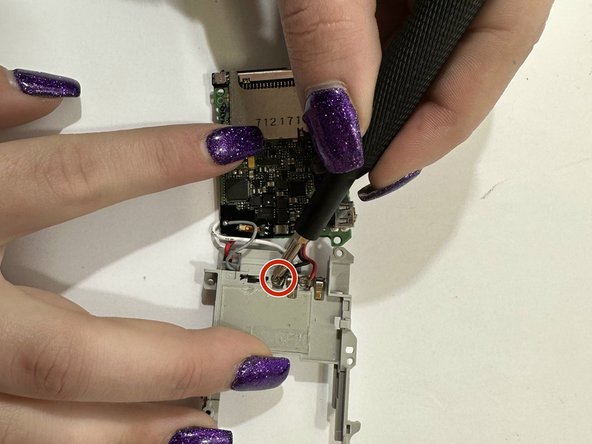
    • Use your Phillips #00 screwdriver to remove the two screws holding the wires to the flash assembly.

  15. Olympus Stylus 1030 SW Flash Assembly Replacement: 手順 15、 2の画像 1 Olympus Stylus 1030 SW Flash Assembly Replacement: 手順 15、 2の画像 2
    • Use your tweezers to gently remove the last wires connected to the flash assembly.

終わりに

To reassemble your device, follow these instructions in reverse order.

作成者

2人の作成者と共同で作成されました。

Paige Asmus

メンバー登録日: 03/24/23

241 ポイント

1ガイドが承認済み

チーム

Casper College, Team 1-4, Lareau Spring 2023 Casper College, Team 1-4, Lareau Spring 2023人のメンバー

CASC-LAREAU-S23S1G4

3 メンバー

5のガイドは作成済み

0 件のコメント

コメントを追加

統計データ:

過去 24時間: 0

過去 7 日: 0

過去 30 日: 4

今までの合計 51